
七里海系统部署
# 部署数据库(DB-1)
# 在线安装PgSQL
访问PgSQL官网,https://www.postgresql.org/,选择Download页签,如下图:
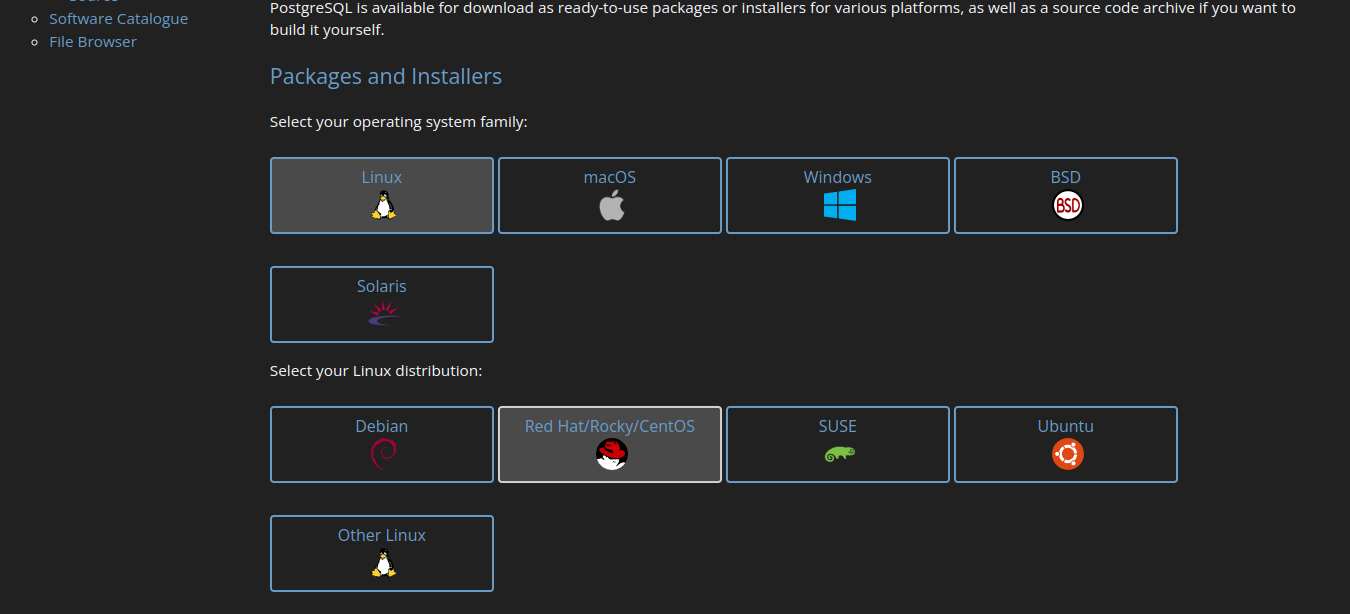
接着,选择操作系统,如图:
然后,确定Select version、Select platform、Select architecture等信息。
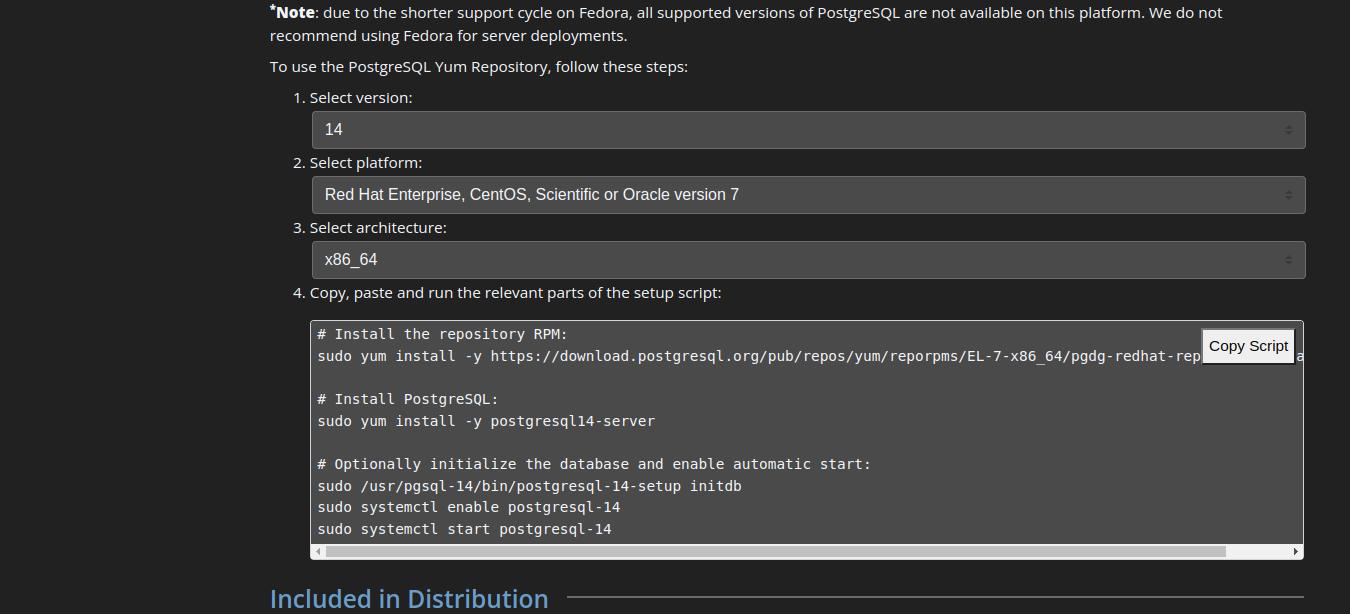
最后,拷贝在线安装脚本:
sudo yum install -y https://download.postgresql.org/pub/repos/yum/reporpms/EL-7-x86_64/pgdg-redhat-repo-latest.noarch.rpm
sudo yum install -y postgresql14-server
sudo /usr/pgsql-14/bin/postgresql-14-setup initdb
sudo systemctl enable postgresql-14
sudo systemctl start postgresql-14
2
3
4
5
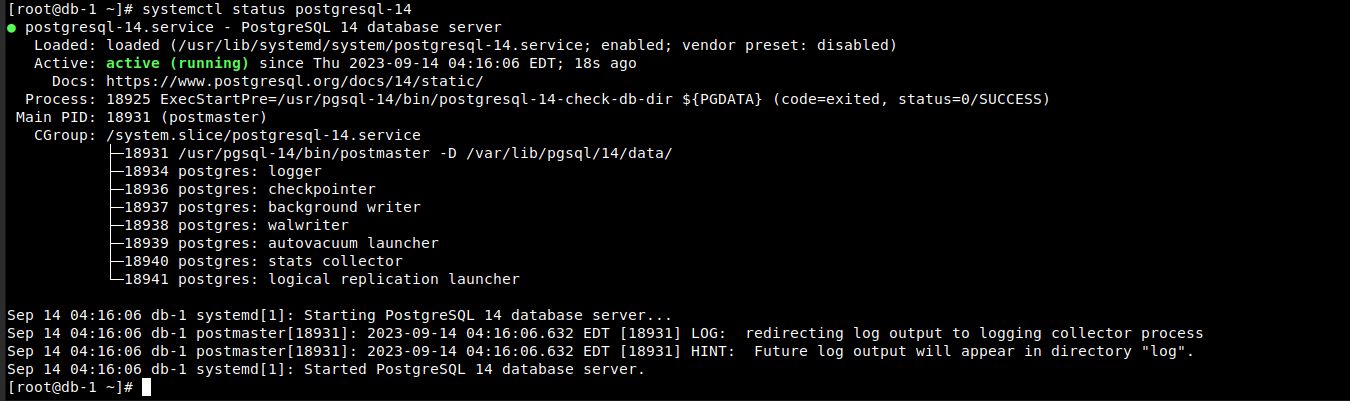
在服务器上依次执行上面的脚本,所有命令执行成功后可以通过下面的命令来查看PgSQL的运行状态:
systemctl status postgresql-14
安装postgis扩展插件:
yum search postgis

yum install -y wget
wget https://mirrors.aliyun.com/repo/epel-7.repo
yum install -y postgis33_14.x86_64
2
3
4
5
# 数据库配置
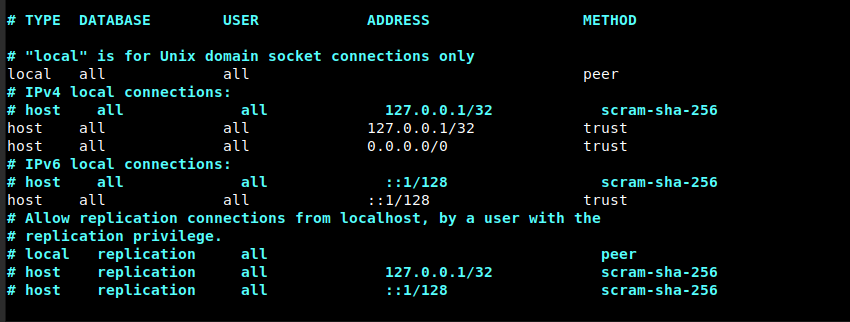
PgSQL安装后,默认是只接受本地访问连接,如果想在其他主机上访问,就需要进行相应的配置。配置远程连接PgSQL,需要修改data目录下的pg_hba.conf和postgresql.conf文件。
- pg_hba.conf 配置对数据库的访问权限
修改文件前,先通过命令备份原pg_hba.conf文件,执行如下命令进行备份:
cd /var/lib/pgsql/14/data/
cp pg_hba.conf pg_hba.conf-bak
2
编辑pg_hba.conf文件,按如下内容修改:
vim pg_hba.conf
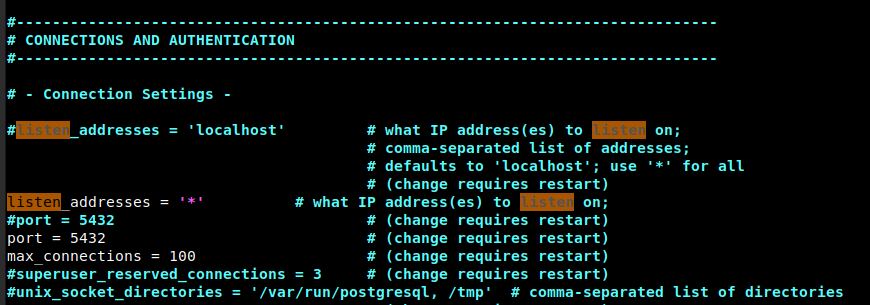
- postgresql.conf 配置数据库服务器的响应参数
先备份
cp postgresql.conf postgresql.conf-bak
在修改
vim postgresql.conf
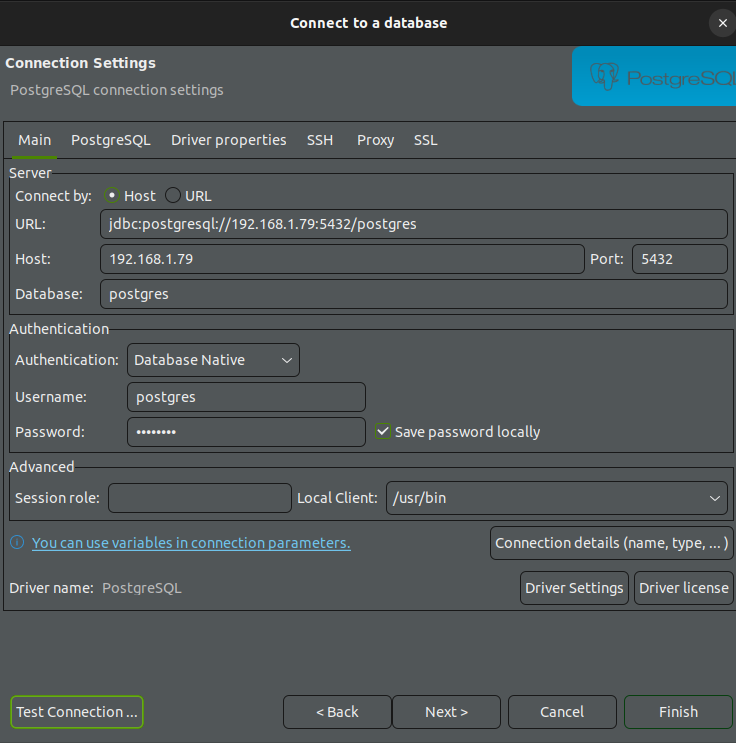
- 修改完上述两个文件后,需要重启PgSQL服务,同时为了远程连接,还需要关闭防火墙,操作成功后,使用数据库连接即可
systemctl restart postgresql-14

systemctl stop firewalld
2
3
# 初始化七里海数据库
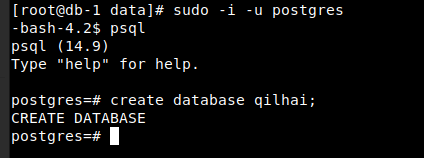
- 创建账号及数据库
sudo -i -u postgres

psql

# create user wind with password '';
# create database qilihai owner wind;
# \c qilihai
# create extension postgis;

create database qilihai;
2
3
4
5
6
7
8
9
10
- 安装postgis插件
sudo -i -u postgres

psql

\c qilihai

create extension postgis;
2
3
4
5
6
7
- 备份七里海开发/测试数据库
pg_dump -h 192.168.1.254 -U postgres qilihai_db > /home/sunyy/Temp/qilihai_db.bak
指令解释
pg_dump: 备份数据库指令192.168.1.254: 数据库的IP地址postgres: 数据库的用户名qilihai_db: 数据库名>: 导出到指定目录
- 还原七里海数据库
psql -h 192.168.1.79 -U postgres -d qilihai < /tmp/qilihai_db.bak
指令解释
psql: 恢复数据库指令192.168.1.79: 要恢复的数据库的IP地址postgres: 数据库的用户名qilihai: 数据库名<: 使用指定的目录文件
# 初始化国标平台数据库
- 创建数据
sudo -i -u postgres

psql

create database wvp;
2
3
4
5
- 安装插件
sudo -i -u postgres

psql

\c wvp

create extension postgis;
2
3
4
5
6
7
- 备份国标平台数据库
pg_dump -h 39.99.245.243 -U ainsn wvp > /home/sunyy/Temp/wvp.bak
- 还原国标平台数据库
psql -h 192.168.1.79 -U postgres -d wvp < /tmp/wvp.bak
# 部署REDIS(DB-1)
# 安装依赖
Redis是由C语言开发,安装之前必须要确保服务器已经安装了gcc,通过下面命令查看是否安装:
gcc -v

如果没有安装,通过下面命令安装:
yum install -y gcc
# 安装Redis
将redis安装包上传至服务器
/usr/local/redis目录下解压
tar -xzvf redis-6.2.4.tar.gz进入解压目录,执行编译,此步骤可能需要耗费几分钟时间
cd cd redis-6.2.4

make
2
3
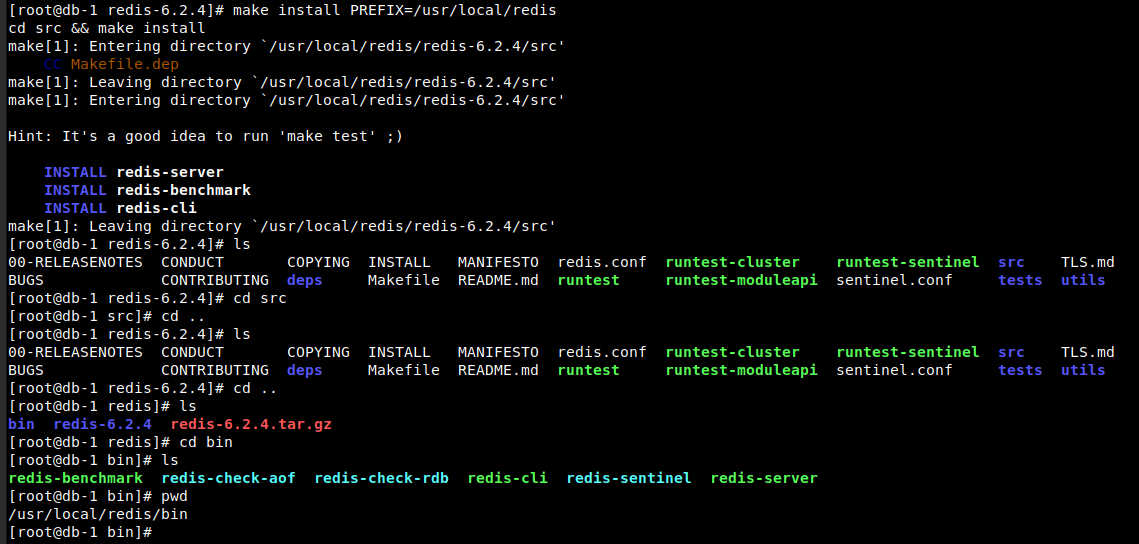
- 安装redis
make install PREFIX=/usr/local/redis
安装完成后,如下图:
- 配置redis
cp redis.conf /usr/local/redis/bin/
cd /usr/local/redis/bin
vim redis.conf
2
3
修改配置:
# bind 172.0.0.1 -::1
# 不限IP连接
bind 0.0.0.0 -::1

# daemonize no
# 以守护进程启动
daemonize yes
2
3
4
5
6
7
- 启动redis
./redis-server redis.conf
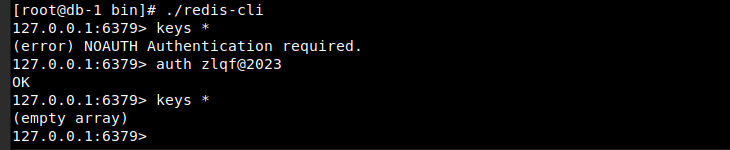
启动成功后,连接验证:

注意
此时,redis服务未设置连接密码,为了安全,可以修改redis.conf配置文件来设置密码。
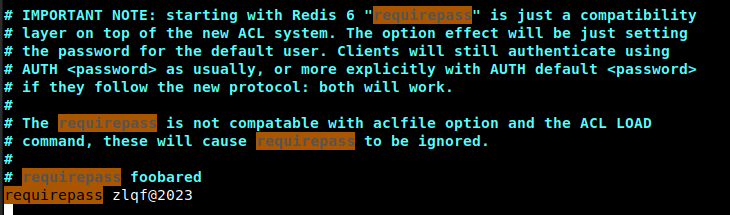
修改配置后,需要重启生效。
再次连接,执行redis指令时就会提示需要认证
# 部署JDK(APP-1、APP-2、APP-3)
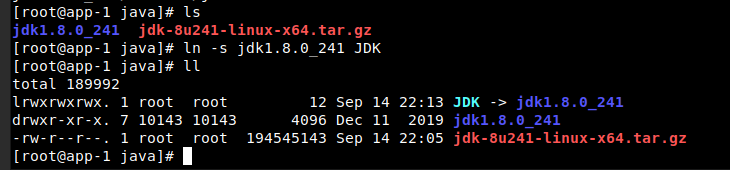
上传jdk安装包
拷贝至
/usr/local/java目录解压,并创建软连接
tar -xzvf jdk-8u241-linux-x64.tar.gz

ln -s jdk1.8.0_241 JDK
2
3
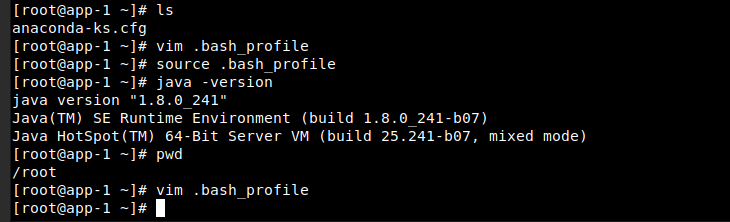
- 配置环境变量,并验证
cd ~/
vim .bash_profile

export JAVA_HOME=/usr/local/java/JDK
PATH=$PATH:$HOME/bin:$JAVA_HOME/bin
export PATH

source .bash_profile
java -version
2
3
4
5
6
7
8
9
# 部署Nginx(APP-1)
- 安装依赖
## 安装 gcc gcc-c++
wget https://mirrors.aliyun.com/repo/epel-7.repo
yum install -y gcc gcc-c++

# 安装pcre
cd /usr/local
mkdir pcre
cd pcre
wget http://downloads.sourceforge.net/project/pcre/pcre/8.45/pcre-8.45.tar.gz
tar -xzvf pcre-8.45.tar.gz
cd pcre-8.45
./configure
make && make install

# 安装openssl
cd /usr/local
mkdir openssl
cd openssl
wget https://www.openssl.org/source/openssl-1.1.1t.tar.gz --no-check-certificate
tar -xzvf openssl-1.1.1t.tar.gz
cd openssl-1.1.1t
./config
make && make install

# 安装zlib
cd /usr/local
mkdir zlib
cd zlib
wget https://zlib.net/zlib-1.3.tar.gz
tar -xzvf zlib-1.3.tar.gz
cd zlib-1.3
./configure
make && make install
2
3
4
5
6
7
8
9
10
11
12
13
14
15
16
17
18
19
20
21
22
23
24
25
26
27
28
29
30
31
32
33
- 安装nginx
cd /usr/local
mkdir nginx
cd nginx
# 上传nginx安装包
# 解压
tar -xzvf nginx-1.23.3.tar.gz
cd nginx-1.23.3
./configure --prefix=/usr/local/nginx --with-http_stub_status_module --with-http_ssl_module
make && make install

# 创建ssl软连接,不然启动报错
ln -s /usr/local/lib64/libssl.so.1.1 /usr/lib64/libssl.so.1.1
ln -s /usr/local/lib64/libcrypto.so.1.1 /usr/lib64/libcrypto.so.1.1
2
3
4
5
6
7
8
9
10
11
12
13
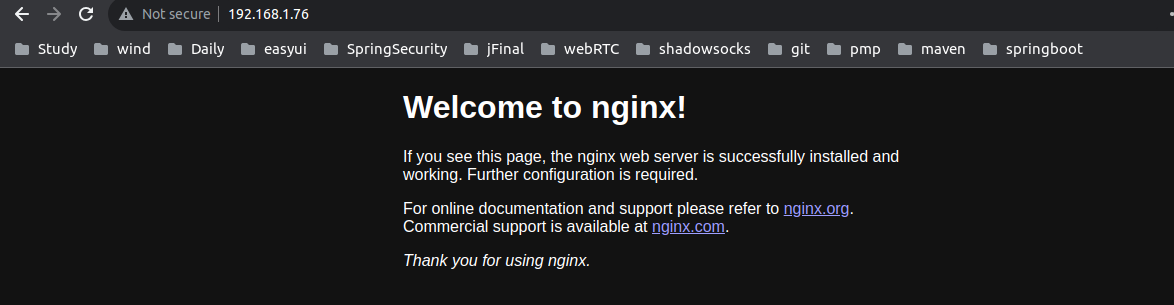
- 启动验证
# 关闭防火墙
systemctl stop firewalld

/usr/local/nginx/sbin/nginx
2
3
4
- 部署登录、首页
# 备份nginx 配置文件
cd /usr/local/nginx/conf
mv nginx.conf nginx.conf-bak

# 创建静态页面存放路径
mkdir -p /usr/local/nginx/sites
2
3
4
5
6
7
8
- 部署人类活动前端页面
# 上传静态页面并解压、重命名
cd /usr/local/nginx/sites
tar -xzvf human-activities.tar.gz
mv dist human-activities

# 配置nginx.conf
cd ../conf
vim nginx.conf
2
3
4
5
6
7
8
#user  nobody;
worker_processes  1;

#error_log  logs/error.log;
#error_log  logs/error.log  notice;
#error_log  logs/error.log  info;

#pid        logs/nginx.pid;


events {
    worker_connections  1024;
}


http {
    include       mime.types;
    default_type  application/octet-stream;

    #log_format  main  '$remote_addr - $remote_user [$time_local] "$request" '
    #                  '$status $body_bytes_sent "$http_referer" '
    #                  '"$http_user_agent" "$http_x_forwarded_for"';

    #access_log  logs/access.log  main;

    sendfile        on;
    #tcp_nopush     on;

    #keepalive_timeout  0;
    keepalive_timeout  65;

    #gzip  on;

    ## server {
        ## listen       80;
        ## server_name  localhost;

        #charset koi8-r;

        #access_log  logs/host.access.log  main;

        ## location / {
            ## root   html;
            ## index  index.html index.htm;
        ## }

        #error_page  404              /404.html;

        # redirect server error pages to the static page /50x.html
        #
        ## error_page   500 502 503 504  /50x.html;
        ## location = /50x.html {
            ## root   html;
        ## }

        # proxy the PHP scripts to Apache listening on 127.0.0.1:80
        #
        #location ~ \.php$ {
        #    proxy_pass   http://127.0.0.1;
        #}

        # pass the PHP scripts to FastCGI server listening on 127.0.0.1:9000
        #
        #location ~ \.php$ {
        #    root           html;
        #    fastcgi_pass   127.0.0.1:9000;
        #    fastcgi_index  index.php;
        #    fastcgi_param  SCRIPT_FILENAME  /scripts$fastcgi_script_name;
        #    include        fastcgi_params;
        #}

        # deny access to .htaccess files, if Apache's document root
        # concurs with nginx's one
        #
        #location ~ /\.ht {
        #    deny  all;
        #}
    ## }


    # another virtual host using mix of IP-, name-, and port-based configuration
    #
    #server {
    #    listen       8000;
    #    listen       somename:8080;
    #    server_name  somename  alias  another.alias;

    #    location / {
    #        root   html;
    #        index  index.html index.htm;
    #    }
    #}


    # HTTPS server
    #
    #server {
    #    listen       443 ssl;
    #    server_name  localhost;

    #    ssl_certificate      cert.pem;
    #    ssl_certificate_key  cert.key;

    #    ssl_session_cache    shared:SSL:1m;
    #    ssl_session_timeout  5m;

    #    ssl_ciphers  HIGH:!aNULL:!MD5;
    #    ssl_prefer_server_ciphers  on;

    #    location / {
    #        root   html;
    #        index  index.html index.htm;
    #    }
    #}
    #

    # Entry
    server {
        listen       8000;
        listen       [::]:8000;
        server_name  localhost;

        location / {
            # proxy_pass http://localhost:8001;
            #
            root   /usr/local/nginx/sites/home;
            index  index.html index.htm;
      try_files $uri $uri/ /index.html;
      # try_files $uri $uri/ @router;
        }

        location /human {
            # proxy_pass http://localhost:8002;
            #
            alias  /usr/local/nginx/sites/human;
            index  index.html index.htm;
      try_files $uri $uri/ /human/index.html;
        }

        # location @router {
            # rewrite ^.*$ /index.html last;
        # }

        location /api/ {
            rewrite ^/(.*)$ /$1 break;
            proxy_set_header Host $host;
            proxy_set_header X-Real-IP $remote_addr;
            proxy_set_header X-Forwarded-For $proxy_add_x_forwarded_for;
            proxy_set_header Upgrade $http_upgrade;
            proxy_set_header Connection "upgrade";
            proxy_http_version 1.1;
            # proxy_cookie_domain 192.168.1.76:9999 127.0.0.1;
            # proxy_cookie_path /api /;
            proxy_pass http://192.168.1.76:9999;
        }
    }
    # home
    # server {
        # listen       8001;
        # listen       [::]:8001;
        # server_name  localhost;

        # location / {
            # root   /usr/local/nginx/sites/home;
            # index  index.html index.htm;
      # try_files $uri $uri/ /index.html;
        # }

        # location /api/ {
            # rewrite ^/(.*)$ /$1 break;
            # proxy_set_header Host $host;
            # proxy_set_header X-Real-IP $remote_addr;
            # proxy_set_header X-Forwarded-For $proxy_add_x_forwarded_for;
            # proxy_set_header Upgrade $http_upgrade;
            # proxy_set_header Connection "upgrade";
            # proxy_http_version 1.1;
            # proxy_cookie_domain 192.168.1.76:9999 127.0.0.1;
            # proxy_cookie_path /api /;
            # proxy_pass http://192.168.1.76:9999;
        # }


    # }
    # human
    # server {
        # listen       8002;
        # listen       [::]:8002;
        # server_name  localhost;

        # location / {
            # root   /usr/local/nginx/sites/human;
            # index  index.html index.htm;
      # try_files $uri $uri/ /index.html;
        # }

        # location /api/ {
            # rewrite ^/(.*)$ /$1 break;
            # proxy_set_header Host $host;
            # proxy_set_header X-Real-IP $remote_addr;
            # proxy_set_header X-Forwarded-For $proxy_add_x_forwarded_for;
            # proxy_set_header Upgrade $http_upgrade;
            # proxy_set_header Connection "upgrade";
            # proxy_http_version 1.1;
            # proxy_cookie_domain 192.168.1.76:9999 127.0.0.1;
            # proxy_cookie_path /api /;
            # proxy_pass http://192.168.1.76:9999;
        # }

    # }

}
2
3
4
5
6
7
8
9
10
11
12
13
14
15
16
17
18
19
20
21
22
23
24
25
26
27
28
29
30
31
32
33
34
35
36
37
38
39
40
41
42
43
44
45
46
47
48
49
50
51
52
53
54
55
56
57
58
59
60
61
62
63
64
65
66
67
68
69
70
71
72
73
74
75
76
77
78
79
80
81
82
83
84
85
86
87
88
89
90
91
92
93
94
95
96
97
98
99
100
101
102
103
104
105
106
107
108
109
110
111
112
113
114
115
116
117
118
119
120
121
122
123
124
125
126
127
128
129
130
131
132
133
134
135
136
137
138
139
140
141
142
143
144
145
146
147
148
149
150
151
152
153
154
155
156
157
158
159
160
161
162
163
164
165
166
167
168
169
170
171
172
173
174
175
176
177
178
179
180
181
182
183
184
185
186
187
188
189
190
191
192
193
194
195
196
197
198
199
200
201
202
203
204
205
206
207
208
209
210
211
212
# 部署NACOS(APP-1)
- 上传nacos安装包并解压
cd /usr/local
mkdir nacos
cd nacos
tar -xzvf nacos-server-2.0.2.tar.gz
2
3
4
- 启动nacos服务
cd /usr/local/nacos/nacos/bin
sh startup.sh -m standalone &
2
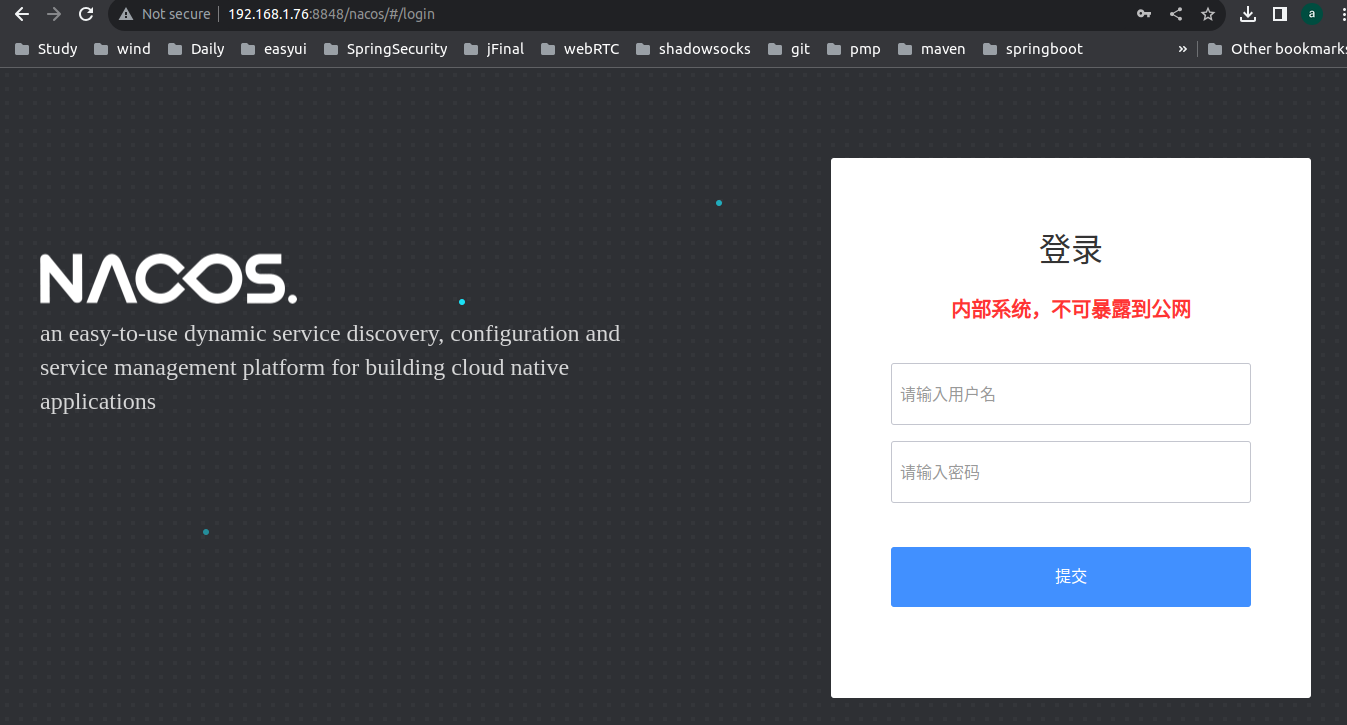
- 验证
访问http://192.168.1.76:8848/nacos/,默认用户/密码为nacos/nacos
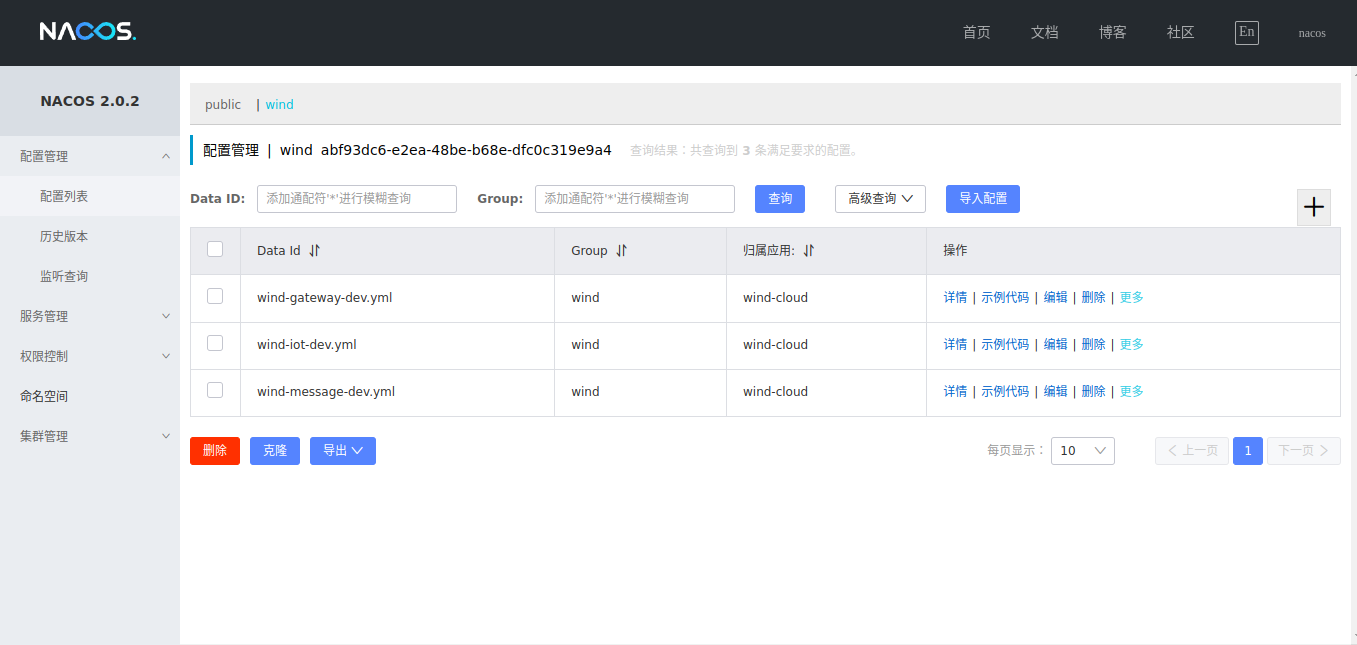
- 为了安全,登录成功后建议先修改密码,然后在创建一个用户和一个命名空间
用户为: wind
密码为: wind@1qazse4@#W
空间名为: wind,描述随意,命名空间创建好后,需要记录命名空间的ID,然后修改网关、消息平台、海康SDK源码中的bootstrap.yml配置文件,将namespace的值修改为该ID值即可
然后在配置管理模块添加三个配置,分别是:wind-gateway-dev.yml、wind-iot-dev.yml、wind-message-dev.yml
注意
DataID一定要是wind-gateway-dev.yml、wind-iot-dev.yml、wind-message-dev.yml这种带后缀的样式,将Group中的DEFAULT_GROUP修改为wind,配置格式选择yaml,将硬盘中的yml格式文件内容拷贝到配置内容里面,点击发布即可。
wind-gateway-dev.yml:
server:
  port: 9999

spring:
  cloud:
    gateway:
      discovery:
        locator:
          enabled: true
      routes:
        - id: wind-iot-api
          uri: lb://wind-iot
          predicates:
            - Path=/api/iot/**
          filters:
            - StripPrefix=2
        - id: wind-iot-file
          uri: lb://wind-iot
          predicates:
            - Path=/file/iot/**
          filters:
            - StripPrefix=2
        - id: wind-message-api
          uri: lb://wind-message
          predicates:
            - Path=/api/msg/**
          filters:
            - StripPrefix=2
        - id: wind-message-ws
          uri: lb:ws://wind-message
          predicates:
            - Path=/ws/msg/**
          filters:
            - StripPrefix=2
        - id: admin-api
          uri: lb://api-admin
          predicates:
            - Path=/api/admin/**
          filters:
            - StripPrefix=2

async:
  executor:
    corePoolSize: 4
    maxPoolSize: 4
    queueCapacity: 128
2
3
4
5
6
7
8
9
10
11
12
13
14
15
16
17
18
19
20
21
22
23
24
25
26
27
28
29
30
31
32
33
34
35
36
37
38
39
40
41
42
43
44
45
46
wind-iot-dev.yml:
server:
  port: 9292

spring:
  devtools:
    restart:
      enabled: false
    livereload:
      port: 39292
  datasource:
    name: wind-iot
    driver-class-name: org.postgresql.Driver
    url: jdbc:postgresql://192.168.1.79:5432/qilihai
    username: postgres
    password: zlqf@2023
    type: com.zaxxer.hikari.HikariDataSource
    hikari:
      minimum-idle: 3
      auto-commit: true
      idle-timeout: 10000
      max-lifetime: 180000
      connection-timeout: 30000
      connection-test-query: SELECT 1
    jackson:
      serialization:
        FAIL_ON_EMPTY_BEANS: false
async:
  executor:
    corePoolSize: 4
    maxPoolSize: 4
    queueCapacity: 128

redisson:
  server:
    mode: single
    idleConnectionTimeout: 8000
    connectTimeout: 8000
    timeout: 8000
    retryAttempts: 3
    retryInterval: 2000
    password: zlqf@2023
    subscriptionsPerConnection: 5
    clientName: iot-cache
    address: "redis://192.168.1.79:6379"
    subscriptionConnectionMinimumIdleSize: 1
    subscriptionConnectionPoolSize: 32
    connectionMinimumIdleSize: 8
    connectionPoolSize: 64
    database: 15
    dnsMonitoringInterval: 5000
  threads: 1
  nettyThreads: 1

file:
  host: http://192.168.1.76:9999/file/iot/attachment
  location: /home/sunyy/Temp/wind-cloud/wind-iot/attachment
  registries:
    - relative: /event/CrossBorder/images/
      access: /attachment/event/CrossBorder/images/**
    - relative: /event/EnterArea/images/
      access: /attachment/event/EnterArea/images/**
    - relative: /event/LeaveArea/images/
      access: /attachment/event/LeaveArea/images/**
    - relative: /event/FieldDetect/images/
      access: /attachment/event/FieldDetect/images/**
    - relative: /event/Loiter/images/
      access: /attachment/event/Loiter/images/**
    - relative: /event/Parking/images/
      access: /attachment/event/Parking/images/**
    - relative: /event/Run/images/
      access: /attachment/event/Run/images/**
    - relative: /event/HighDensity/images/
      access: /attachment/event/HighDensity/images/**
    - relative: /event/Left/images/
      access: /attachment/event/Left/images/**
    - relative: /event/Take/images/
      access: /attachment/event/Take/images/**
    - relative: /event/Fire/images/
      access: /attachment/event/Fire/images/**

wvp:
  url: http://192.168.1.172/api/play/start/

hik:
  sdk:
    path: /usr/local/hiksdk/
  log:
    path: /var/log/wind-cloud/hiksdk/
2
3
4
5
6
7
8
9
10
11
12
13
14
15
16
17
18
19
20
21
22
23
24
25
26
27
28
29
30
31
32
33
34
35
36
37
38
39
40
41
42
43
44
45
46
47
48
49
50
51
52
53
54
55
56
57
58
59
60
61
62
63
64
65
66
67
68
69
70
71
72
73
74
75
76
77
78
79
80
81
82
83
84
85
86
87
88
wind-message-dev.yml:
server:
  port: 9393

spring:
  datasource:
    name: wind-message
    # driver-class-name: org.postgresql.Driver
    driver-class-name: com.p6spy.engine.spy.P6SpyDriver
    url: jdbc:p6spy:postgresql://192.168.1.254:5432/qilihai_db
    username: postgres
    password: 123456
    type: com.zaxxer.hikari.HikariDataSource
    hikari:
      minimum-idle: 3
      auto-commit: true
      idle-timeout: 10000
      max-lifetime: 180000
      connection-timeout: 30000
      connection-test-query: SELECT 1
    jackson:
      serialization:
        FAIL_ON_EMPTY_BEANS: false
async:
  executor:
    corePoolSize: 4
    maxPoolSize: 4
    queueCapacity: 128

redisson:
  server:
    mode: single
    idleConnectionTimeout: 8000
    connectTimeout: 8000
    timeout: 8000
    retryAttempts: 3
    retryInterval: 2000
    password: zlqf@2023
    subscriptionsPerConnection: 5
    clientName: wind-message
    address: "redis://192.168.1.79:6379"
    subscriptionConnectionMinimumIdleSize: 1
    subscriptionConnectionPoolSize: 32
    connectionMinimumIdleSize: 8
    connectionPoolSize: 64
    database: 15
    dnsMonitoringInterval: 5000
  threads: 1
  nettyThreads: 1

file:
  location: /home/Temp/wind-cloud/wind-iot/attachment
  registries:
    - relative: /message/images/
      access: /attachment/message/images/**
2
3
4
5
6
7
8
9
10
11
12
13
14
15
16
17
18
19
20
21
22
23
24
25
26
27
28
29
30
31
32
33
34
35
36
37
38
39
40
41
42
43
44
45
46
47
48
49
50
51
52
53
54
# 部署网关服务(APP-1)
- 创建日志存放目录
mkdir /var/log/wind-cloud
上传服务Jar包
启动Jar包
nohup java -jar wind-gateway-0.0.1-SNAPSHOT.jar &
# 部署消息服务(APP-2)
- 创建日志存放目录
mkdir /var/log/wind-cloud
mkdir -p /home/Temp/wind-cloud/wind-iot/attachment
2
上传服务Jar包
启动Jar包
nohup java -jar wind-message-server-0.0.1-SNAPSHOT.jar &
# 部署海康SDK服务(APP-2)
- 安装海康SDK
cd /usr/local
mkdir hiksdk
cd hiksdk
2
3
上传海康SDK
配置海康SDK
# 配置/etc/profile 或 ~/.bash_profile
vim ~/.bash_profile
export LD_LIBRARY_PATH=$LD_LIBRARY_PATH:/usr/local/hiksdk:/usr/local/hiksdk/HCNetSDKCom
# 保存后使环境变量生效
source ~/.bash_profile

# 配置/etc/ld.so.conf
/usr/local/hiksdk
/usr/local/hiksdk/HCNetSDKCom
include ld.so.conf.d/*.conf
# 保存后执行ldconfig使之生效
ldconfig
2
3
4
5
6
7
8
9
10
11
12
上传Iot服务Jar
启动Iot服务
nohup java -jar wind-iot-server-0.0.1-SNAPSHOT.jar &