
FastAPI 用户指南
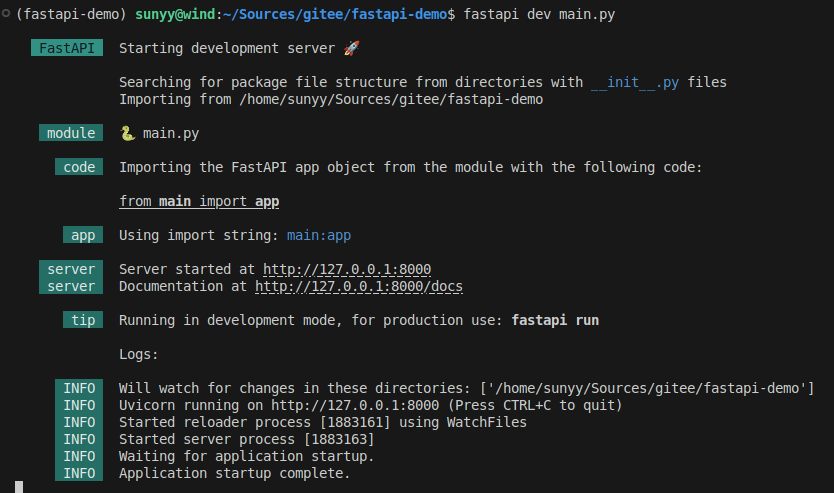
fastapi dev main.py
# 第一步
最简单的FastAPI文件类似:
from fastapi import FastAPI

app = FastAPI()


@app.get("/")
async def root():
    return {"message": "Hello World"}
2
3
4
5
6
7
8
将其复制到main.py文件中. 运行实时服务器:
fastapi dev main.py
# 查看
# 交互式API文档
# 可选的API文档
# OpenAPI
FastAPI使用定义API的OpenAPI标准将你的所有API转换成模式.
# 模式
模式是对事物的一种定义或描述. 它并非具体的实现代码, 而只是抽象的描述.
# API模式
在这种场景下, OpenAPI是一种规定如何定义API模式的规范. 模式的定义包括你的API路径, 以及它们可能使用的参数等.
# 数据模式
模式这个术语也可能指的是某些数据如JSON的结构. 在这种情况下, 它可以表示JSON的属性及其具有的数据类型, 等等.
# OpenAPI和JSON Schema
OpenAPI为你的API定义API模式. 该模式中包含了你的API发送和接收的数据的定义(或称为模式), 这些定义通过JSON数据模式标准JSON Schema所生成.
# 查看 openapi.json
如果你对原始的OpenAPI模式感到好奇, FastAPI自动生成了包含所有API描述的JSON(模式). http://127.0.0.1:8000/openapi.json.
{
  "openapi": "3.1.0",
  "info": {
    "title": "FastAPI",
    "version": "0.1.0"
  },
  "paths": {
    "/": {
      "get": {
        "summary": "Read Root",
        "operationId": "read_root__get",
        "responses": {
          "200": {
            "description": "Successful Response",
            "content": {
              "application/json": {
                "schema": {}
              }
            }
          }
        }
      }
    },
    "/items/{item_id}": {
      "get": {
        "summary": "Read Item",
        "operationId": "read_item_items__item_id__get",
        "parameters": [
          {
            "name": "item_id",
            "in": "path",
            "required": true,
            "schema": {
              "type": "integer",
              "title": "Item Id"
            }
          },
          {
            "name": "q",
            "in": "query",
            "required": false,
            "schema": {
              "anyOf": [
                {
                  "type": "string"
                },
                {
                  "type": "null"
                }
              ],
              "title": "Q"
            }
          }
        ],
        "responses": {
          "200": {
            "description": "Successful Response",
            "content": {
              "application/json": {
                "schema": {}
              }
            }
          },
          "422": {
            "description": "Validation Error",
            "content": {
              "application/json": {
                "schema": {
                  "$ref": "#/components/schemas/HTTPValidationError"
                }
              }
            }
          }
        }
      },
      "put": {
        "summary": "Update Item",
        "operationId": "update_item_items__item_id__put",
        "parameters": [
          {
            "name": "item_id",
            "in": "path",
            "required": true,
            "schema": {
              "type": "integer",
              "title": "Item Id"
            }
          }
        ],
        "requestBody": {
          "required": true,
          "content": {
            "application/json": {
              "schema": {
                "$ref": "#/components/schemas/Item"
              }
            }
          }
        },
        "responses": {
          "200": {
            "description": "Successful Response",
            "content": {
              "application/json": {
                "schema": {}
              }
            }
          },
          "422": {
            "description": "Validation Error",
            "content": {
              "application/json": {
                "schema": {
                  "$ref": "#/components/schemas/HTTPValidationError"
                }
              }
            }
          }
        }
      }
    }
  },
  "components": {
    "schemas": {
      "HTTPValidationError": {
        "properties": {
          "detail": {
            "items": {
              "$ref": "#/components/schemas/ValidationError"
            },
            "type": "array",
            "title": "Detail"
          }
        },
        "type": "object",
        "title": "HTTPValidationError"
      },
      "Item": {
        "properties": {
          "name": {
            "type": "string",
            "title": "Name"
          },
          "price": {
            "type": "number",
            "title": "Price"
          },
          "is_offer": {
            "anyOf": [
              {
                "type": "boolean"
              },
              {
                "type": "null"
              }
            ],
            "title": "Is Offer"
          }
        },
        "type": "object",
        "required": [
          "name",
          "price"
        ],
        "title": "Item"
      },
      "ValidationError": {
        "properties": {
          "loc": {
            "items": {
              "anyOf": [
                {
                  "type": "string"
                },
                {
                  "type": "integer"
                }
              ]
            },
            "type": "array",
            "title": "Location"
          },
          "msg": {
            "type": "string",
            "title": "Message"
          },
          "type": {
            "type": "string",
            "title": "Error Type"
          }
        },
        "type": "object",
        "required": [
          "loc",
          "msg",
          "type"
        ],
        "title": "ValidationError"
      }
    }
  }
}
2
3
4
5
6
7
8
9
10
11
12
13
14
15
16
17
18
19
20
21
22
23
24
25
26
27
28
29
30
31
32
33
34
35
36
37
38
39
40
41
42
43
44
45
46
47
48
49
50
51
52
53
54
55
56
57
58
59
60
61
62
63
64
65
66
67
68
69
70
71
72
73
74
75
76
77
78
79
80
81
82
83
84
85
86
87
88
89
90
91
92
93
94
95
96
97
98
99
100
101
102
103
104
105
106
107
108
109
110
111
112
113
114
115
116
117
118
119
120
121
122
123
124
125
126
127
128
129
130
131
132
133
134
135
136
137
138
139
140
141
142
143
144
145
146
147
148
149
150
151
152
153
154
155
156
157
158
159
160
161
162
163
164
165
166
167
168
169
170
171
172
173
174
175
176
177
178
179
180
181
182
183
184
185
186
187
188
189
190
191
192
193
194
195
196
197
198
199
200
201
202
# OpenAPI的用途
驱动FastAPI内置的2个交互式文档系统的正是OpenAPI模式. 并且还有数十种替代方案, 它们全部基于OpenAPI. 你可以轻松地将这些替代方案中的任何一种添加到使用FastAPI构建的应用程序中. 你还可以使用它自动生成与你的API进行通信的客户端代码. 例如Web前段, 移动端或物联网嵌入程序.
# 分布概括
# 步骤1: 导入FastAPI
from fastapi import FastAPI

app = FastAPI()

@app.get("/")
async def root():
    return {"message": "Hello World"}
2
3
4
5
6
7
FastAPI是一个为你的API提供了所有功能的Python类. FastAPI是直接从Starlette继承的类.
# 步骤2: 创建一个FastAPI实例
上面的变量app会是FastAPI类的一个实例. 这个实例将是创建你所有API的主要交互对象.
# 步骤3: 创建一个路径操作
- 路径
这里的路径指的是URL中从第一个/起的后半部分. https://example.com/items/foo这样一个URL中的路径会是/items/foo. 路径也通常被称为端点或路由. 开发API时, 路径是用来分离关注点和资源的主要手段.
- 操作
这里的操作指的是一种HTTP方法: POST, GET, PUT, DELETE, 以及更少见的: OPTIONS, HEAD, PATCH, TRACE. 在HTTP协议中, 可以使用以上的其中一种(或多种)方法与每个路径进行通信.
在开发API时, 通常使用特定的HTTP方法去执行特定的行为. 通常使用:
POST: 创建数据GET: 读取数据PUT: 更新数据DELETE: 删除数据
因此, 在OpenAPI中, 每一个HTTP方法都被称为操作.
- 定义一个路径操作装饰器
from fastapi import FastAPI

app = FastAPI()

@app.get("/")
async def root():
    return {"message": "Hello World"}
2
3
4
5
6
7
@app.get("/")告诉FastAPI在它下方的函数负责处理如下访问请求:
- 请求路径为
/ - 使用
get操作
@something语法在Python中被称为装饰器. 装饰器接收位于其下方的函数并且用它完成一些工作. 上面的@app.get("/")它是一个路径操作装饰器.
也可以使用其他操作装饰器:
@app.post()@app.put()@app.delete()
以及更少见的:
@app.option()@app.head()@app.patch()@app.trace()
可以随意使用任何一个操作(HTTP方法), FastAPI没有强制要求操作有任何特定的含义. 此处提供的信息进作为指导, 而不是要求.
# 步骤4: 定义路径操作函数
路径操作函数:
- 路径:
/ - 操作:
get - 函数: 位于装饰器下方的函数(位于
@app.get("/")下方)
这是一个Python函数. 每当FastAPI接收一个使用GET方法访问URL/的请求时这个函数会被调用. 在这个例子中, 它是一个async函数. 你也可以将其定义为常规函数而不使用async def:
from fastapi import FastAPI

app = FastAPI()

@app.get("/")
def root():
    return {"message": "Hello World"}
2
3
4
5
6
7
# 步骤5: 返回内容
可以返回一个dict, list, 像str, int一样的单个值, 等. 也可以返回Pydantic模型, 还有许多其他将会自动转换为JSON的对象和模型(包括ORM对象等)
# 总结
- 导入FastAPI
- 创建一个app实例
- 编写一个路径操作装饰器, 如
@app.get("/") - 定义一个路径操作函数, 如
def root(): ... - 使用命令
fastapi def运行开发服务器
# 路径参数
FastAPI支持使用Python字符串格式化语法声明路径参数(变量):
from fastapi import FastAPI

app = FastAPI()

@app.get("/items/{item_id}")
async def read_item(item_id):
    return {"item_id": item_id}
2
3
4
5
6
7
这段代码把路径参数item_id的值传递给路径函数的参数item_id. 运行示例并访问http://127.0.0.1:8000/items/foo, 可获得如下响应:
{"item_id":"foo"}
# 声明路径参数的类型
使用Python标准类型注解, 声明路径操作函数中路径参数的类型.
from fastapi import FastAPI

app = FastAPI()

@app.get("/items/{item_id}")
async def read_item(item_id: int):
    return {"item_id": item_id}
2
3
4
5
6
7
本例把item_id的类型声明为int, 类型声明将为函数提供错误检查, 代码补全等编辑器支持.
# 数据转换
运行示例并访问http://127.0.0.1:8000/items/3, 返回的响应如下:
{"item_id":3}
注意
函数接收并返回的值是3(int), 不是"3"(str). FastAPI通过类型声明自动解析请求中的数据.
# 数据校验
通过浏览器访问http://127.0.0.1:8000/items/foo, 接收如下HTTP错误信息:
{
  "detail": [
    {
      "type": "int_parsing",
      "loc": [
        "path",
        "item_id"
      ],
      "msg": "Input should be a valid integer, unable to parse string as an integer",
      "input": "foo"
    }
  ]
}
2
3
4
5
6
7
8
9
10
11
12
13
这是因为路径参数item_id的值("foo")的类型不是int. 值的类型不是int而是浮点数(float)时也会显示同样的错误, 比如: http://127.0.0.1:8000/items/4.2.
检查
FastAPI使用Python类型声明实现了数据校验. 注意, 上面的错误清晰地指出了未通过校验的具体原因. 这在开发调试与API交互的代码时非常有用.
# 查看文档
检查
还是使用Python类型声明, FastAPI提供了(集成Swagger UI的)API文档. 注意, 路径参数的类型是整数.
# 基于标准的好处, 备选文档
FastAPI使用OpenAPI生成概图, 所以能兼容很多工具. 因此, FastAPI还内置了ReDoc生成的备选API文档, http://127.0.0.1:8000/redoc.
# Pydantic
FastAPI充分地利用了Pydantic的优势, 用它在后台校验数据. 众所周知, Pydantic擅长的就是数据校验. 同样, str, float, bool以及很多复合数据类型都可以使用类型声明.
# 顺序很重要
有时, 路径操作中的路径是写死的. 比如使用/users/me获取当前用户的数据. 然后使用/users/{user_id}, 通过用户ID获取指定用户的数据. 由于路径操作是按顺序依次执行的, 因此, 一定要在/users/{user_id}之前声明/users/me:
from fastapi import FastAPI

app = FastAPI()

@app.get("/users/me")
async def read_user_me():
    return {"user_id": "the current user"}

@app.get("/users/{user_id}")
async def read_user(user_id: str):
    return {"user_id": user_id}
2
3
4
5
6
7
8
9
10
11
否则, /users/{user_id}将匹配/users/me, FastAPI会认为正在接受值为"me"的user_id参数
# 预设值
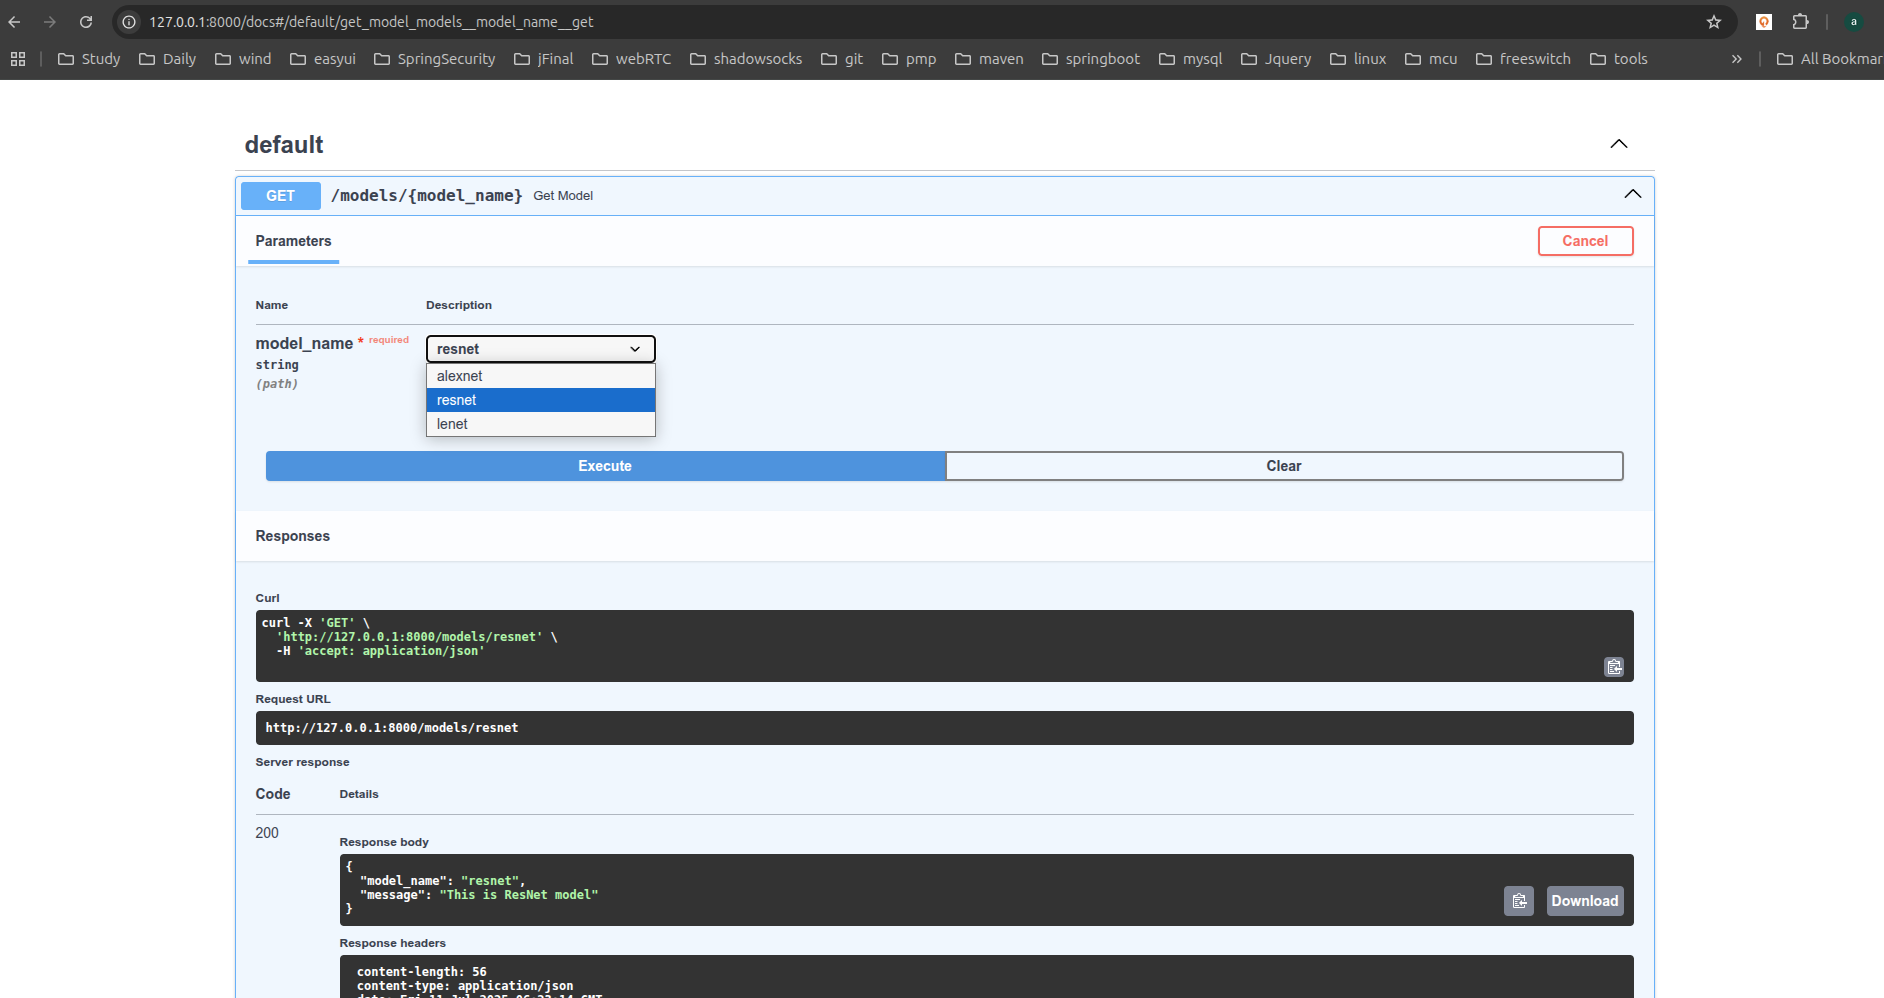
路径操作使用Python的Enum类型接收预设的路径参数.
# 创建Enum类
导入Enum并创建继承自str核Enum的子类. 通过从str继承, API文档就能把值的类型定义为字符串, 并且能正确渲染. 然后, 创建包含固定值的类属性, 这些固定值是可用的有效值:
from enum import Enum

from fastapi import FastAPI

class ModelName(str, Enum):
    alexnet = "alexnet"
    resnet = "resnet"
    lenet = "lenet"

app = FastAPI()

@app.get("/models/{model_name}")
async def get_model(model_name: ModelName):
    if model_name == ModelName.alexnet:
        return {"model_name": model_name, "message": "This is AlexNet model"}
    elif model_name == ModelName.resnet:
        return {"model_name": model_name, "message": "This is ResNet model"}
    elif model_name == ModelName.lenet:
        return {"model_name": model_name, "message": "This is LeNet model"}
    else:
        return {"model_name": model_name, "message": "Model not found"}
2
3
4
5
6
7
8
9
10
11
12
13
14
15
16
17
18
19
20
21
说明
Python3.4及之后版本支持枚举(即enums). AlexNext, ResNet, LeNet是机器学习模型.
# 声明路径参数
如上代码, 使用Enum类(ModelName)创建使用类型注解的路径参数.
# 查看文档
API文档会显示预定义路径参数的可用值:
# 使用Python枚举类型
路径参数的值是枚举的元素.
# 比较枚举元素
枚举类ModelName中的枚举元素支持比较操作:
from enum import Enum

from fastapi import FastAPI

class ModelName(str, Enum):
    alexnet = "alexnet"
    resnet = "resnet"
    lenet = "lenet"

app = FastAPI()

@app.get("/models/{model_name}")
async def get_model(model_name: ModelName):
    if model_name == ModelName.alexnet:
        return {"model_name": model_name, "message": "This is AlexNet model"}

    if model_name.value == "lenet":
        return {"model_name": model_name, "message": "This is LeNet model"}

    return {"model_name": model_name, "message": "Have some residuals"}
2
3
4
5
6
7
8
9
10
11
12
13
14
15
16
17
18
19
20
# 获取枚举值
使用model_name.value或your_enum_member.value获取实际的值(本例中为字符串), 使用ModelName.lenet.value也能获取值"lenet".
# 返回枚举元素
即使嵌套在JSON请求体里(例如, dict), 也可以从路径操作返回枚举元素. 返回给客户端之前, 要把枚举元素转换为对应的值(本例中为字符串).
客户端中的JSON响应如下:
{
  "model_name": "alexnet",
  "message": "This is AlexNet model"
}
2
3
4
# 包含路径的路径参数
假设路径操作的路径为/files/{file_path}. 但需要file_path中也包含路径, 比如, home/johndoe/myfile.txt. 此时, 该文件的URL是这样的: /files/home/johndoe/myfile.txt.
# OpenAPI支持
OpenAPI不支持声明包含路径的路径参数, 因为这会导致测试和定义更加困难. 不过, 仍可使用Starlette内置工具在FastAPI中实现这一功能. 而且不影响文档正常运行, 但是不会添加该参数包含路径的说明.
# 路径转换器
直接使用Starlette的选项声明包含路径的路径参数: /files/{file_path:path}. 本例中, 参数名为file_path, 结尾部分的:path说明该参数应匹配路径. 用法如下:
from fastapi import FastAPI

app = FastAPI()

@app.get("/files/{file_path:path}")
async def read_file(file_path: str):
    return {"file_path": file_path}
2
3
4
5
6
7
注意
包含/home/johndoe/myfile.txt的路径参数要以斜杠/开头. 本例中的URL是/files//home/johndoe/myfile.txt. 注意, files和home之间要使用双斜杠//.
# 小结
通过简短, 直观的Python标准类型声明, FastAPI可以获得:
- 编辑器支持: 错误检查, 代码自动补全等
- 数据解析
- 数据校验
- API注解和API文档
这可能是除了性能以外, FastAPI与其他框架相比的主要优势.
# 查询参数
声明的参数不是路径参数时, 路径操作函数会把该参数自动解释为查询参数.
from fastapi import FastAPI

app = FastAPI()

fake_items = [{"item_id": "Foo"}, {"item_id": "Bar"}, {"item_id": "Baz"}]

@app.get("/items/")
async def read_items(skip: int = 0, limit: int = 10):
    return fake_items[skip: skip + limit]
2
3
4
5
6
7
8
9
查询字符串是键值对的集合, 这些键值对位于URL的?之后, 以&分隔. 例如, 以下URL中: http://127.0.0.1:8000/items/?skip=0&limit=10, 查询参数为:
skip: 值为0limit: 值为10
这些值都是URL的组成部分, 因此, 它们的类型本应是字符串. 但声明Python类型(上例中为int)之后, 这些值就会转换为声明的类型, 并进行类型校验. 所有应用于路径参数的流程也适用于查询参数:
- 编辑器支持
- 数据解析
- 数据校验
- API文档
# 默认值
查询参数不是路径的固定内容, 它是可选的, 还支持默认值. 上例用skip=0和limit=10设定默认值. 访问URL: http://127.0.0.1:8000/items/ 与访问以下地址相同: http://127.0.0.1:8000/items/?skip=0&limit=10, 但如果访问: http://127.0.0.1:8000/items/?skip=20. 查询参数的值就是:
skip=20: 在URL中设定的值limit=10: 使用默认值
# 可选参数
同理, 把默认值设为None即可声明可选的查询参数:
from fastapi import FastAPI

app = FastAPI()

@app.get("/items/{item_id}")
async def read_item(item_id: str, q: str | None = None):
    if q:
        return {"item_id": item_id, "q": q}
    return {"item_id": item_id}
2
3
4
5
6
7
8
9
本例中, 查询参数q是可选的, 默认值为None. 注意, FastAPI可以识别出item_id是路径参数, q不是路径参数, 而是查询参数. 因为默认值为= None, FastAPI把q识别为可选参数. FastAPI不使用Optional[str]中的Optional(只使用str), 但Optional[str]可以帮助编辑器发现代码中的错误.
# 查询参数类型转换
参数还可以声明为bool类型, FastAPI会自动转换参数类型:
from fastapi import FastAPI

app = FastAPI()

@app.get("/items/{item_id}")
async def read_item(item_id: str, q: str | None = None, short: bool = False):
    item = {"item_id": item_id}
    if q:
        item.update({"q": q})
    if not short:
        item.update(
            {"description": "This is an amazing item that has a long description"}
        )
    return item
2
3
4
5
6
7
8
9
10
11
12
13
14
本例中, 访问http://127.0.0.1:8000/items/foo?short=1或http://127.0.0.1:8000/items/foo?short=True或http://127.0.0.1:8000/items/foo?short=true或http://127.0.0.1:8000/items/foo?short=on或http://127.0.0.1:8000/items/foo?short=yes. 或其它任意大小写形式(大写, 首字母大写等), 函数接收的short参数都是布尔值True.
# 多个路径和查询参数
FastAPI可以识别同时声明的朵儿路径参数和查询参数. 而且声明查询参数的顺序并不重要. FastAPI通过参数名进行检测:
from fastapi import FastAPI

app = FastAPI()

fake_items = [{"item_id": "Foo"}, {"item_id": "Bar"}, {"item_id": "Baz"}]

@app.get("/users/{user_id}/items/{item_id}")
async def read_user_item(user_id: int, item_id: str, q: str | None = None, short: bool = False):
    item = {"item_id": item_id, "owner_id": user_id}
    if q:
        item.update({"q": q})
    if not short:
        item.update({"description": "This is an amazing item that has a long description."})
    return item
2
3
4
5
6
7
8
9
10
11
12
13
14
# 必选查询参数
为不是路径参数的参数声明默认值(至此, 仅有查询参数), 该参数就不是必选的了. 如果只想把参数设为可选, 但又不想指定参数的值, 则要把默认值设为None. 如果要把查询参数设置为必选, 就不要声明默认值:
from fastapi import FastAPI

app = FastAPI()

@app.get("/items/{item_id}")
async def read_user_item(item_id: str, needy: str):
    item = {"item_id": item_id, "needy": needy}
    return item
2
3
4
5
6
7
8
这里的查询参数needy是类型为str的必选查询参数. 在浏览器打开URL: http://127.0.0.1:8000/items/123, 因为路径中没有必选参数needy, 返回的响应中会显示如下错误信息:
{
  "detail": [
    {
      "type": "missing",
      "loc": [
        "query",
        "needy"
      ],
      "msg": "Field required",
      "input": null
    }
  ]
}
2
3
4
5
6
7
8
9
10
11
12
13
needy是必选参数, 因此要在URL中设置值: http://127.0.0.1:8000/items/123?needy=hello, 这样就正常了:
{
  "item_id": 123,
  "needy": "hello"
}
2
3
4
当然, 把一些参数定义为必选, 为另一些参数设置默认值, 再把其他参数定义为可选, 这些操作都是可以的:
from fastapi import FastAPI

app = FastAPI()


@app.get("/items/{item_id}")
async def read_user_item(
    item_id: str, needy: str, skip: int = 0, limit: int | None = None
):
    item = {"item_id": item_id, "needy": needy, "skip": skip, "limit": limit}
    return item
2
3
4
5
6
7
8
9
10
11
本例中有3个查询参数:
needy: 必选的str类型参数skip: 默认值为0的int类型参数limit: 可选的int类型参数
# 请求体
FastAPI使用请求体从客户端(例如浏览器)向API发送数据. 请求体是客户端发送给API的数据. 响应体是API发送给客户端的数据. API基本上肯定要发送响应体, 但是客户端不一定能够发送请求体. 使用Pydantic模型声明请求体, 能充分利用它的功能和优点.
说明
发送数据使用POST(最常用), PUT, DELETE, PATCH等操作. 规范中没有定义使用GET发送请求体的操作, 但不管怎样, FastAPI也支持这种方式, 只不过仅用于非常复杂或极端的用例. 不建议使用GET, 因此, 在SwaggerUI交互文档中不会显示有关GET的内容, 而且代理协议也不一定支持GET.
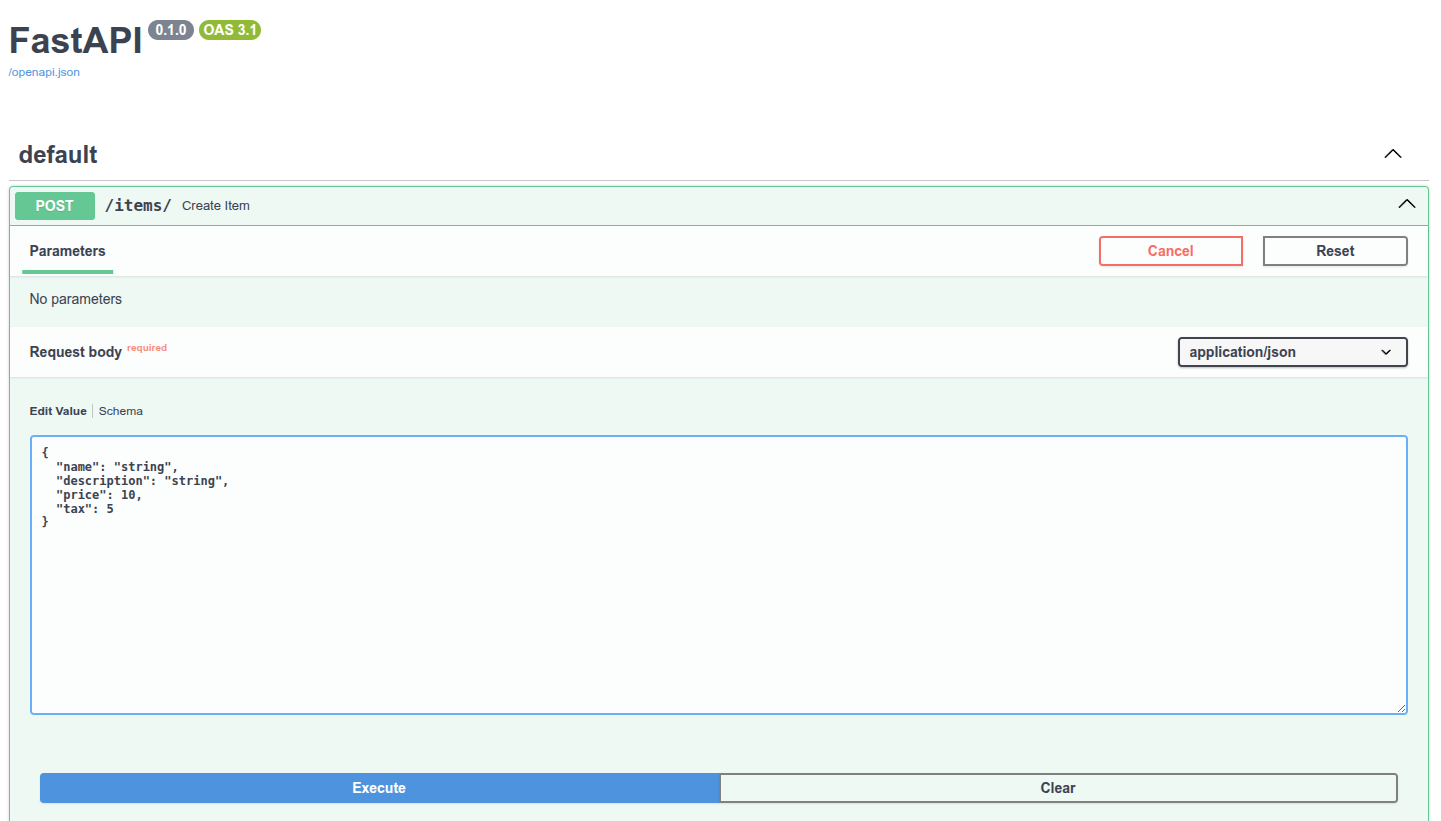
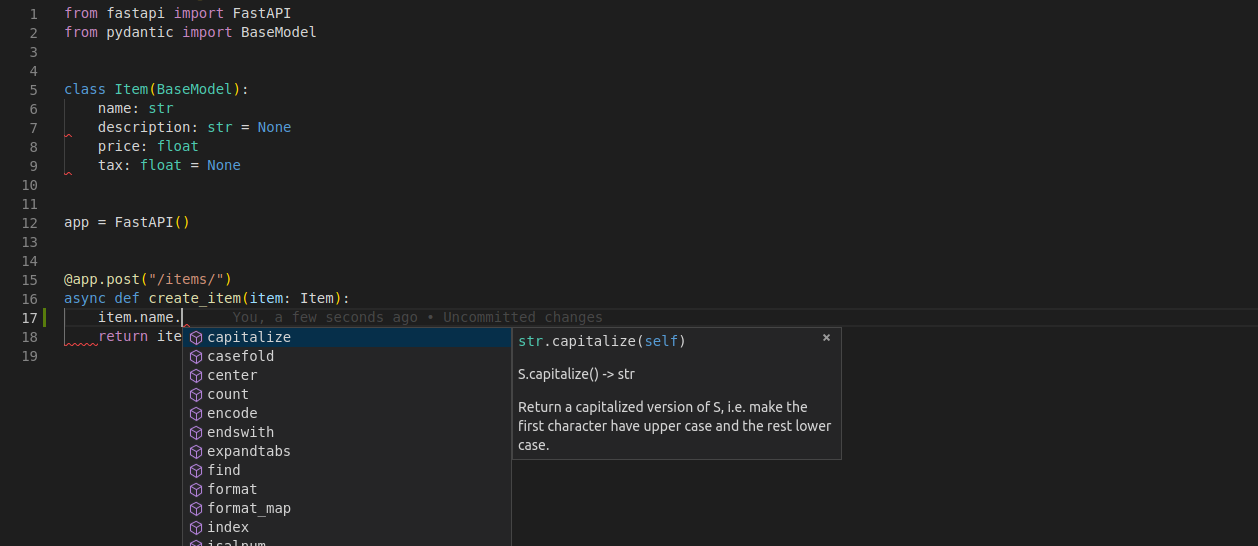
# 导入Pydantic的BaseModel
from fastapi import FastAPI
from pydantic import BaseModel
class Item(BaseModel):
name: str
description: str | None = None
price: float
tax: float = None
app = FastAPI()
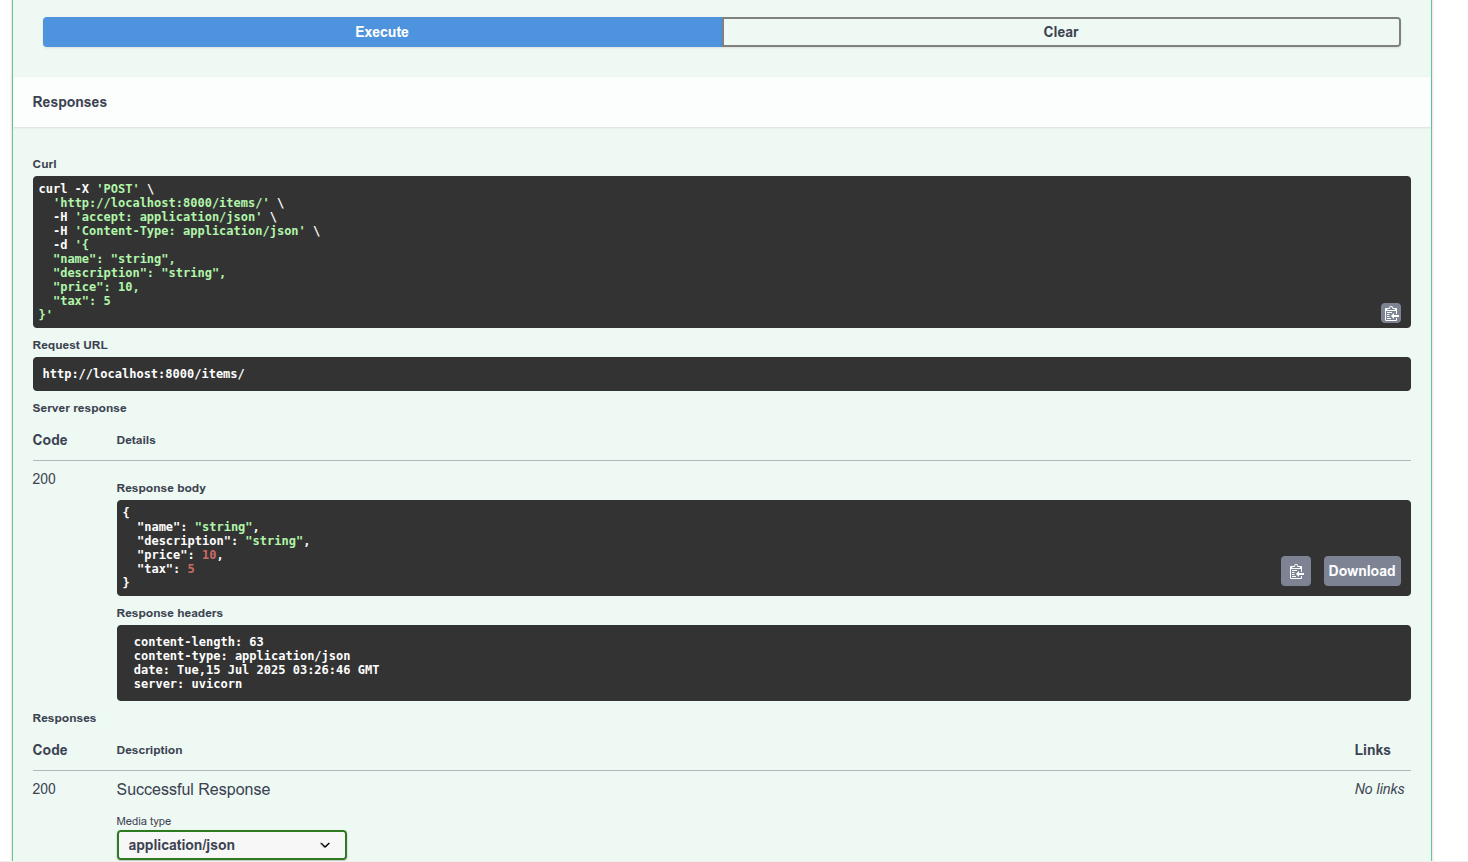
@app.post("/items/")
async def create_item(item: Item):
return item
2
3
4
5
6
7
8
9
10
11
12
13
14
# 创建数据模型
把数据模型声明为继承BaseModel的类. 使用Python标准类型声明所有属性. 与声明查询参数一样, 包含默认值的模型属性是可选的, 否则就是必选的. 默认值为None的模型属性也是可选的.
例如, 上述模型声明如下JSON对象(即Python字典):
{
    "name": "Foo",
    "description": "An optional description",
    "price": 45.2,
    "tax": 3.5
}
2
3
4
5
6
由于description和tax是可选的(默认值为None), 下面的JSON对象也是有效的:
{
    "name": "Foo",
    "price": 45.2
}
2
3
4
# 声明请求体参数
使用与声明路径和查询参数相同的方式声明请求体, 把请求体添加至路径操作, 上面的请求体参数类型为Item模型.
# 结论
仅使用Python类型声明, FastAPI就可以:
- 以JSON形式读取请求体
- (必要时)把请求体转换为对应的类型
- 校验数据:
- 数据无效时返回错误信息, 并支持错误数据的确切位置和内容
- 把接收的数据赋值给参数
item- 把函数中请求体参数的类型声明为
Item, 还能获得代码补全和编辑器支持
- 把函数中请求体参数的类型声明为
- 为模型生成JSON Schema, 在项目中所需的位置使用
- 这些概图是OpenAPI概图的部件, 用于API文档UI
# API文档
Pydantic模型的JSON概图是OpenAPI生成的概图部件, 可在API文档中显示:
而且, 还会用于API文档中使用了概图的路径操作:
# 编辑器支持
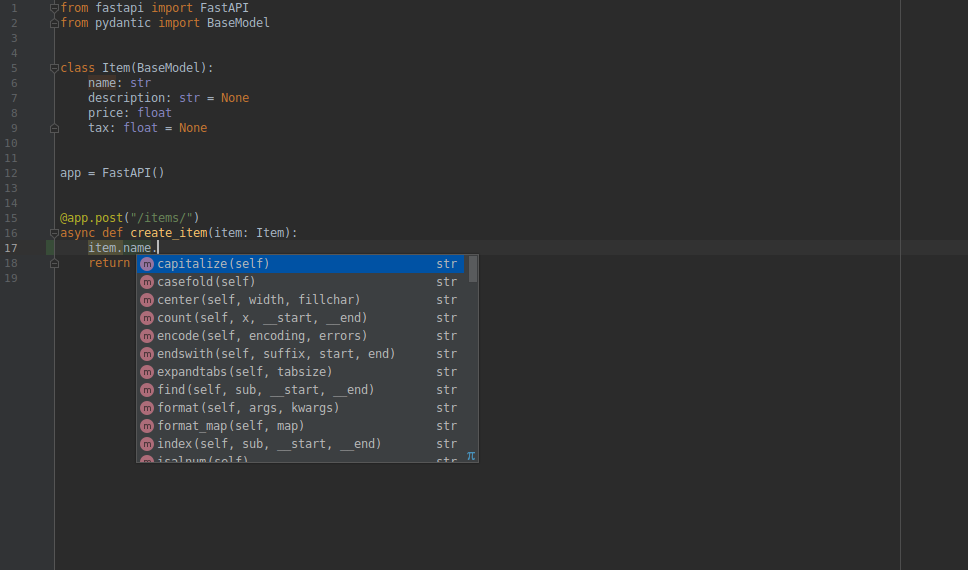
在编辑器中, 函数内部均可使用类型提示, 代码补全(如果接收的不是Pydantic模型, 而是字典, 就没有这样的支持):
还支持检查错误的类型操作:
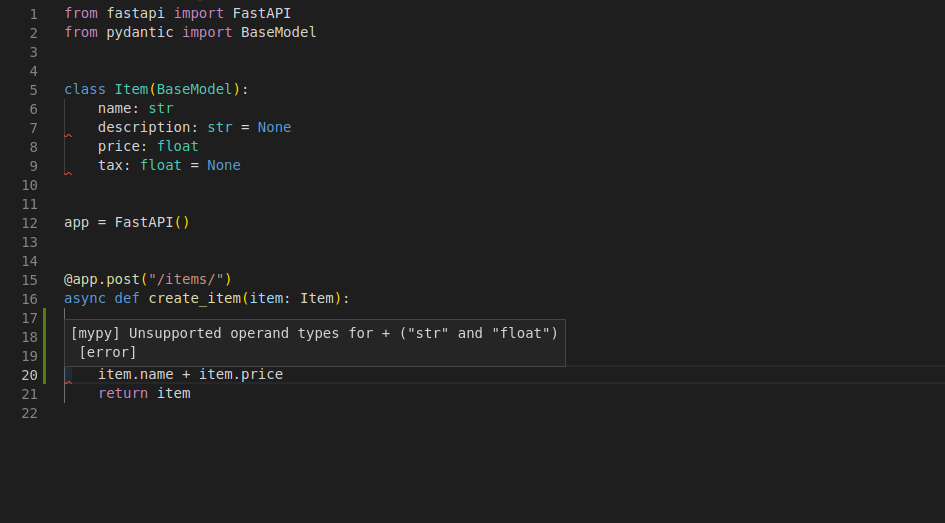
这并非偶然, 整个FastAPI框架都是围绕这种思路精心设计的. 并且, 在FastAPI的设计阶段, 就已经进行了全面测试, 以确保FastAPI可以获得所有编辑器的支持. 另外还改进了Pydantic, 让它支持这些功能. 虽然上面的截图取自Visual Studio Code, 但PyCharm和大多数Python编辑器也支持同样的功能.
使用PyCharm编辑器时, 推荐安装Pydantic PyCharm插件. 该插件用于完善PyCharm对Pydantic模型的支持, 优化的功能如下:
- 自动补全
- 类型检查
- 代码重构
- 查找
- 代码审查
# 使用模型
在路径操作函数内部直接访问模型对象的属性:
from fastapi import FastAPI
from pydantic import BaseModel

class Item(BaseModel):
    name: str
    description: str | None = None
    price: float
    tax: float = None

app = FastAPI()

@app.post("/items/")
async def create_item(item: Item):
    item_dict = item.model_dump()
    if item.tax is not None:
        price_with_tax = item.price + item.tax
        item_dict.update({"price_with_tax": price_with_tax})
    return item_dict
2
3
4
5
6
7
8
9
10
11
12
13
14
15
16
17
18
# 请求体+路径参数
FastAPI支持同时声明路径参数和请求体. FastAPI能识别与路径参数匹配的函数参数, 还能识别从请求体中获取的类型为Pydantic模型的函数参数.
from fastapi import FastAPI
from pydantic import BaseModel

class Item(BaseModel):
    name: str
    description: str | None = None
    price: float
    tax: float = None

app = FastAPI()

@app.post("/items/{item_id}")
async def create_item(item_id: int, item: Item):
    return {"item_id": item_id, **item.model_dump()}
2
3
4
5
6
7
8
9
10
11
12
13
14
# 请求体+路径参数+查询参数
FastAPI支持同时声明请求体, 路径参数和查询参数. FastAPI能够正确识别这三种参数, 并从正确的位置获取数据.
from fastapi import FastAPI
from pydantic import BaseModel

class Item(BaseModel):
    name: str
    description: str | None = None
    price: float
    tax: float = None

app = FastAPI()

@app.post("/items/{item_id}")
async def create_item(item_id: int, item: Item, q: str | None = None):
    result = {
        "item_id": item_id,
        **item.model_dump()
    }
    if q:
        result.update({"q": q})
    return result
2
3
4
5
6
7
8
9
10
11
12
13
14
15
16
17
18
19
20
函数参数按如下规则进行识别:
- 路径中声明了相同参数的参数, 是路径参数
- 类型是(
int,float,str,bool等)单类型的参数, 是查询参数 - 类型是Pydantic模型的参数, 是请求体
笔记
因为默认值是None, FastAPI会把q当作可选参数. FastAPI不使用Optional[str]中的Optional, 但Optional可以让编辑器提供更好的支持, 并检测错误.
# 不使用Pydantic
即便不使用Pydantic模型也能使用Body参数.
# 查询参数和字符串校验
FastAPI允许为参数声明额外的信息和校验. 如下:
from fastapi import FastAPI

app = FastAPI()


@app.get("/items/")
async def read_items(q: str | None = None):
    results = {"items": [{"item_id": "Foo"}, {"item_id": "Bar"}]}
    if q:
        results.update({"q": q})
    return results
2
3
4
5
6
7
8
9
10
11
查询参数q的类型为str, 默认值为None, 因此它是可选的.
# 额外的校验
下载打算添加约束条件: 即使q是可选的, 但只要提供了该参数, 则该参数值不能超过50个字符的长度.
# 导入Query
为此, 首先从fastapi导入Query:
from typing import Union
from fastapi import FastAPI, Query

app = FastAPI()

@app.get("/items/")
async def read_items(q: Union[str, None] = Query(default=None, max_length=50)):
    results = {"items": [{"item_id": "Foo"}, {"item_id": "Bar"}]}
    if q:
        results.update({"q": q})
    return results
2
3
4
5
6
7
8
9
10
11
# 使用Query作为默认值
现在, 将Query用作查询参数的默认值, 并将它的max_length参数设置为50.
由于我们必须用Query(default=None)替换默认值None, Query的第一个参数同样也是用于定义默认值. 所以, q: Union[str, None] = Query(default=None) 等同于 q: str = None, 但是Query显式地将其声明为查询参数. 然后, 我们可以将更多的参数传递给Query. 在本例中, 适用于字符串的max_length参数: q: Union[str, None] = Query(default=None, max_length=50), 将会校验数据, 在数据无效时展示清晰的错误信息, 并在OpenAPI模式的路径操作中记录该参数.
# 添加更多校验
还可以添加min_length参数:
from typing import Union
from fastapi import FastAPI, Query

app = FastAPI()

@app.get("/items/")
async def read_items(q: Union[str, None] = Query(default=None, min_length=3, max_length=50)):
    results = {"items": [{"item_id": "Foo"}, {"item_id": "Bar"}]}
    if q:
        results.update({"q": q})
    return results
2
3
4
5
6
7
8
9
10
11
# 添加正则表达式
可以定义一个参数值必须匹配的正则表达式:
from typing import Union
from fastapi import FastAPI, Query

app = FastAPI()

@app.get("/items/")
async def read_items(q: Union[str, None] = Query(default=None, min_length=3, max_length=50, pattern="^fixedquery$")):
    results = {"items": [{"item_id": "Foo"}, {"item_id": "Bar"}]}
    if q:
        results.update({"q": q})
    return results
2
3
4
5
6
7
8
9
10
11
这个指定的正则表达式通过以下规则检查接收到的参数值:
^: 以该符号之后的字符开头, 符号之前没有字符.fixedquery: 值精确地等于fixedquery.$: 到此结束, 在fixedquery之后没有更多字符.
# 默认值
可以向Query的第一个参数传入None用作查询参数的默认值, 以同样的方式也可以传递其他默认值. 假设你想要声明查询参数q, 使其min_length为3, 并且默认值为fixedquery:
from fastapi import FastAPI, Query

app = FastAPI()


@app.get("/items/")
async def read_items(q: str = Query(default="fixedquery", min_length=3)):
    results = {"items": [{"item_id": "Foo"}, {"item_id": "Bar"}]}
    if q:
        results.update({"q": q})
    return results
2
3
4
5
6
7
8
9
10
11
具有默认值还会使该参数称为可选参数.
# 声明为必须参数
当我们不需要声明额外的校验或元数据时, 只需不声明默认值就可以使q参数成为必需参数, 例如: q: str 代替 q: Union[str, None] = None, 但是现在用Query声明q: Union[str, None] = Query(default=None, min_length=3). 因此, 当在使用Query且需要声明一个值是必须的时候, 只需不声明默认参数:
from fastapi import FastAPI, Query

app = FastAPI()


@app.get("/items/")
async def read_items(q: str = Query(min_length=3)):
    results = {"items": [{"item_id": "Foo"}, {"item_id": "Bar"}]}
    if q:
        results.update({"q": q})
    return results
2
3
4
5
6
7
8
9
10
11
# 使用None声明必须参数
可以声明一个参数可以接收None值, 但它仍然是必需的. 这将强制客户端发送一个值, 即使该值是None. 为此, 可以声明None是一个有效的类型, 并仍然使用default=...:
from typing import Union

from fastapi import FastAPI, Query

app = FastAPI()


@app.get("/items/")
async def read_items(q: Union[str, None] = Query(min_length=3)):
    results = {"items": [{"item_id": "Foo"}, {"item_id": "Bar"}]}
    if q:
        results.update({"q": q})
    return results
2
3
4
5
6
7
8
9
10
11
12
13
Pydantic是FastAPI中所有数据验证和序列化的核心, 当在没有默认值的情况下使用Optional或Union[Something, None]时, 它具有特殊行为, 你可以在Pydantic文档中阅读有关必需可选字段的更多信息.
# 查询参数列表/多个值
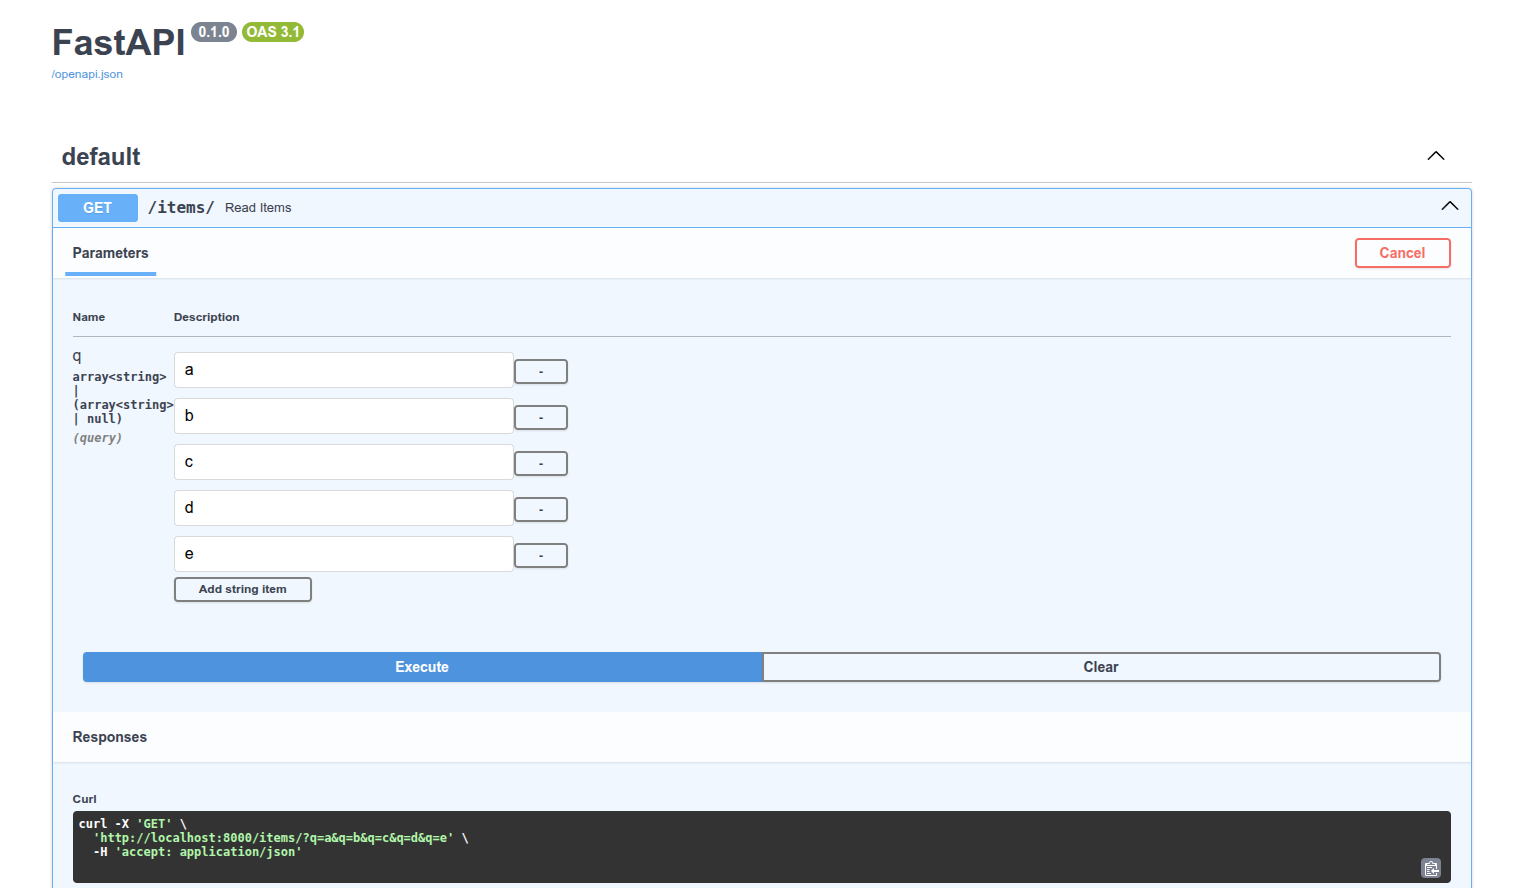
当你使用Query显式地定义查询参数时, 你还可以声明它去接收一组值, 或换句话说, 接收多个值. 例如, 要声明一个可在URL中出现多次的查询参数q, 可以这样写:
from typing import List, Union

from fastapi import FastAPI, Query

app = FastAPI()


@app.get("/items/")
async def read_items(q: Union[List[str], None] = Query(default=None)):
    query_items = {"q": q}
    return query_items
2
3
4
5
6
7
8
9
10
11
然后, 输入如下网址: http://localhost:8000/items/?q=a&q=b&q=c&q=d&q=e, 会在路径操作函数的函数参数q中以一个Pythonlist的形式接收到查询参数q的多个值(a, b, c, d, e). 因此, 该URL的响应将会是:
{
  "items": [
    {
      "item_id": "Foo"
    },
    {
      "item_id": "Bar"
    }
  ],
  "q": [
    "a",
    "b",
    "c",
    "d",
    "e"
  ]
}
2
3
4
5
6
7
8
9
10
11
12
13
14
15
16
17
提示
要声明类型为list的查询参数, 如上例所示, 需要显式地使用Query, 否则该参数将被解释为请求体.
交互式API文档将会相应地进行更新, 以允许使用多个值:
# 具有默认值的查询参数列表/多个值
还可以定义在没有任何给定值时的默认list值:
from typing import Union, List
from fastapi import FastAPI, Query

app = FastAPI()

@app.get("/items/")
async def read_items(q: Union[List[str], None] = Query(default=["foo", "bar"])):
    query_items = {"q": q}
    return query_items
2
3
4
5
6
7
8
9
访问http://localhost:8000/items/, 响应:
{
  "q": [
    "foo",
    "bar"
  ]
}
2
3
4
5
6
# 使用list
也可以直接使用list代替List[str]:
from fastapi import FastAPI, Query

app = FastAPI()


@app.get("/items/")
async def read_items(q: list = Query(default=[])):
    query_items = {"q": q}
    return query_items
2
3
4
5
6
7
8
9
在这种情况下FastAPI将不会检查列表的内容. 例如, List[int]将检查(并记录到文档)列表的内容必须是整数, 但是单独的list不会.
# 声明更多元数据
还可以添加更多有关该参数的信息. 这些信息将包含生成的OpenAPI模式中, 并由文档用户界面和外部工具所使用.
不同的工具对OpenAPI的支持程度可能不同. 其中一些可能不会展示所有已声明的额外信息, 尽管在大多数情况下, 缺少的这部分功能已经计划进行开发.
比如可以添加title以及description:
from typing import Union, List
from fastapi import FastAPI, Query

app = FastAPI()

@app.get("/items/")
async def read_items(q: Union[str, None] = Query(default=None, title="查询参数", description="查询参数,可以是字符串或None")):
    results = {"items": [{"item_id": "Foo"}, {"item_id": "Bar"}]}
    if q:
        results.update({"q": q})
    return results
2
3
4
5
6
7
8
9
10
11
# 别名参数
假设想要查询参数为item-query, 比如这样http://127.0.0.1:8000/items/?item-query=foobaritems, 但是item-query不是一个有效的Python变量名称. 最接近的有效名称是item_query. 但是仍然要求它在URL中必须是item-query. 这时可以用alias参数声明一个别名, 该别名将用于在URL中查找查询参数值:
from typing import Union, List
from fastapi import FastAPI, Query

app = FastAPI()

@app.get("/items/")
async def read_items(q: Union[str, None] = Query(default=None, alias="item-query")):
    results = {"items": [{"item_id": "Foo"}, {"item_id": "Bar"}]}
    if q:
        results.update({"q": q})
    return results
2
3
4
5
6
7
8
9
10
11
访问http://localhost:8000/items/?item-query=hello获取响应:
{
  "items": [
    {
      "item_id": "Foo"
    },
    {
      "item_id": "Bar"
    }
  ],
  "q": "hello"
}
2
3
4
5
6
7
8
9
10
11
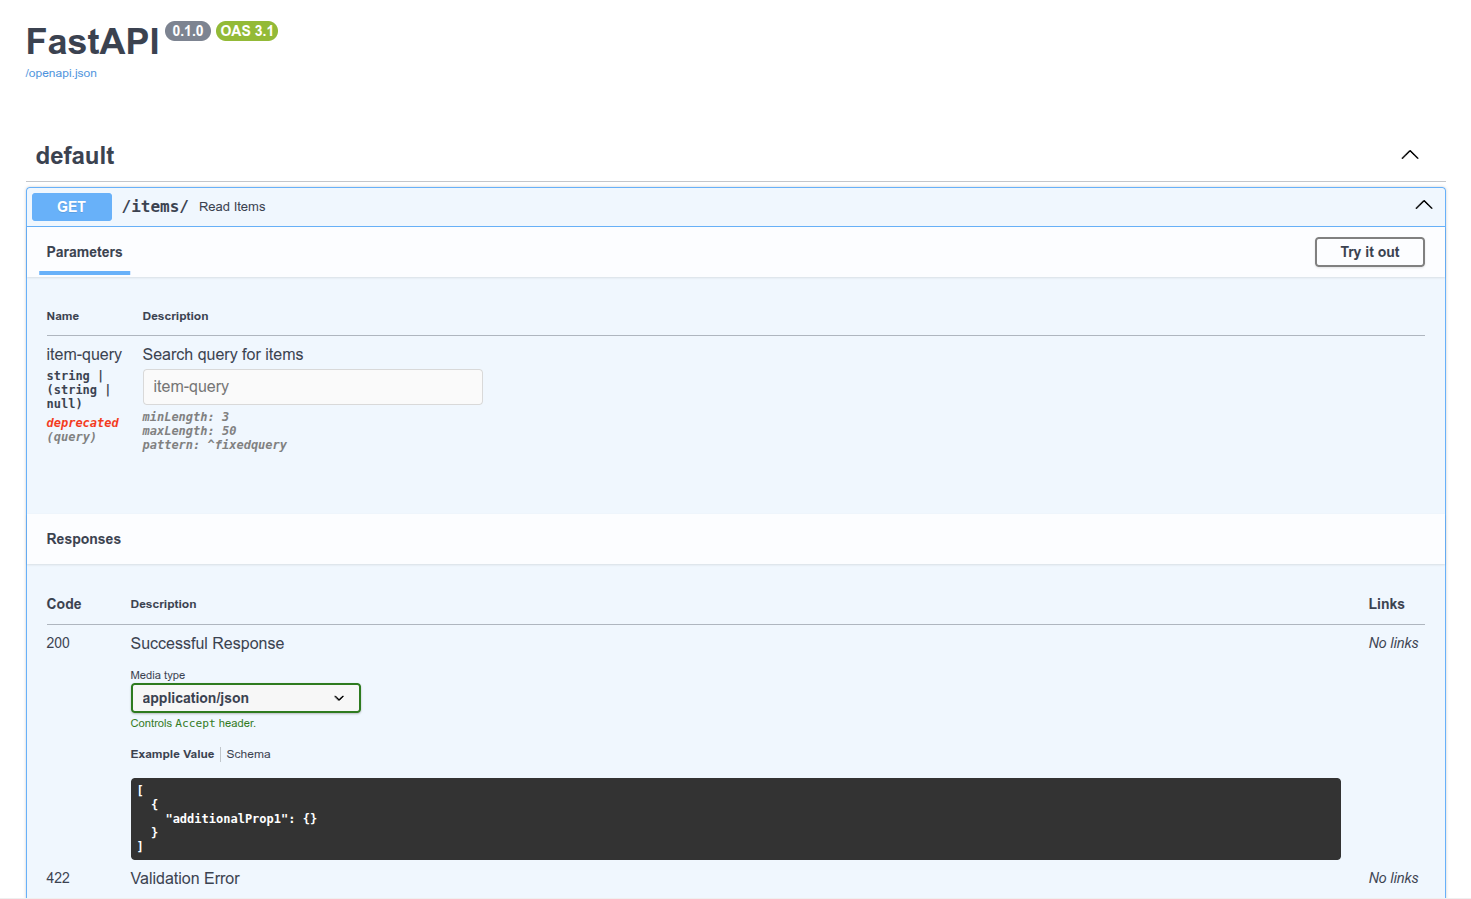
# 弃用参数
如果某个参数不再需要, 但是不得不将其保留一段时间, 因为有些客户端正在使用它, 但你希望文档清楚地将其展示为已弃用. 那么将参数deprecated=True传入Query:
from typing import Union

from fastapi import FastAPI, Query

app = FastAPI()

@app.get("/items/")
async def read_items(
    q: Union[str, None] = Query(
        default=None,
        alias="item-query",
        title="Query string",
        description="Query string for the items to search in the database that have a good match",
        min_length=3,
        max_length=50,
        pattern="^fixedquery$",
        deprecated=True,
    ),
):
    results = {"items": [{"item_id": "Foo"}, {"item_id": "Bar"}]}
    if q:
        results.update({"q": q})
    return results
2
3
4
5
6
7
8
9
10
11
12
13
14
15
16
17
18
19
20
21
22
23
# 总结
可以为查询参数声明额外的校验和元数据. 通用的校验和元数据:
aliastitledescriptiondeprecated特定于字符串的校验:min_lengthmax_lengthregex在这些示例中, 可以了解如何声明对str值的校验.
# 路径参数和数值校验
与使用Query为查询参数声明更多的校验和元数据的方式相同, 也可以使用Path为路径参数声明相同类型的校验和元数据.
# 导入Path
首先, 从fastapi导入Path:
from typing import Annotated
from fastapi import FastAPI, Query, Path

app = FastAPI()

@app.get("/items/{item_id}")
async def read_item(item_id: Annotated[int, Path(title="The ID of the item to get")],
    q: Annotated[str | None, Query(alias="item-query")] = None):
    results = {"item_id": item_id}
    if q:
        results.update({"query": q})
    return results
2
3
4
5
6
7
8
9
10
11
12
# 声明元数据
还可以声明与Query相同的所有参数. 例如, 要声明路径参数item_id的title元数据值, 可以输入:
from typing import Annotated

from fastapi import FastAPI, Path, Query

app = FastAPI()

@app.get("/items/{item_id}")
async def read_items(
    item_id: Annotated[int, Path(title="The ID of the item to get")],
    q: Annotated[str | None, Query(alias="item-query")] = None,
):
    results = {"item_id": item_id}
    if q:
        results.update({"q": q})
    return results
2
3
4
5
6
7
8
9
10
11
12
13
14
15
路径参数总是必需的, 因为它必须是路径的一部分. 然而, 即使使用None声明路径参数或设置一个其他默认值也不会有任何影响, 它依然会是必需参数.
# 按需对参数排序
假设你想要声明一个必需的str类型查询参数q. 而且你不需要为该参数声明任何其他内容, 所以实际上你并不需要使用Query. 但是你仍然需要使用Path来声明路径参数item_id. 如果你将带有默认值的参数放在没有默认值的参数之前, Python会报错. 但是你可以对其重新排序, 并将不带默认值的值(查询参数q)放到最前面. 对FastAPI来说这无关紧要. 它将通过参数的名称, 类型和默认值声明(Query, Path等)来检测参数, 而不在乎参数的顺序.因此, 你可以将函数声明为:
from fastapi import FastAPI, Path

app = FastAPI()

@app.get("/items/{item_id}")
async def read_items(q: str, item_id: int = Path(title="The ID of the item to get")):
    results = {"item_id": item_id}
    if q:
        results.update({"q": q})
    return results
2
3
4
5
6
7
8
9
10
# 按需对参数排序的技巧
如果你想不使用Query声明没有默认值的查询参数q, 同时使用Path声明路径参数item_id, 并使它们的顺序与上面不同, Python对此有一些特殊语法.
传递*作为函数的第一个参数. Python不会对*做任何事情, 但是它将知道之后的所有参数都应作为关键字参数(键值对), 也被称为kwargs, 来调用. 即使它们没有默认值.
from typing import Annotated
from fastapi import FastAPI, Query, Path

app = FastAPI()

@app.get("/items/{item_id}")
async def read_item(*, item_id: Annotated[int, Path(title="The ID of the item to get")], q: str = "test", p: str):
    results = {"item_id": item_id}
    if q:
        results.update({"query": q, "p": p})
    return results
2
3
4
5
6
7
8
9
10
11
# 数值校验: 大于等于
使用Query和Path(以及后面看到的其他类)可以声明字符串约束, 但也可以声明数值约束. 比如, 添加ge=1后, item_id将必须是一个大于(greater than)或等于(equal)1的整数.
from fastapi import FastAPI, Path

app = FastAPI()

@app.get("/items/{item_id}")
async def read_items(
    *, item_id: int = Path(title="The ID of the item to get", ge=1), q: str
):
    results = {"item_id": item_id}
    if q:
        results.update({"q": q})
    return results
2
3
4
5
6
7
8
9
10
11
12
# 数值校验: 大于和小于等于
同样的规则适用于:
gt: 大于(greater than)le: 小于等于(less than orequal)
from fastapi import FastAPI, Path

app = FastAPI()

@app.get("/items/{item_id}")
async def read_items(
    *,
    item_id: int = Path(title="The ID of the item to get", gt=0, le=1000),
    q: str,
):
    results = {"item_id": item_id}
    if q:
        results.update({"q": q})
    return results
2
3
4
5
6
7
8
9
10
11
12
13
14
# 数值校验: 浮点数, 大于和小于
数值校验同样适用于float值. 能够声明gt而不仅仅是ge在这个前提下变得重要起来. 比如, 你可以要求一个值必须大于0, 即使它小于1. 因此, 0.5将是有效值, 但0.0或0不是. 对于lt也是一样的.
from fastapi import FastAPI, Path, Query

app = FastAPI()

@app.get("/items/{item_id}")
async def read_items(
    *,
    item_id: int = Path(title="The ID of the item to get", ge=0, le=1000),
    q: str,
    size: float = Query(gt=0, lt=10.5),
):
    results = {"item_id": item_id}
    if q:
        results.update({"q": q})
    if size:
        results.update({"size": size})
    return results
2
3
4
5
6
7
8
9
10
11
12
13
14
15
16
17
# 总结
可以与查询参数和字符串校验相同的方式使用Query, Path(以及其他还没见过的类)声明元数据和字符串校验. 而且还可以声明数值校验:
gt: 大于(greaterthan)ge: 大于等于(greater than orequal)lt: 小于(lessthan)le: 小于等于(less than orequal)
Query, Path以及后面看到的其他类继承自同一个共同的Param类(不需要直接使用它). 而且它们都共享相同的所有你已看到并用于添加额外校验和元数据的参数.
技术细节
当从fastapi导入Query, Path和其他同类对象时, 它们实际上是函数. 当被调用时, 它们返回同名类的实例. 如此, 导入Query这个函数. 当调用它时, 它将返回一个同样命名为Query的类的实例. 因为使用了这些函数(而不是直接使用类), 所以你的编辑器不会标记有关其类型的错误. 这样, 你可以使用常规的编辑器和编码工具, 而不必添加自定义配置来忽略这些错误.
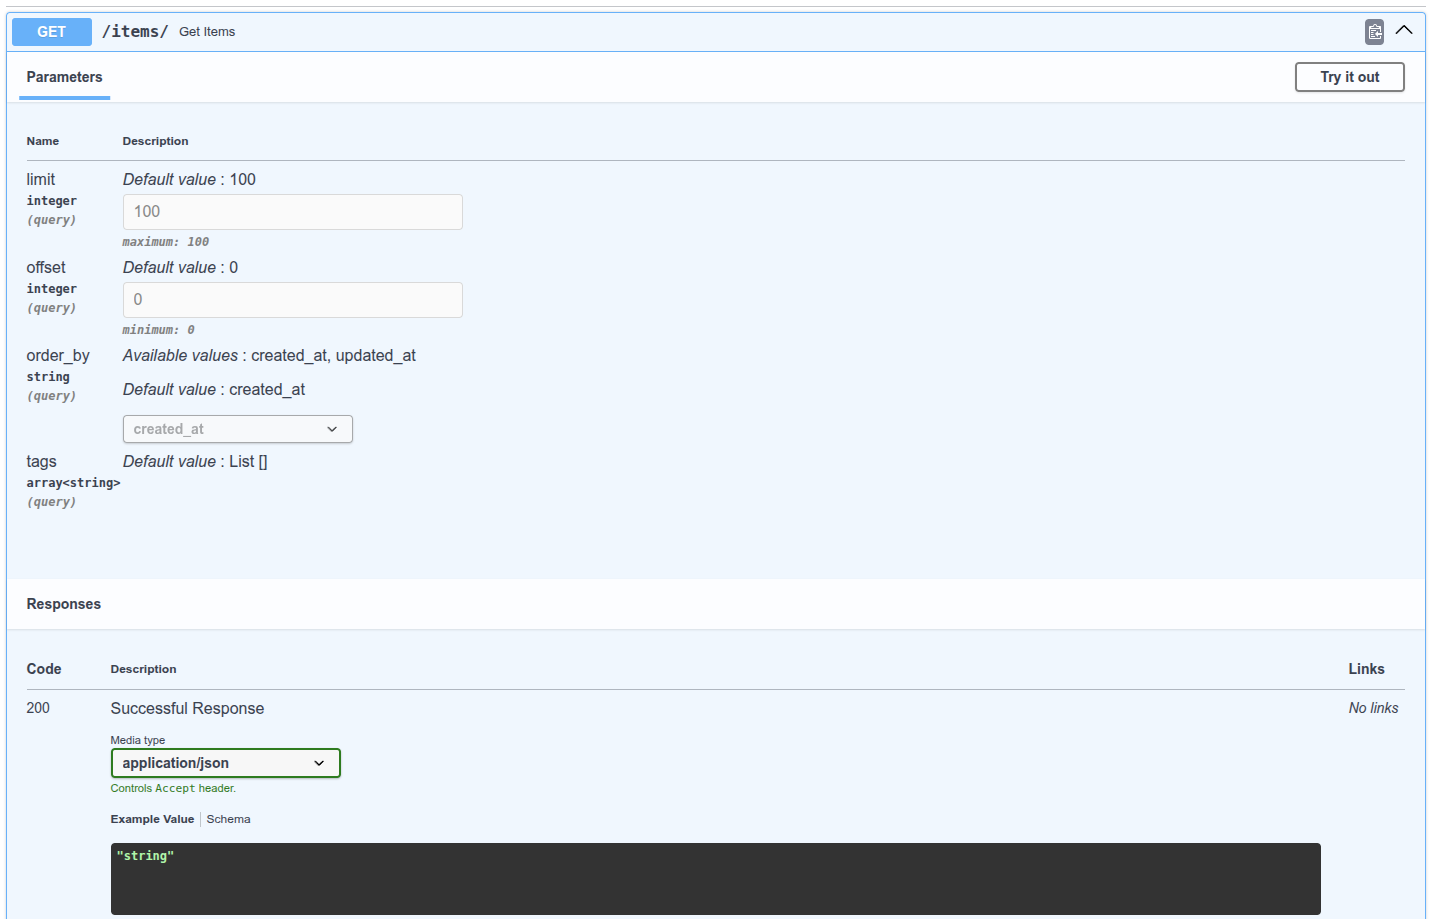
# 查询参数模型
如果你有一组具有相关性的查询参数, 可以创建一个Pydantic模型来声明它们. 这将允许你在多个地方去复用模型, 并且一次性为所有参数声明验证和元数据. FastAPI从0.115.0版本开始支持这个特性.
# 使用Pydantic模型的查询参数
在一个Pydantic模型中声明你需要的查询参数, 然后将参数声明为Query:
from typing import Annotated, Literal
from fastapi import FastAPI, Query
from pydantic import BaseModel, Field

app = FastAPI()

class FilterParams(BaseModel):
    limit: int = Field(100, gt=0, le=100)
    offset: int = Field(0, ge=0)
    order_by: Literal["created_at", "updated_at"] = "created_at"
    tags: list[str] = []


@app.get("/items/")
async def get_items(filter_query: Annotated[FilterParams, Query()]):
    return filter_query
2
3
4
5
6
7
8
9
10
11
12
13
14
15
16
FastAPI将会从请求的查询参数中提取出每个字段的数据, 并将其提供给你定义的Pydantic模型.
# 查看文档
# 禁止额外的查询参数
在一些特殊的使用场景中(可能不是很常见), 你希望限制要接收的查询参数. 可以使用Pydantic模型配置来forbid(禁止)任何extra(额外的)字段:
from typing import Annotated, Literal
from fastapi import FastAPI, Query
from pydantic import BaseModel, Field

app = FastAPI()

class FilterParams(BaseModel):
    model_config = {"extra": "forbid"}
    limit: int = Field(100, gt=0, le=100)
    offset: int = Field(0, ge=0)
    order_by: Literal["created_at", "updated_at"] = "created_at"
    tags: list[str] = []


@app.get("/items/")
async def get_items(filter_query: Annotated[FilterParams, Query()]):
    return filter_query
2
3
4
5
6
7
8
9
10
11
12
13
14
15
16
17
访问http://localhost:8000/items/?item-query=hello, 响应:
{
  "detail": [
    {
      "type": "extra_forbidden",
      "loc": [
        "query",
        "item-query"
      ],
      "msg": "Extra inputs are not permitted",
      "input": "hello"
    }
  ]
}
2
3
4
5
6
7
8
9
10
11
12
13
# 总结
你可以使用Pydantic模型在FastAPI中声明查询参数.
你也可以使用Pydantic模型来声明cookie和headers, 后面会介绍到.
# 请求体-多个参数
既然已经知道了如何使用Path和Query, 下面来了解一下请求体声明的高级用法.
# 混合使用Path, Query和请求体参数
首先, 毫无疑问地, 可以随意地混合使用Path, Query和请求体参数声明, FastAPI会知道如何处理. 还可以通过将默认值设置为None来将请求体参数声明为可选参数:
from typing import Annotated

from fastapi import FastAPI, Path
from pydantic import BaseModel

app = FastAPI()

class Item(BaseModel):
    name: str
    description: str | None = None
    price: float
    tax: float | None = None

@app.put("/items/{item_id}")
async def update_item(
    item_id: Annotated[int, Path(title="The ID of the item to update", ge=0, le=1000)],
    q: str | None = None,
    item: Item | None = None
):
    results = {"item_id": item_id}
    if q:
        results.update({"q": q})
    if item:
        results.update({"item": item})
    return results
2
3
4
5
6
7
8
9
10
11
12
13
14
15
16
17
18
19
20
21
22
23
24
25
请注意, 在这种情况下, 将从请求体获取的item是可选的, 因为它的默认值是None.
# 多个请求体参数
在上面的示例中, 路径操作将期望一个具有Item的属性的JSON请求体, 就像:
{
    "name": "Foo",
    "description": "The pretender",
    "price": 42.0,
    "tax": 3.2
}
2
3
4
5
6
但是你也可以声明多个请求体参数, 例如item和user:
from fastapi import FastAPI
from pydantic import BaseModel

app = FastAPI()

class Item(BaseModel):
    name: str
    description: str | None = None
    price: float
    tax: float | None = None

class User(BaseModel):
    username: str
    full_name: str | None = None

@app.put("/items/{item_id}")
async def update_item(item_id: int, item: Item, user: User):
    results = {
        "item_id": item_id,
        "item": item,
        "user": user
    }
    return results
2
3
4
5
6
7
8
9
10
11
12
13
14
15
16
17
18
19
20
21
22
23
在这种情况下, FastAPI将注意到该函数中有多个请求体参数(两个Pydantic模型参数). 因此, 它将使用参数名称作为请求体中的键(字段名称), 并期望类似于以下内容的请求体:
{
    "item": {
        "name": "Foo",
        "description": "The pretender",
        "price": 42.0,
        "tax": 3.2
    },
    "user": {
        "username": "dave",
        "full_name": "Dave Grohl"
    }
}
2
3
4
5
6
7
8
9
10
11
12
请注意, 即使item的声明方式于之前相同, 但现在它被期望通过item键内嵌在请求体中.
FastAPI将自动对请求中的数据进行转换, 因此item参数将接收指定的内容, user参数也是如此. 它将执行对复合数据的校验, 并且像现在这样为OpenAPI模式和自动化文档对其进行记录.
# 请求体中的单一值
与使用Query和Path为查询参数和路径参数定义额外数据的方式相同, FastAPI提供了一个同等的Body. 例如, 为了扩展先前的模型, 你可能决定除了item和user之外, 还想在同一请求体中具有另一个键importance. 如果你就按原样声明它, 因为它是一个单一值, FastAPI将假定它是一个查询参数. 但是你可以使用Body指示FastAPI将其作为请求体的另一个键进行处理.
from typing import Annotated

from fastapi import FastAPI, Body
from pydantic import BaseModel

app = FastAPI()

class Item(BaseModel):
    name: str
    description: str | None = None
    price: float
    tax: float | None = None

class User(BaseModel):
    username: str
    full_name: str | None = None

@app.put("/items/{item_id}")
async def update_item(item_id: int, item: Item, user: User, importance: Annotated[int, Body()]):
    results = {
        "item_id": item_id,
        "item": item,
        "user": user,
        "importance": importance
    }
    return results
2
3
4
5
6
7
8
9
10
11
12
13
14
15
16
17
18
19
20
21
22
23
24
25
26
在这种情况下, FastAPI将期望像这样的请求体:
{
    "item": {
        "name": "Foo",
        "description": "The pretender",
        "price": 42.0,
        "tax": 3.2
    },
    "user": {
        "username": "dave",
        "full_name": "Dave Grohl"
    },
    "importance": 5
}
2
3
4
5
6
7
8
9
10
11
12
13
同样的, 它将转换数据类型, 校验, 生成文档等.
# 多个请求体参数和查询参数
当然, 除了请求体参数外, 你还可以在任何需要的时候声明额外的查询参数. 由于默认情况下单一值被解释为查询参数, 因此你不必显式地添加Query, 你可以仅执行以下操作: q: str = None 比如:
from typing import Annotated

from fastapi import FastAPI, Body
from pydantic import BaseModel

app = FastAPI()

class Item(BaseModel):
    name: str
    description: str | None = None
    price: float
    tax: float | None = None

class User(BaseModel):
    username: str
    full_name: str | None = None

@app.put("/items/{item_id}")
async def update_item(
    *,
    item_id: int,
    item: Item,
    user: User,
    importance: Annotated[int, Body(gt=0)],
    q: str | None = None,
):
    results = {
        "item_id": item_id,
        "item": item,
        "user": user,
        "importance": importance,
    }
    if q:
        results.update({"q": q})
    return results
2
3
4
5
6
7
8
9
10
11
12
13
14
15
16
17
18
19
20
21
22
23
24
25
26
27
28
29
30
31
32
33
34
35
Body同样具有与Query, Path以及其他后面将看到的类完全相同的额外校验和元数据参数.
# 嵌入单个请求体参数
假设你只有一个来自Pydantic模型Item的请求体参数item. 默认情况下, FastAPI将直接期望这样的请求体. 但是, 如果你希望它期望一个拥有item键并在值中包含模型内容的JSON, 就像在声明额外的请求体参数时的那样, 则可以使用一个特殊的Body参数embed:
from typing import Annotated

from fastapi import Body, FastAPI
from pydantic import BaseModel

app = FastAPI()

class Item(BaseModel):
    name: str
    description: str | None = None
    price: float
    tax: float | None = None


@app.put("/items/{item_id}")
async def update_item(item_id: int, item: Annotated[Item, Body(embed=True)]):
    results = {"item_id": item_id, "item": item}
    return results
2
3
4
5
6
7
8
9
10
11
12
13
14
15
16
17
18
在这种情况下, FastAPI将期望像这样的请求体:
{
    "item": {
        "name": "Foo",
        "description": "The pretender",
        "price": 42.0,
        "tax": 3.2
    }
}
2
3
4
5
6
7
8
而不是:
{
    "name": "Foo",
    "description": "The pretender",
    "price": 42.0,
    "tax": 3.2
}
2
3
4
5
6
# 总结
你可以添加多个请求体参数到路径操作函数中, 即使一个请求只能有一个请求体. 但是FastAPI会处理它, 在函数中为你提供正确的数据, 并在路径操作中校验并记录正确的模式. 你还可以声明将作为请求体的一部分所接收的单一值. 你还可以指示FastAPI在仅声明了一个请求体参数的情况下, 将原本的请求体嵌入到一个键中.
# 请求体-字段
与在路径操作函数中使用Query, Path, Body声明校验与元数据的方式一样, 可以使用Pydantic的Field在Pydantic模型内部声明校验和元数据.
# 导入 Field
首先, 从Pydantic中导入Field:
from typing import Annotated

from fastapi import FastAPI, Body
from pydantic import BaseModel, Field

app = FastAPI()

class Item(BaseModel):
    name: str
    description: str | None = Field(default=None, title="The description of the item", max_length=300)
    price: float = Field(gt=0, description="The price must be greater than zero")
    tax: float | None = None

@app.put("/items/{item_id}")
async def update_item(item_id: int, item: Annotated[Item, Body(embed=True)]):
    results = {"item_id": item_id, "item": item}
    return results
2
3
4
5
6
7
8
9
10
11
12
13
14
15
16
17
警告
注意, 与从fastapi导入Query, Path, Body不同, 要直接从pydantic导入Field.
# 声明模拟属性
然后, 使用Field定义模型的属性, Field的工作方式和Query, Path, Body相同, 参数也相同.
技术细节
实际上, Query, Path都是Params的子类, 而Params类又是Pydantic中FieldInfo的子类. Pydantic的Field返回也是FieldInfo的类实例. Body直接返回的也是FieldInfo的子类的对象. 后文还会介绍一些Body的子类. 注意, 从fastapi导入的Query, Path等对象实际上都是返回特殊类的函数.
注意, 模型属性的类型, 默认值及Field的代码结构与路径操作函数的参数相同, 只不过是用Field替换了Path, Query, Body.
# 添加更多信息
Field, Query, Body等对象里可以声明更多信息, 并且JSON Schema中也会集成这些信息.
# 小结
Pydantic的Field可以为模型属性声明更多校验和元数据. 传递JSON Schema元数据还可以使用更多关键字参数.
# 请求体-嵌套模型
使用FastAPI, 可以定义, 校验, 记录文档并使用任意深度嵌套的模型(归功于Pydantic).
# List字段
你可以将一个属性定义为拥有子元素的类型, 例如Python list:
from fastapi import FastAPI
from pydantic import BaseModel

app = FastAPI()

class Item(BaseModel):
    name: str
    description: str | None = None
    price: float
    tax: float | None = None
    tags: list = []

@app.put("/items/{item_id}")
async def update_item(item_id: int, item: Item):
    results = {"item_id": item_id, "item": item}
    return results
2
3
4
5
6
7
8
9
10
11
12
13
14
15
16
这将使tags成为一个由元素组成的列表. 不过它没有声明每个元素的类型.
# 具有子类型的List字段
但是Python有一种特定的方法来声明具有子类型的列表:
# 从typing导入List
首先, 从Python的标准库typing模块中导入List:
from typing import List, Union

from fastapi import FastAPI
from pydantic import BaseModel

app = FastAPI()

class Item(BaseModel):
    name: str
    description: Union[str, None] = None
    price: float
    tax: Union[float, None] = None
    tags: List[str] = []

@app.put("/items/{item_id}")
async def update_item(item_id: int, item: Item):
    results = {"item_id": item_id, "item": item}
    return results
2
3
4
5
6
7
8
9
10
11
12
13
14
15
16
17
18
# 声明具有子类型的List
要声明具有子类型的类型, 例如list, dict, tuple:
- 从
typing模块导入它们 - 使用方括号
[]将子类型作为类型参数传入
from typing import List

my_list: List[str]
2
3
这完全是用于类型声明的标准Python语法. 对具有子类型的模型属性也使用相同的标准语法. 因此, 在我们的示例中, 我们可以将tags明确地指定为一个字符串列表.
from fastapi import FastAPI
from pydantic import BaseModel

app = FastAPI()

class Item(BaseModel):
    name: str
    description: str | None = None
    price: float
    tax: float | None = None
    tags: list[str] = []

@app.put("/items/{item_id}")
async def update_item(item_id: int, item: Item):
    results = {"item_id": item_id, "item": item}
    return results
2
3
4
5
6
7
8
9
10
11
12
13
14
15
16
# Set类型
但是随后我们考虑了一下, 意识到标签不应该重复, 它们很大可能会是唯一的字符串. Python具有一种特殊的数据类型来保存一组唯一的元素, 即set. 然后我们可以导入Set并将tag声明为一个由str组成的set:
from fastapi import FastAPI
from pydantic import BaseModel

app = FastAPI()


class Item(BaseModel):
    name: str
    description: str | None = None
    price: float
    tax: float | None = None
    tags: set[str] = set()


@app.put("/items/{item_id}")
async def update_item(item_id: int, item: Item):
    results = {"item_id": item_id, "item": item}
    return results
2
3
4
5
6
7
8
9
10
11
12
13
14
15
16
17
18
这样, 即使你收到带有重复数据的请求, 这些数据也会被转换为一组唯一项. 而且, 每当你输出该数据时, 即使源数据有重复, 它们也将作为一组唯一项输出. 并且还会被相应地标注/记录文档.
# 嵌套模型
Pydantic模型的每个属性都具有类型. 但是这个类型本身可以是另一个Pydantic. 因此, 你可以声明拥有特定属性名称, 类型和校验的深度嵌套的JSON对象. 上述这些都可以任意的嵌套.
# 定义子模型
例如, 我们可以定义一个Image模型:
from fastapi import FastAPI
from pydantic import BaseModel

app = FastAPI()

class Image(BaseModel):
    url: str
    name: str

class Item(BaseModel):
    name: str
    description: str | None = None
    price: float
    tax: float | None = None
    tags: set[str] = set()
    image: Image | None = None

@app.put("/items/{item_id}")
async def update_item(item_id: int, item: Item):
    results = {"item_id": item_id, "item": item}
    return results
2
3
4
5
6
7
8
9
10
11
12
13
14
15
16
17
18
19
20
21
# 将子模型用作类型
然后我们可以将其用作一个属性的类型, 这意味着FastAPI将期望类似于以下内容的请求体:
{
    "name": "Foo",
    "description": "The pretender",
    "price": 42.0,
    "tax": 3.2,
    "tags": ["rock", "metal", "bar"],
    "image": {
        "url": "http://example.com/baz.jpg",
        "name": "The Foo live"
    }
}
2
3
4
5
6
7
8
9
10
11
再一次, 仅仅进行这样的声明, 你将通过FastAPI获得:
- 对被嵌入的模型也适用的编辑器支持(自动补全等)
- 数据转换
- 数据校验
- 自动生成文档
# 特殊的类型和校验
除了普通的单一值类型(如str, int, float等)外, 你还可以使用从str继承的更复杂的单一值类型. 要了解所有的可用选项, 请查看关于来自Pydantic的外部类型的文档. 例如, 在Image模型中我们有一个url字段, 我们可以把它声明为Pydantic的HttpUrl, 而不是str:
from fastapi import FastAPI
from pydantic import BaseModel, HttpUrl

app = FastAPI()

class Image(BaseModel):
    url: HttpUrl
    name: str


class Item(BaseModel):
    name: str
    description: str | None = None
    price: float
    tax: float | None = None
    tags: set[str] = set()
    image: Image | None = None


@app.put("/items/{item_id}")
async def update_item(item_id: int, item: Item):
    results = {"item_id": item_id, "item": item}
    return results
2
3
4
5
6
7
8
9
10
11
12
13
14
15
16
17
18
19
20
21
22
23
该字符串将被检查是否为有效的URL, 并在JSON Schema / OpenAPI文档中进行记录.
# 带有一组子模型的属性
你还可以将Pydantic模型用作list, set等的子类型.
from fastapi import FastAPI
from pydantic import BaseModel, HttpUrl

app = FastAPI()

class Image(BaseModel):
    url: HttpUrl
    name: str

class Item(BaseModel):
    name: str
    description: str | None = None
    price: float
    tax: float | None = None
    tags: set[str] = set()
    images: list[Image] | None = None

@app.put("/items/{item_id}")
async def update_item(item_id: int, item: Item):
    results = {"item_id": item_id, "item": item}
    return results
2
3
4
5
6
7
8
9
10
11
12
13
14
15
16
17
18
19
20
21
这将期望(转换, 校验, 记录文档等)下面这样的JSON请求体:
{
    "name": "Foo",
    "description": "The pretender",
    "price": 42.0,
    "tax": 3.2,
    "tags": [
        "rock",
        "metal",
        "bar"
    ],
    "images": [
        {
            "url": "http://example.com/baz.jpg",
            "name": "The Foo live"
        },
        {
            "url": "http://example.com/dave.jpg",
            "name": "The Baz"
        }
    ]
}
2
3
4
5
6
7
8
9
10
11
12
13
14
15
16
17
18
19
20
21
请注意images键现在具有一组image对象是如何发生的.
# 深度嵌套模型
你可以定义任意深度的嵌套模型:
from fastapi import FastAPI
from pydantic import BaseModel, HttpUrl

app = FastAPI()


class Image(BaseModel):
    url: HttpUrl
    name: str


class Item(BaseModel):
    name: str
    description: str | None = None
    price: float
    tax: float | None = None
    tags: set[str] = set()
    images: list[Image] | None = None


class Offer(BaseModel):
    name: str
    description: str | None = None
    price: float
    items: list[Item]


@app.post("/offers/")
async def create_offer(offer: Offer):
    return offer
2
3
4
5
6
7
8
9
10
11
12
13
14
15
16
17
18
19
20
21
22
23
24
25
26
27
28
29
30
请注意offer拥有一组Item而反过来Item又是一个可选的Image列表是如何发生的.
# 纯列表请求体
如果你期望的JSON请求体的最外层是一个JSON array(即Python list), 则可以在路径操作函数的参数中声明此类型, 就像声明Pydantic模型一样: images: List[Image]. 例如:
from fastapi import FastAPI
from pydantic import BaseModel, HttpUrl

app = FastAPI()

class Image(BaseModel):
    url: HttpUrl
    name: str

@app.post("/images/multiple/")
async def create_images(images: list[Image]):
    return images
2
3
4
5
6
7
8
9
10
11
12
# 无处不在的编辑器支持
你可以随处获得编辑器支持. 即使是列表中的元素:
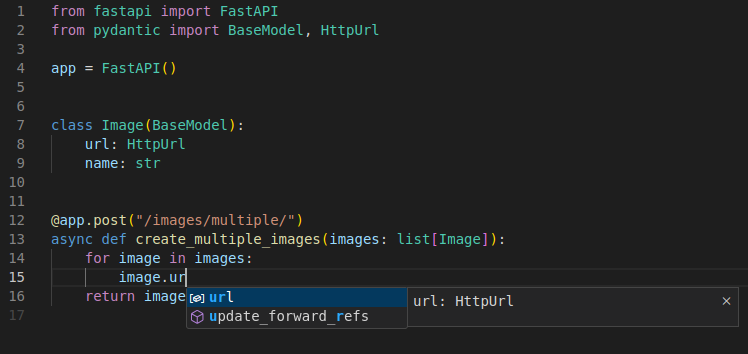
如果你直接使用dict而不是Pydantic模型, 那你将无法获得这种编辑器支持. 但是你根本不必担心这两者, 传入的字典会自动转换, 你的输出也会自动被转换为JSON.
# 任意dict构成的请求体
你也可以将请求体声明为使用某类型的键和其他类型值的dict. 无需实现知道有效的字段/属性(在使用Pydantic模型的场景)名称是什么. 如果你想接收一些尚且未知的键, 这将很有用.
其他有用的场景是当你想要接收其他类型的键时, 例如int. 这也是我们接下来将看到的. 在下面的例子中, 你将接收任意键为int类型并且值为float类型的dict:
from fastapi import FastAPI

app = FastAPI()

@app.post("/index-weights")
async def create_index_weights(weights: dict[int, float]):
    return weights
2
3
4
5
6
7
请记住JSON仅支持str作为键, 但是Pydantic具有自动转换数据的功能. 这意味着, 即使你的API客户端只能将字符串作为键发送, 只要这些字符串内容仅包含整数, Pydantic就会对其进行转换并校验. 然后你接收的名为weights的dict实际上将具有int类型的键和float类型的值.
# 总结
使用FastAPI你可以拥有Pydantic模型提供的极高灵活性, 同时保持代码的简单, 简短和优雅. 而且还具有下列好处:
- 编辑器支持(处处皆可自动补全)
- 数据转换(也被称为解析/序列化)
- 数据校验
- 模式文档
- 自动生成文档
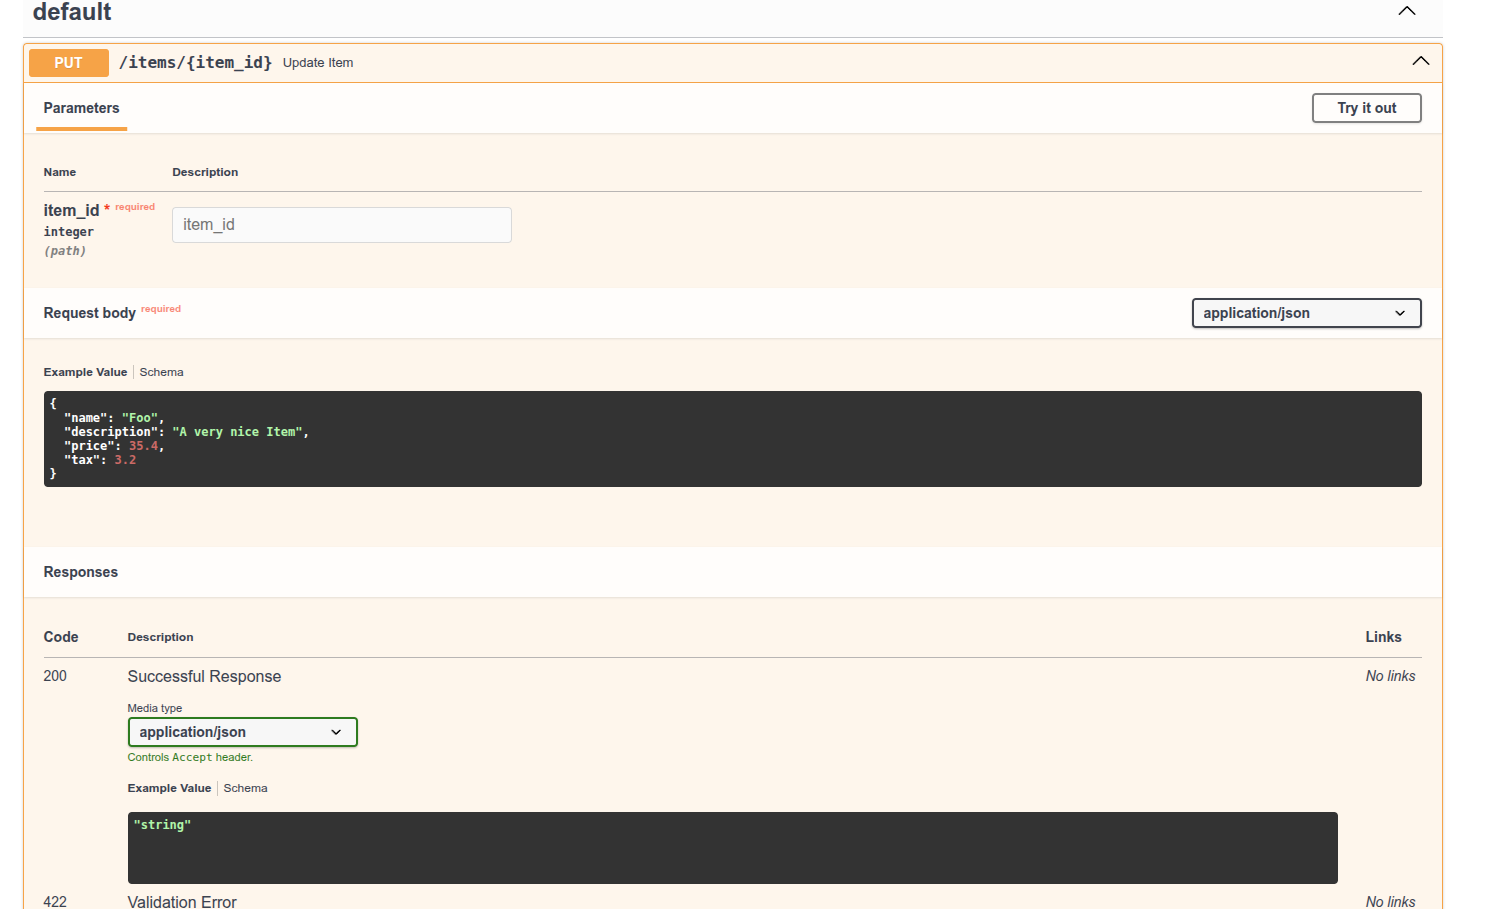
# 模式的额外信息-例子
你可以在JSON模式中定义额外的信息. 一个常见的用例是添加一个将在文档中显示的example. 有几种方法可以声明额外的JSON模式信息.
# Pydantic schema_extra
可以使用Config和schema_extra为Pydantic模型声明一个示例, 如Pydantic文档: 定制Schema中所述:
from fastapi import FastAPI
from pydantic import BaseModel

app = FastAPI()

class Item(BaseModel):
    name: str
    description: str | None = None
    price: float
    tax: float = None

    model_config = {
        "json_schema_extra": {
            "example": {
                "name": "Foo",
                "description": "A very Nice Item.",
                "price": 35.4,
                "tax": 3.2,
            }
        }
    }

@app.put("/items/{item_id}")
async def update_item(item_id: int, item: Item):
    results = {"item_id": item_id, "item": item}
    return results
2
3
4
5
6
7
8
9
10
11
12
13
14
15
16
17
18
19
20
21
22
23
24
25
26
这些额外的信息将按原样添加到输出的JSON模式中.
# Field 的附加参数
在Field, Path, Query, Body和其他你之后将会看到的工厂函数, 你可以为JSON模式声明额外信息, 你也可以通过给工厂函数传递其他的任意参数来给JSON模式声明额外信息, 比如增加example:
from fastapi import FastAPI
from pydantic import BaseModel, Field

app = FastAPI()

class Item(BaseModel):
    name: str = Field(examples=["Foo"])
    description: str | None = Field(default=None, examples=["A very nice Item"])
    price: float = Field(examples=[35.4])
    tax: float | None = Field(default=None, examples=[3.2])


@app.put("/items/{item_id}")
async def update_item(item_id: int, item: Item):
    results = {"item_id": item_id, "item": item}
    return results
2
3
4
5
6
7
8
9
10
11
12
13
14
15
16
请记住, 传递的那些额外参数不会添加任何验证, 只会添加注释, 用于文档目的.
# Body 额外参数
你可以通过传递额外信息给Field同样的方式操作Path, Query, Body等. 比如, 你可以将请求体的一个example传递给Body:
from typing import Annotated

from fastapi import Body, FastAPI
from pydantic import BaseModel

app = FastAPI()

class Item(BaseModel):
    name: str
    description: str | None = None
    price: float
    tax: float | None = None

@app.put("/items/{item_id}")
async def update_item(
    item_id: int,
    item: Annotated[Item, Body(
        examples=[
            {
                "name": "Foo",
                "description": "A very nice Item",
                "price": 35.4,
                "tax": 3.2
            }
        ]
    )]
):
    results = {"item_id": item_id, "item": item}
    return results
2
3
4
5
6
7
8
9
10
11
12
13
14
15
16
17
18
19
20
21
22
23
24
25
26
27
28
29
# 文档UI中的例子
使用上面的任何方法, 它在/docs中看起来都是这样的:
# 技术细节
from typing import Annotated

from fastapi import Body, FastAPI
from pydantic import BaseModel

app = FastAPI()

class Item(BaseModel):
    name: str
    description: str | None = None
    price: float
    tax: float | None = None

@app.put("/items/{item_id}")
async def update_item(
    item_id: int,
    item: Annotated[Item, Body(
        example=Item(
            name="Foo",
            description="A very nice Item",
            price=35.4,
            tax=3.2
        ),
        examples=[
            {
                "name": "Foo",
                "description": "A very nice Item",
                "price": 35.4,
                "tax": 3.3
            }
        ]
    )]
):
    results = {"item_id": item_id, "item": item}
    return results
2
3
4
5
6
7
8
9
10
11
12
13
14
15
16
17
18
19
20
21
22
23
24
25
26
27
28
29
30
31
32
33
34
35
关于example和examples. JSON Schema在最新的一个版本中定义了一个字段examples, 但是OpenAPI基于之前的一个旧版JSON Schema, 并没有examples. 所以OpenAPI为了相似的目的定义了自己的example(使用example, 而不是examples), 这也是文档UI所使用的(使用Swagger UI). 所以, 虽然example不是JSON Schema的一部分, 但它是OpenAPI的一部分, 这将被文档UI使用.
# 其他信息
同样的方法, 也可以添加自己的额外信息, 这些信息将被添加到每个模型的JSON模式中, 例如定制前端用户界面, 等等.
# 额外数据类型
到目前为止, 一直在使用常见的数据类型, 如:
intfloatstrbool
但是也可以使用更复杂的数据类型. 而且仍然会拥有现在已经看到的相同的特性:
- 很棒的编辑器支持
- 传入请求的数据转换
- 响应数据转换
- 数据验证
- 自动补全和文档
# 其他数据类型
下面是一些你可以使用的其他数据类型:
UUID:- 一种标准的"通用唯一标识符", 在许多数据库和系统中用作ID.
- 在请求和响应中将以
str表示.
datetime.datetime:- 一个Python
datetime.datetime. - 在请求和响应中将表示为ISO 8601格式的
str, 比如:2008-09-15T15:53:00+05:00.
- 一个Python
datetime.date:- Python
datetime.date. - 在请求和响应中将表示为ISO 8601格式的
str, 比如:2008-09-15.
- Python
datetime.time:- 一个Python
datetime.time. - 在请求和响应中将表示为IOS 8601格式的
str, 比如:14:23:55.003.
- 一个Python
datetime.timedelta:- 一个Python
datetime.timedelta. - 在请求和响应中将表示为
float代表总秒数. - Pydantic也允许将其表示为"ISO 8610 时间差异编码", 查看文档了解更多信息.
- 一个Python
frozenset:- 在请求和响应中, 作为
set对待:- 在请求中, 列表将被读取, 消除重复, 并将其转换为一个
set. - 在响应中
set将被转换为list. - 产生的模式将指定那些
set的值是唯一的(使用JSON模式的uniqueItem).
- 在请求中, 列表将被读取, 消除重复, 并将其转换为一个
- 在请求和响应中, 作为
bytes:- 标准的Python
bytes. - 在请求和响应中被当做
str处理. - 生成的模式将指定这个
str是binary"格式".
- 标准的Python
Decimal:- 标准的Python
Decimal. - 在请求和响应中被当做
float一样处理.
- 标准的Python
- 可以在这里检查所有有效的Pydantic数据类型: Pydantic data types.
# 例子
下面是一个路径操作的实例, 其中的参数使用了上面的一些类型.
from datetime import datetime, time, timedelta
from typing import Annotated
from uuid import UUID

from fastapi import FastAPI, Body

app = FastAPI()

@app.put("/items/{item_id}")
async def read_items(
    item_id: UUID,
    start_datetime: Annotated[datetime, Body()],
    end_datetime: Annotated[datetime, Body()],
    process_after: Annotated[timedelta, Body()],
    repeat_at: Annotated[time | None, Body()] = None,
):
    start_process = start_datetime + process_after
    duration = end_datetime - start_process
    return {
        "item_id": item_id,
        "start_datetime": start_datetime,
        "end_datetime": end_datetime,
        "process_after": process_after,
        "repeat_at": repeat_at,
        "start_process": start_process,
        "duration": duration,
    }
2
3
4
5
6
7
8
9
10
11
12
13
14
15
16
17
18
19
20
21
22
23
24
25
26
27
注意, 函数内的参数有原生的数据类型, 你可以, 例如, 执行正常的日期操作.
# Cookie 参数
定义Cookie参数与定义Query和Path参数一样.
# 导入 Cookie
首先, 导入Cookie:
from typing import Annotated

from fastapi import Cookie, FastAPI

app = FastAPI()

@app.get("/items/")
async def read_items(ads_id: Annotated[str | None, Cookie()] = None):
    return {"ads_id": ads_id}
2
3
4
5
6
7
8
9
# 声明 Cookie 参数
声明Cookie参数的方式与声明Query和Path参数相同. 第一个值是默认值, 还可以传递所有验证参数或注释参数.
Cookie, Path, Query是兄弟类, 都继承自共用的Param类. 注意, 从fastapi导入的Query, Path, Cookie等对象, 实际上是返回特殊类的函数。必须使用Cookie声明cookie参数, 否则该参数会被解释为查询参数.
# 小结
使用Cookie声明cookie参数的方式与Query和Path相同.
# Header 参数
定义Header参数的方式与定义Query, Path, Cookie参数相同.
# 导入 Header
from typing import Annotated
from fastapi import FastAPI, Header

app = FastAPI()

@app.get("/items/")
async def read_items(user_agent: Annotated[str | None, Header()] = None):
    return {"user_agent": user_agent}
2
3
4
5
6
7
8
# 声明 Header 参数
然后, 使用和Path, Query, Cookie一样的结构定义header参数. 第一个值是默认值, 还可以传递所有验证参数或注释参数.
Header是Path, Query, Cookie的兄弟类, 都继承自共用的Param类. 注意, 从fastapi导入的Query, Path, Header等对象, 实际上是返回特殊类的函数. 必须使用Header声明header参数, 否则该参数会被解释为查询参数.
# 自动转换
Header比Path, Query和Cookie提供了更多功能. 大部分标准请求头用连字符分隔, 即减号(-). 但是user-agent这样的变量在Python中是无效的. 因此, 默认情况下, Header把参数名中的字符由下划线(_)改为连字符(-)来提取并存档请求头. 同时, HTTP的请求头不区分大小写, 可以使用Python标准样式(即snake_case)进行声明. 因此, 可以像在Python代码中一样使用user_agent, 无需把首字母大写为User_Agent等形式. 如需禁用下划线自动转换为连字符, 可以把Header的convert_underscores参数设置为False:
from typing import Annotated

from fastapi import FastAPI, Header

app = FastAPI()

@app.get("/items/")
async def read_items(
    strange_header: Annotated[str | None, Header(convert_underscores=False)] = None,
):
    return {"strange_header": strange_header}
2
3
4
5
6
7
8
9
10
11
注意, 使用convert_underscores = False要慎重, 有些HTTP代理和服务器不支持使用带有下划线的请求头.
# 重复的请求头
有时, 可能需要接收重复的请求头. 即同一个请求头有多个值. 类型声明中可以使用list定义多个请求头. 使用Python list可以接收重复请求头所有的值. 例如, 声明X-Token多次出现的请求头, 可以写成这样:
from typing import Annotated
from fastapi import FastAPI, Header

app = FastAPI()


@app.get("/items/")
async def read_items(x_token: Annotated[list[str], Header()] = None):
    return {"X-Token values": x_token}
2
3
4
5
6
7
8
9
与路径操作通信时, 以下面的方式发送两个HTTP请求头:
X-Token: foo
X-Token: bar
2
响应结果是:
{
    "X-Token values": [
        "bar",
        "foo"
    ]
}
2
3
4
5
6
# 小结
使用Header声明请求头的方式与Query, Path, Cookie相同. 不用担心变量中的下划线, FastAPI可以自动转换.
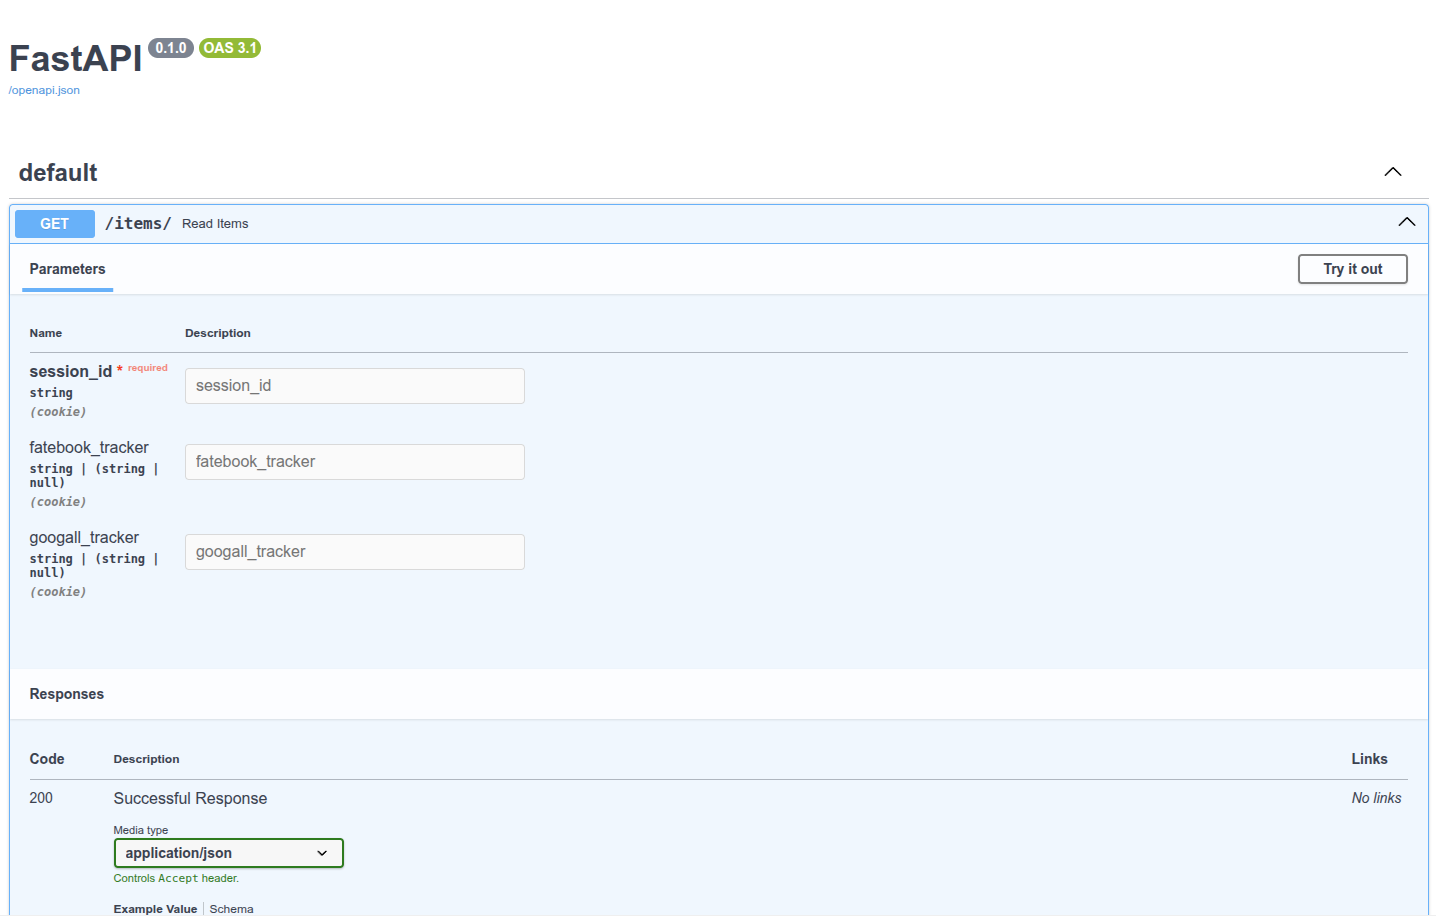
# Cookie 参数模型
如果您有一组相关的cookie, 你可以创建一个Pydantic模型来声明它们. 这将允许你在多个地方能够重用模型, 并且可以一次性声明所有参数的验证方式和元数据.
自FastAPI版本0.115.0起支持此功能. 此技术同样适用于Query, Cookie和Header.
# 带有Pydantic模型的Cookie
在Pydantic模型中声明所需的cookie参数, 然后将参数声明为Cookie:
from typing import Annotated
from fastapi import FastAPI, Cookie
from pydantic import BaseModel

app = FastAPI()


class Cookies(BaseModel):
    session_id: str
    fatebook_tracker: str | None = None
    googall_tracker: str | None = None


@app.get("/items/")
async def read_items(cookies: Annotated[Cookies, Cookie()]):
    return cookies
2
3
4
5
6
7
8
9
10
11
12
13
14
15
16
FastAPI将从请求中接收到的cookie中提取出每个字段的数据, 并提供你定义的Pydantic模型.
# 查看文档
请记住, 由于浏览器以特殊方式处理cookie, 并在后台进行操作, 因此它们不会轻易允许JavaScript访问这些cookie. 如果你访问/docs的API文档UI, 你将能够查看你路径操作的cookie文档. 但是即使你填写数据并点击执行, 由于文档界面使用JavaScript, cookie将不会被发送, 而你会看到一条错误消息, 就好像没有输入任何值一样.
# 禁止额外的Cookie
在某些特殊使用情况下(可能并不常见), 你可能希望限制你想要接收的cookie. 你的API可以控制自己的cookie同意. 你可以使用Pydantic的模型配置来禁止forbid任何额外的extra字段:
from typing import Annotated, Union
from fastapi import FastAPI, Cookie
from pydantic import BaseModel

app = FastAPI()


class Cookies(BaseModel):
    model_config = {"extra": "forbid"}
    session_id: str
    fatebook_tracker: Union[str, None] = None
    googall_tracker: Union[str, None] = None


@app.get("/items/")
async def read_items(cookies: Annotated[Cookies, Cookie()]):
    return cookies
2
3
4
5
6
7
8
9
10
11
12
13
14
15
16
17
如果客户发送一些额外的cookie, 它们将接收到错误响应. 可怜的cookie通知条, 费尽心思为了获得你的同意, 却被API拒绝了. 例如, 如果客户端尝试发送一个值为good-list-please的santa_trackercookie, 客户端将收到一个错误响应, 告知他们santa_trackercookie是不允许的.
{
    "detail": [
        {
            "type": "extra_forbidden",
            "loc": ["cookie", "santa_tracker"],
            "msg": "Extra inputs are not permitted",
            "input": "good-list-please",
        }
    ]
}
2
3
4
5
6
7
8
9
10
# 总结
可以使用Pydantic模型在FastAPI中声明cookie.
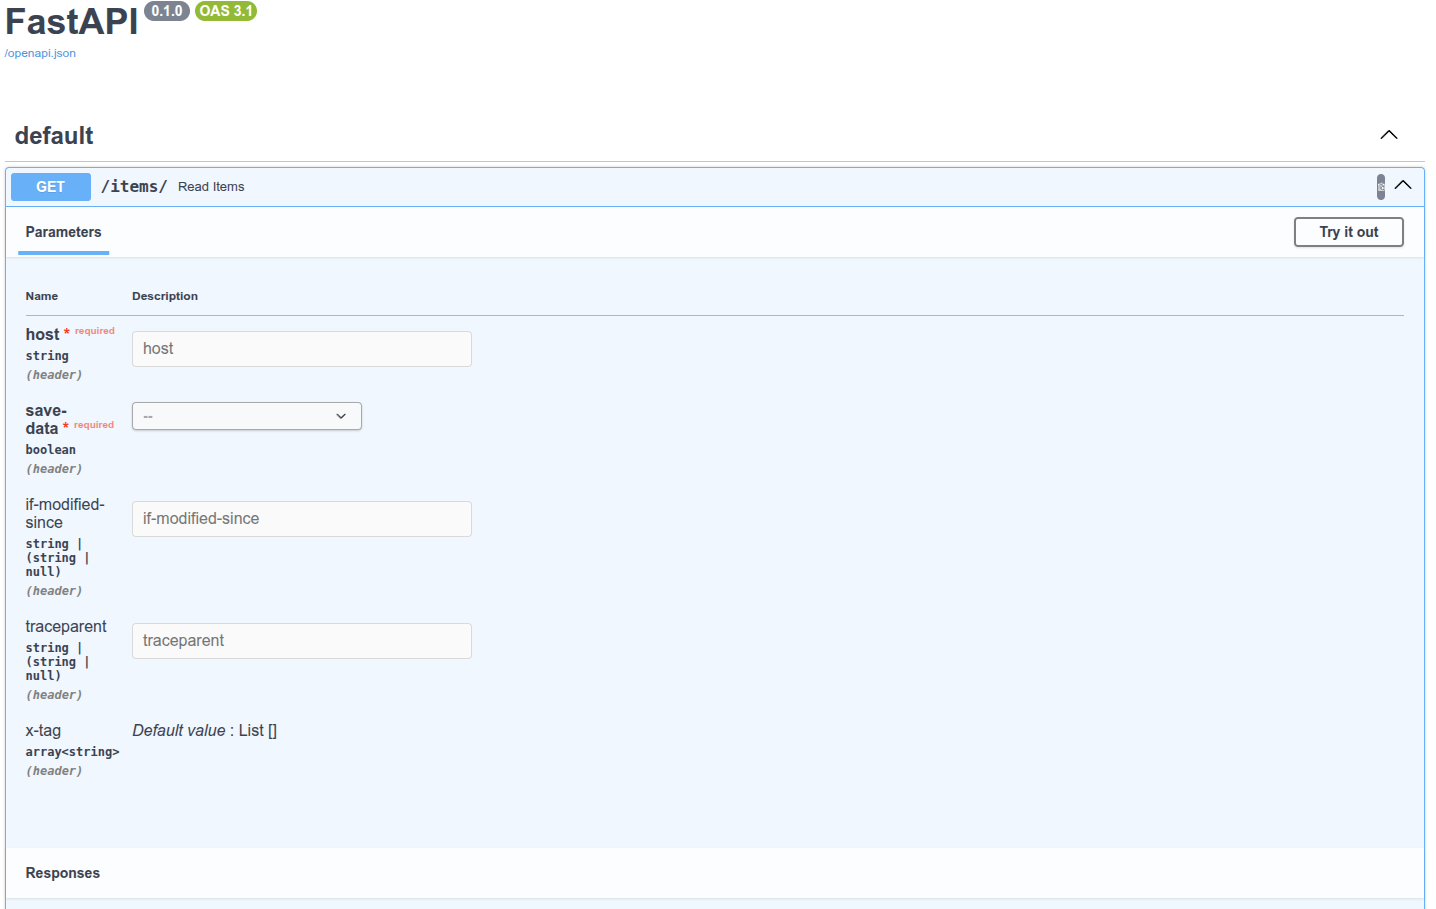
# Header 参数模型
如果你有一组相关的header参数, 可以创建一个Pydantic模型来声明它们. 这将允许你在多个地方能够重用模型, 并且可以一次性声明所有参数的验证和元数据.
自FastAPI版本0.115.0起支持此功能.
# 使用Pydantic模型的Header参数
在Pydantic模型中声明所需的header参数, 然后将参数声明为Header:
from typing import Annotated
from fastapi import FastAPI, Header
from pydantic import BaseModel

app = FastAPI()


class CommonHeaders(BaseModel):
    host: str
    save_data: bool
    if_modified_since: str | None = None
    traceparent: str | None = None
    x_tag: list[str] = []


@app.get("/items/")
async def read_items(headers: Annotated[CommonHeaders, Header()]):
    return headers
2
3
4
5
6
7
8
9
10
11
12
13
14
15
16
17
18
FastAPI将从请求中接收到的headers中提取出每个字段的数据, 并提供你定义的Pydantic模型.
# 查看文档
# 禁止额外的Headers
在某些特殊使用情况下(可能并不常见), 你可能希望限制你想要接收的headers. 你可以使用Pydantic的模型配置来禁止forbid任何额外的extra字段:
from typing import Annotated
from fastapi import FastAPI, Header
from pydantic import BaseModel

app = FastAPI()


class CommonHeaders(BaseModel):
    model_config = {"extra": "forbid"}
    host: str
    save_data: bool
    if_modified_since: str | None = None
    traceparent: str | None = None
    x_tag: list[str] = []


@app.get("/items/")
async def read_items(headers: Annotated[CommonHeaders, Header()]):
    return headers
2
3
4
5
6
7
8
9
10
11
12
13
14
15
16
17
18
19
如果客户端尝试发送一些额外的headers, 他们将收到错误响应. 例如, 如果客户端尝试发送一个值为plumbus的toolheader, 客户端将接收到一个错误响应, 告知他们header参数tool时不允许的.
{
    "detail": [
        {
            "type": "extra_forbidden",
            "loc": ["header", "tool"],
            "msg": "Extra inputs are not permitted",
            "input": "plumbus",
        }
    ]
}
2
3
4
5
6
7
8
9
10
# 总结
可以使用Pydantic模型在FastAPI中声明headers.
# 响应模型
你可以在任意的路径操作中使用response_model参数来声明用于响应的模型:
@app.get()@app.post()@app.put()@app.delete()- 等等
from typing import Any

from fastapi import FastAPI
from pydantic import BaseModel

app = FastAPI()


class Item(BaseModel):
    name: str
    description: str | None = None
    price: float
    tax: float | None = None
    tags: list[str] = []


@app.post("/items/", response_model=Item)
async def create_item(item: Item) -> Item:
    return item


@app.get("/items/", response_model=list[Item])
async def get_items() -> list[Item]:
    return [
        Item(
            name="Sample Item 1",
            description="A sample item",
            price=10.0,
            tax=1.0,
            tags=["sample", "item"],
        ),
        Item(
            name="Sample Item 2",
            description="Another sample item",
            price=20.0,
            tax=2.0,
            tags=["sample", "item"],
        ),
    ]
2
3
4
5
6
7
8
9
10
11
12
13
14
15
16
17
18
19
20
21
22
23
24
25
26
27
28
29
30
31
32
33
34
35
36
37
38
39
注意, response_model是装饰器方法(get, post等)的一个参数. 不像之前的所有参数和请求体, 它不属于路径操作函数.
它接收的类型与你将为Pydantic模型属性所声明的类型相同, 因此它可以是一个Pydantic模型, 但也可以是一个由Pydantic模型组成的list, 例如List[Item].
FastAPI将使用此response_model来:
- 将输出数据转换为其声明的类型.
- 校验数据.
- 在OpenAPI的路径操作中为响应添加一个JSON Schema.
- 并在自动生成文档系统中使用.
但最重要的是:
- 会将输出数据限制在该模型定义内. 下面我们会看到这一点有多重要.
技术细节
响应模型在参数中被声明, 而不是作为函数返回类型的注解, 这是因为路径函数可能不会真正返回该响应模型, 而是返回一个dict, 数据库对象或其他模型, 然后再使用response_model来执行字段约束和序列化.
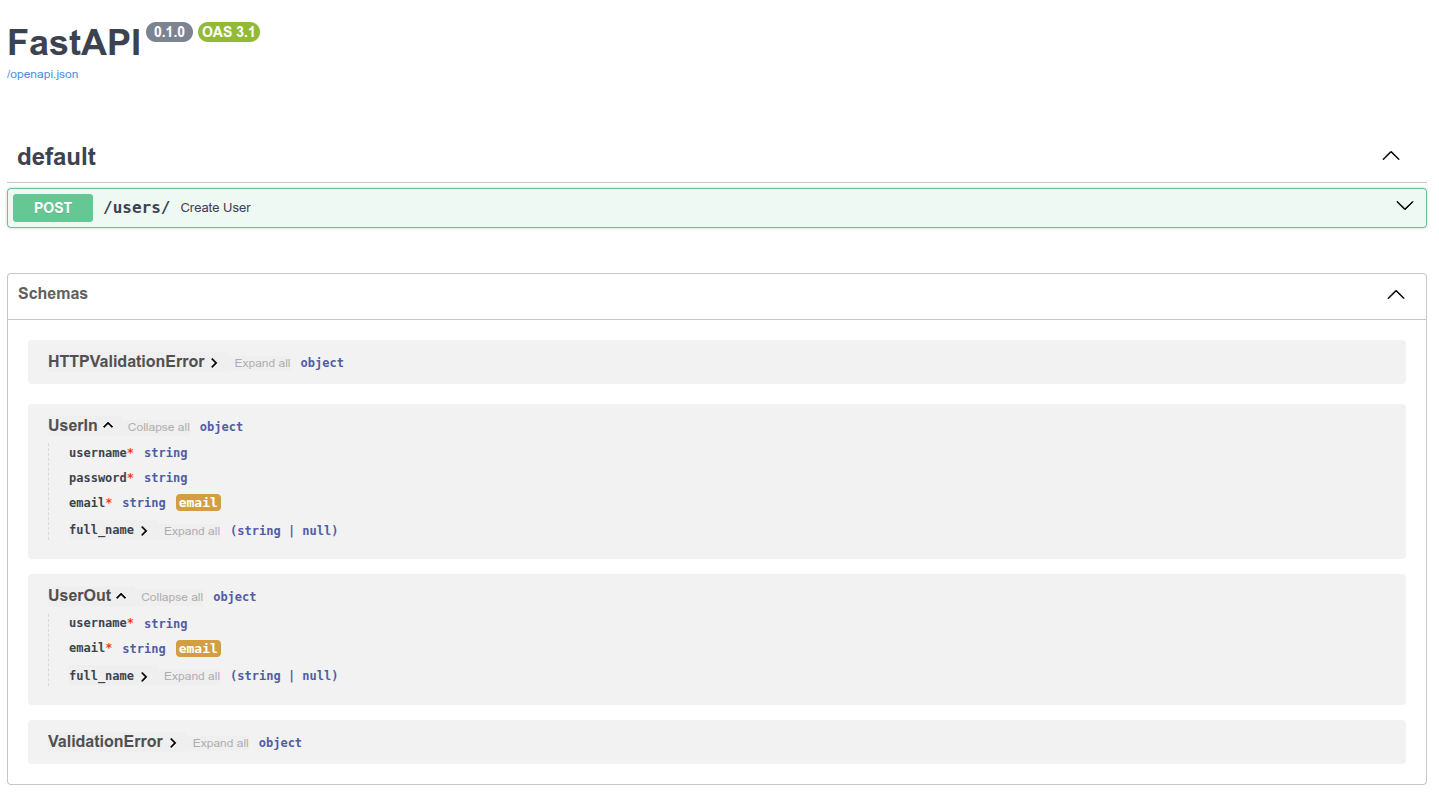
# 返回与输入相同的数据
现在声明一个UserIn模型, 它将包含一个明文密码属性.
from typing import Union

from fastapi import FastAPI
from pydantic import BaseModel, EmailStr

app = FastAPI()


class UserIn(BaseModel):
    username: str
    password: str
    email: EmailStr
    full_name: Union[str, None] = None


@app.post("/users/")
def create_user(user: UserIn) -> UserIn:
    return user
2
3
4
5
6
7
8
9
10
11
12
13
14
15
16
17
18
上面使用此模型声明输入数据, 并使用同一模型声明输出数据. 现在, 每当浏览器使用一个密码创建用户时, API都会在响应中返回相同的密码. 在这个案例中, 这可能不算是问题, 因为用户自己正在发送密码. 但是, 如果我们在其他路径操作中使用相同的模型, 则可能会将用户的密码发送给每个客户端.
永远不要存储用户的明文密码, 也不要再响应中发送密码.
# 添加输出模型
相反, 可以创建一个由明文密码的输入模型和一个没有明文密码的输出模型:
from typing import Any

from fastapi import FastAPI
from pydantic import BaseModel, EmailStr

app = FastAPI()


class UserIn(BaseModel):
    username: str
    password: str
    email: EmailStr
    full_name: str | None = None


class UserOut(BaseModel):
    username: str
    email: EmailStr
    full_name: str | None = None


@app.post("/users/", response_model=UserOut)
def create_user(user: UserIn) -> Any:
    return user
2
3
4
5
6
7
8
9
10
11
12
13
14
15
16
17
18
19
20
21
22
23
24
这样, 即便我们的路径操作函数将会返回包含密码的相同输入用户, 但我们已经将response_model声明为了不包含密码的UserOut模型. 因此, FastAPI将会负责过滤掉未在输出模型中声明的所有数据(使用Pydantic).
# 在文档中查看
当查看自动化文档时, 可以检查输入模型和输出模型是否都具有自己的JSON Schema, 并且两种模型都将在交互式API文档中使用.
# 响应模型编码参数
你的响应模型可以具有默认值, 例如:
from typing import List, Union

from fastapi import FastAPI
from pydantic import BaseModel

app = FastAPI()


class Item(BaseModel):
    name: str
    description: Union[str, None] = None
    price: float
    tax: float = 10.5
    tags: List[str] = []


items = {
    "foo": {"name": "Foo", "price": 50.2},
    "bar": {"name": "Bar", "description": "The bartenders", "price": 62, "tax": 20.2},
    "baz": {"name": "Baz", "description": None, "price": 50.2, "tax": 10.5, "tags": []},
}


@app.get("/items/{item_id}", response_model=Item, response_model_exclude_unset=True)
async def read_item(item_id: str):
    return items[item_id]
2
3
4
5
6
7
8
9
10
11
12
13
14
15
16
17
18
19
20
21
22
23
24
25
26
description: Union[str, None] = None具有默认值None.tax: float = 10.5具有默认值10.5.tags: List[str] = []具有一个空列表作为默认值:[].
但如果它们并没有存储实际的值, 你可能想从结果中忽略它们的默认值. 举个例子, 当你在NoSQL数据库中保存了具有许多可选属性的模型, 但你又不想发送充满默认值的很长的JSON响应.
# 使用response_model_exclude_unset参数
你可以设置路径操作装饰器的response_model_exclude_unset=True参数, 然后响应中将不会包含那些默认值, 而是仅有实际设置的值. 因此如果你向路径操作发送ID为foo的商品的请求, 则响应(不包括默认值)将为:
{
    "name": "Foo",
    "price": 50.2
}
2
3
4
FastAPI通过Pydantic模型的.dict()配合该方法的exclude_unset参数来实现此功能.
还可以使用:
response_model_exclude_defaults=Trueresponse_model_exclude_none=True参考Pydantic文档中对exclude_defaults和exclude_none的描述.
# 默认值字段有实际值的数据
但是, 如果你的数据在具有默认值的模型字段中有实际的值, 例如ID为bar的项:
{
    "name": "Bar",
    "description": "The bartenders",
    "price": 62,
    "tax": 20.2
}
2
3
4
5
6
这些值将包含在响应中.
# 具有与默认值相同值的数据
如果数据具有与默认值相同的值, 例如ID为baz的项:
{
    "name": "Baz",
    "description": None,
    "price": 50.2,
    "tax": 10.5,
    "tags": []
}
2
3
4
5
6
7
即使description, tax和tags具有与默认值相同的值, FastAPI足够聪明(实际上是Pydantic足够聪明)去认识到这一点, 它们的值被显式地所设定(而不是取自默认值). 因此, 它们将包含在JSON响应中.
请注意默认值可以是任何值, 而不仅是None. 它们可以是一个列表[], 一个值为10.5的float, 等等.
# response_model_include和response_model_exclude
你还可以使用路径操作装饰器的response_model_include和response_model_exclude参数. 它们接收一个由属性名称str组成的set来包含(忽略其他的)或者排除(包含其他的)这些属性.
如果你只有一个Pydantic模型, 并且想要从输出中移除一些数据, 则可以使用这种快捷方法.
但是依然建议你使用上面提到的主意, 使用多个类而不是这些参数. 这是因为即使使用response_model_include或response_model_exclude来省略某些属性, 在应用程序的OpenAPI定义(和文档)中生成的JSON Schema仍将是完整的模型. 这也适用于作用类似的response_model_by_alias.
from typing import Union

from fastapi import FastAPI
from pydantic import BaseModel

app = FastAPI()


class Item(BaseModel):
    name: str
    description: Union[str, None] = None
    price: float
    tax: float = 10.5


items = {
    "foo": {"name": "Foo", "price": 50.2},
    "bar": {"name": "Bar", "description": "The bartenders", "price": 62, "tax": 20.2},
    "baz": {"name": "Baz", "description": "There goes my baz", "price": 50.2, "tax": 10.5},
}


@app.get(
    "/items/{item_id}",
    response_model=Item,
    response_model_include={"name", "description"},
)
async def read_item(item_id: str):
    return items[item_id]


@app.get("/items/{item_id}/public", response_model=Item, response_model_exclude={"tax"})
async def read_item_public_data(item_id: str):
    return items[item_id]
2
3
4
5
6
7
8
9
10
11
12
13
14
15
16
17
18
19
20
21
22
23
24
25
26
27
28
29
30
31
32
33
34
{"name", "description"}语法创建一个具有这两个值的set. 等同于set(["name", "description"]).
# 使用list而不是set
如果你忘记使用set而是使用list或tuple, FastAPI仍会将其转换为set并且正常工作.
from typing import Union

from fastapi import FastAPI
from pydantic import BaseModel

app = FastAPI()


class Item(BaseModel):
    name: str
    description: Union[str, None] = None
    price: float
    tax: float = 10.5


items = {
    "foo": {"name": "Foo", "price": 50.2},
    "bar": {"name": "Bar", "description": "The bartenders", "price": 62, "tax": 20.2},
    "baz": {
        "name": "Baz",
        "description": "There goes my baz",
        "price": 50.2,
        "tax": 10.5,
    },
}


@app.get(
    "/items/{item_id}",
    response_model=Item,
    response_model_include=["name", "description"],
)
async def read_item(item_id: str):
    return items[item_id]


@app.get("/items/{item_id}/public", response_model=Item, response_model_exclude=["tax"])
async def read_item_public_data(item_id: str):
    return items[item_id]
2
3
4
5
6
7
8
9
10
11
12
13
14
15
16
17
18
19
20
21
22
23
24
25
26
27
28
29
30
31
32
33
34
35
36
37
38
39
# 总结
使用路径操作装饰器的response_model参数来定义响应模型, 特别是确保私有数据被过滤掉. 使用response_model_exclude_unset来仅返回显式设定的值.
# 更多模型
书接上文, 多个关联模型这种情况很常见. 特别是用户模型, 因为:
- 输入模型应该含密码
- 输出模型不应含密码
- 数据库模型需要加密的密码
千万不要存储用户的明文密码. 始终存储可以进行验证的安全哈希值. 如果不了解这些方面的知识, 参阅安全性中的章节, 了解什么是密码哈希.
# 多个模型
下面的代码展示了不同模型处理密码字段的方式, 及使用位置的大致思路:
from fastapi import FastAPI
from pydantic import BaseModel, EmailStr

app = FastAPI()


class UserIn(BaseModel):
    username: str
    password: str
    email: EmailStr
    full_name: str | None = None


class UserOut(BaseModel):
    username: str
    email: EmailStr
    full_name: str | None = None


class UserInDB(UserIn):
    username: str
    hashed_password: str
    email: EmailStr
    full_name: str | None = None


def fake_password_header(raw_password: str):
    return "supersecret" + raw_password


def fake_save_user(user_in: UserIn):
    hashed_password = fake_password_header(user_in.password)
    user_in_db = UserInDB(**user_in.model_dump(), hashed_password=hashed_password)
    print("User saved! ..not really")
    return user_in_db


@app.post("/users/", response_model=UserOut)
async def create_user(user_in: UserIn):
    user_saved = fake_save_user(user_in)
    return user_saved
2
3
4
5
6
7
8
9
10
11
12
13
14
15
16
17
18
19
20
21
22
23
24
25
26
27
28
29
30
31
32
33
34
35
36
37
38
39
40
41
# **user_in.dict()简介
# Pydantic的.dict()
**user_in.model_dump().
Pydantic的.dict(), user_in是类UserIn的Pydantic模型. Pydantic模型至此.dict()方法, 能返回包含模型数据的字典. 因此, 如果使用如下方式创建Pydantic对象user_in:
user_in = UserIn(username="john", password="secret", email="john.doe@example.com")
就能以如下方式调用:
user_dict = user_in.dict()
现在, 变量user_dict中的就是包含数据的字典(变量user_dict是字典, 不是Pydantic模型对象). 以如下方式调用: print(user_dict), 输出的就是Python字典:
{
    'username': 'john',
    'password': 'secret',
    'email': 'john.doe@example.com',
    'full_name': None,
}
2
3
4
5
6
# 解包dict
把字典user_dict以**user_dict形式传递给函数(或类), Python会执行解包操作. 它会把user_dict的键和值作为关键字参数直接传递. 因此, 接着上面的user_dict继续编写如下代码: UserInDB(**user_dict), 就会生成如下结果:
UserInDB(
    username="john",
    password="secret",
    email="john.doe@example.com",
    full_name=None,
)
2
3
4
5
6
或更精准, 直接把可能会用到的内容与user_dict一起使用:
UserInDB(
    username = user_dict["username"],
    password = user_dict["password"],
    email = user_dict["email"],
    full_name = user_dict["full_name"],
)
2
3
4
5
6
# 用其它模型中的内容生成Pydantic模型
上例中, 从user_in.dict()中得到了user_dict, 下面的代码:
user_dict = user_in.dict()
UserInDB(**user_dict)
2
等效于: UserInDB(**user_in.dict())
因为user_in.dict()是字典, 在传递给UserInDB时, 把**加在user_in.dict()前, 可以让Python进行解包. 这样, 就可以用其它Pydantic模型中的数据生成Pydantic模型.
# 解包dict和更多关键字
接下来, 继续添加关键字参数hashed_password=hashed_password, 例如: UserInDB(**user_in.dict(), hashed_password=hashed_password), 输出结果如下:
UserInDB(
    username = user_dict["username"],
    password = user_dict["password"],
    email = user_dict["email"],
    full_name = user_dict["full_name"],
    hashed_password = hashed_password,
)
2
3
4
5
6
7
警告
辅助的附加函数只是为了演示可能的数据流, 但它们显然不能提供任何真正的安全机制.
# 减少重复
FastAPI的核心思想就是减少代码重复. 代码重复会导致BUG, 安全问题, 代码失步等问题(更新了某个位置的代码, 但没有同步更新其它位置的代码). 上面的这些模型共享了大量数据, 拥有重复的属性名和类型. FastAPI可以做得更好. 声明UserBase模型作为其他模型的基类, 然后, 用类衍生出继承其属性(类型声明, 验证等)的子类. 所有数据转换, 校验, 文档等功能仍将正常运行. 这样, 就可以仅声明模型之间的差异部分(具有明文的password, 具有hashed_password以及不包括密码). 通过这种方式, 可以只声明模型之间的区别(分别包含明文密码, 哈希密码, 以及无密码的模型).
from fastapi import FastAPI
from pydantic import BaseModel, EmailStr

app = FastAPI()


class UserBase(BaseModel):
    username: str
    email: EmailStr
    full_name: str | None = None


class UserIn(UserBase):
    password: str


class UserOut(UserBase):
    pass


class UserInDB(UserIn):
    hashed_password: str


def fake_password_header(raw_password: str):
    return "supersecret" + raw_password


def fake_save_user(user_in: UserIn):
    hashed_password = fake_password_header(user_in.password)
    user_in_db = UserInDB(**user_in.model_dump(), hashed_password=hashed_password)
    print("User saved! ..not really")
    return user_in_db


@app.post("/users/", response_model=UserOut)
async def create_user(user_in: UserIn):
    user_saved = fake_save_user(user_in)
    return user_saved
2
3
4
5
6
7
8
9
10
11
12
13
14
15
16
17
18
19
20
21
22
23
24
25
26
27
28
29
30
31
32
33
34
35
36
37
38
39
# Union或者AnyOf
响应可以声明为两种类型的Union类型, 即该响应可以是两种类型中的任意类型. 在OpenAPI中可以使用anyOf定义. 为此, 请使用Python标准类型提示typing.Union.
定义Union类型时, 要把详细的类型写在前面, 然后是不太详细的类型. 下例中, 更详细的PlaneItem位于Union[PlaneItem, CarItem]中的CarItem之前.
from typing import Union

from fastapi import FastAPI
from pydantic import BaseModel

app = FastAPI()


class BaseItem(BaseModel):
    description: str
    type: str


class CarItem(BaseItem):
    type: str = "car"


class PlaneItem(BaseItem):
    type: str = "plane"
    size: int


items = {
    "item1": {"description": "All my friends drive a low rider", "type": "car"},
    "item2": {
        "description": "Music is my aeroplane, it's my aeroplane",
        "type": "plane",
        "size": 5,
    },
}


@app.get("/items/{item_id}", response_model=Union[PlaneItem, CarItem])
async def get_item(item_id: str):
    return items[item_id]
2
3
4
5
6
7
8
9
10
11
12
13
14
15
16
17
18
19
20
21
22
23
24
25
26
27
28
29
30
31
32
33
34
35
# 模型列表
使用同样的方式也可以声明由对象列表构成的响应. 为此, 请使用标准的Pythontyping.List:
from typing import List

from fastapi import FastAPI
from pydantic import BaseModel

app = FastAPI()


class Item(BaseModel):
    name: str
    description: str

items = [
    {"name": "Foo", "description": "There comes my hero"},
    {"name": "Bar", "description": "It's my aeroplane"},
]

@app.get("/items", response_model=List[Item])
async def get_items():
    return items
2
3
4
5
6
7
8
9
10
11
12
13
14
15
16
17
18
19
20
# 任意dict构成的响应
任意的dict都能用于声明响应, 只要声明键和值的类型, 无需使用Pydantic模型. 事先不知道可用的字段/属性名(Pydantic模型必须知道字段是什么), 这种方式特别有用. 此时, 可以使用typing.Dict:
from fastapi import FastAPI

app = FastAPI()


@app.get("/keyword-weights", response_model=dict[str, float])
async def get_keyword_weights():
    return {"foo": 2.3, "bar": 3.4}
2
3
4
5
6
7
8
# 小结
针对不同场景, 可以随意使用不同的Pydantic模型继承定义的基类. 实体必须具有不同的状态时, 不必为不同状态实体单独定义数据模型. 例如, 用户实体就有包含password, 包含password_hash以及不含密码等多种状态.
# 响应状态码
与指定响应模型的方式相同, 在以下任意路径操作中, 可以使用status_code参数声明用于响应的HTTP状态码:
@app.get()@app.post()@app.put()@app.delete()- 等......
from fastapi import FastAPI

app = FastAPI()


@app.post("/items/", status_code=201)
async def create_item(name: str):
    return {"name": name}
2
3
4
5
6
7
8
注意, status_code是(get, post等)装饰器方法中的参数. 与之前的参数和请求体不同, 不是路径操作函数的参数. status_code参数接收表示HTTP状态码的数字. status_code还能接收IntEnum类型, 比如Python的http.HTTPStatus.
它可以:
- 在响应中返回状态码
- 在OpenAPI概图(及用户界面)中存档
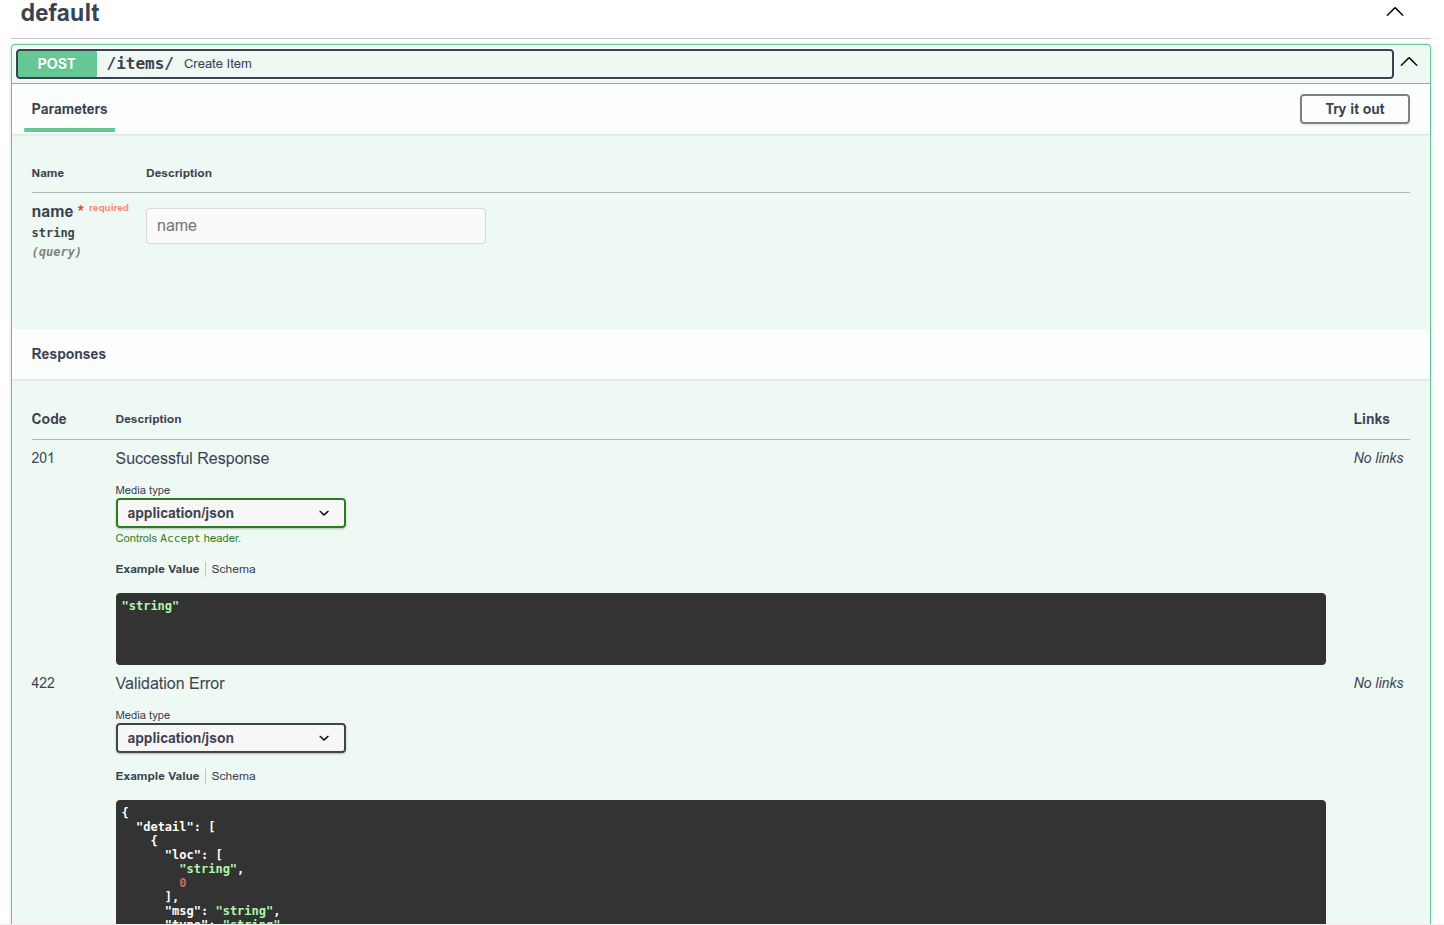
某些响应状态码表示响应没有响应体(参阅下一章). FastAPI可以进行识别, 并生成表明无响应体的OpenAPI文档.
# 关于HTTP状态码
在HTTP协议中, 发送3位数的数字状态码是响应的一部分. 这些状态码都具有便于识别的关联名称, 但是重要的还是数字. 简言之:
100及以上的状态码用于返回信息. 这类状态码很少直接使用. 具有这些状态码的响应不能包含响应体.200及以上的状态码用于表示成功. 这些状态码是最常用的200是默认状态代码, 表示一切正常201表示已创建, 通常在数据库中创建新记录后使用204是一种特殊的例子, 表示无内容. 该响应在没有为客户端返回内容时使用, 因此, 该响应不能包含响应体
300及以上的状态码用于重定向. 具有这些状态码的响应不一定包含响应体, 但304未修改是个例外, 该响应不得包含响应体400及以上的状态码用于表示客户端错误. 这些可能是第二常用的类型404, 用于未找到响应- 对于来自客户端的一般错误, 可以只使用
400
500及以上的状态码用于表示服务器端错误. 几乎永远不会直接使用这些状态码. 应用代码或服务器出现问题时, 会自动返回这些状态代码.
状态码及使用场景的详情, 请参阅MDN的HTTP状态码文档.
# 状态码名称快捷方式
再看下之前的例子:
from fastapi import FastAPI

app = FastAPI()


@app.post("/items/", status_code=201)
async def create_item(name: str):
    return {"name": name}
2
3
4
5
6
7
8
201表示已创建的状态码. 但没有必要记住所有的代码的含义. 可以使用fastapi.status中的快捷变量.
from fastapi import FastAPI, status

app = FastAPI()


@app.post("/items/", status_code=status.HTTP_201_CREATED)
async def create_item(name: str):
    return {"name": name}
2
3
4
5
6
7
8
这只是一种快捷方式, 具有相同的数字代码, 但它可以使用编辑器的自动补全功能:
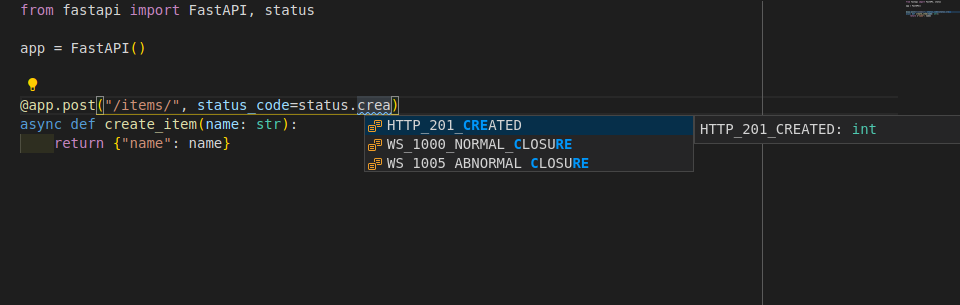
也可以使用from starlette import status. 为了让开发者更方便, FastAPI提供了与starlette.status完全相同的fastapi.status. 但它直接来自于Starlette.
# 更改默认状态码
高级用户指南中, 将介绍如何返回与在此声明的默认状态码不同的状态码.
# 表单数据
接收的不是JSON, 而是表单字段时, 要使用Form.
要使用表单, 需要先安装python-multipart. 例如, pip install python-multipart.
# 导入 Form
from fastapi import FastAPI, Form

app = FastAPI()


@app.post("/login")
async def login(username: str = Form()):
    return {"username": username}
2
3
4
5
6
7
8
# 定义 Form 参数
创建表单(Form)参数的方式与Body和Query一样:
from fastapi import FastAPI, Form

app = FastAPI()


@app.post("/login")
async def login(username: str = Form(), password: str = Form()):
    return {"username": username}
2
3
4
5
6
7
8
例如, OAuth2规范的"密码流"模式规定要通过表单字段发送username和password. 该规范要求字段必须命名为username和password, 并通过表单字段发送, 不能用JSON. 使用Form可以声明与Body(及Query, Path, Cookie)相同的元数据和验证. Form是直接继承自Body的类.
声明表单体要显式使用Form, 否则, FastAPI会把该参数当做查询参数或请求体(JSON)参数.
# 关于表单字段
与JSON不同, HTML表单(<form></form>)向服务器发送数据通常使用特俗的编码. FastAPI要确保从正确的位置读取数据, 而不是读取JSON.
技术细节
表单数据的媒体类型编码一般为application/x-www-form-urlencoded. 但包含文件的表单编码为multipart/form-data. 文件处理详见下节. 编码和表单字段详见MDN Web文档的 POST小节.
警告
可在一个路径操作中声明多个Form参数, 但不能同时声明要接收JSON的Body字段. 因为此时请求体的编码是application/x-www-form-urlencoded, 不是application/json. 这不是FastAPI的问题, 而是HTTP协议的规定.
# 小结
本节介绍了如何使用Form声明表单数据输入参数.
# 表单模型
可以使用Pydantic模型在FastAPI中声明表单字段. 自FastAPI版本0.113.0起支持此功能.
要使用表单, 需预先安装python-multipart.
# 表单的Pydantic模型
只需要声明一个Pydantic模型, 其中包含希望接收的表单字段, 然后将参数声明为Form:
from typing import Annotated

from fastapi import FastAPI, Form
from pydantic import BaseModel

app = FastAPI()


class FormData(BaseModel):
    username: str
    password: str


@app.post("/login")
async def login(data: Annotated[FormData, Form()]):
    return data
2
3
4
5
6
7
8
9
10
11
12
13
14
15
16
FastAPI将从请求中的表单数据中提取出每个字段的数据, 并提供你定义的Pydantic模型.
# 检查文档
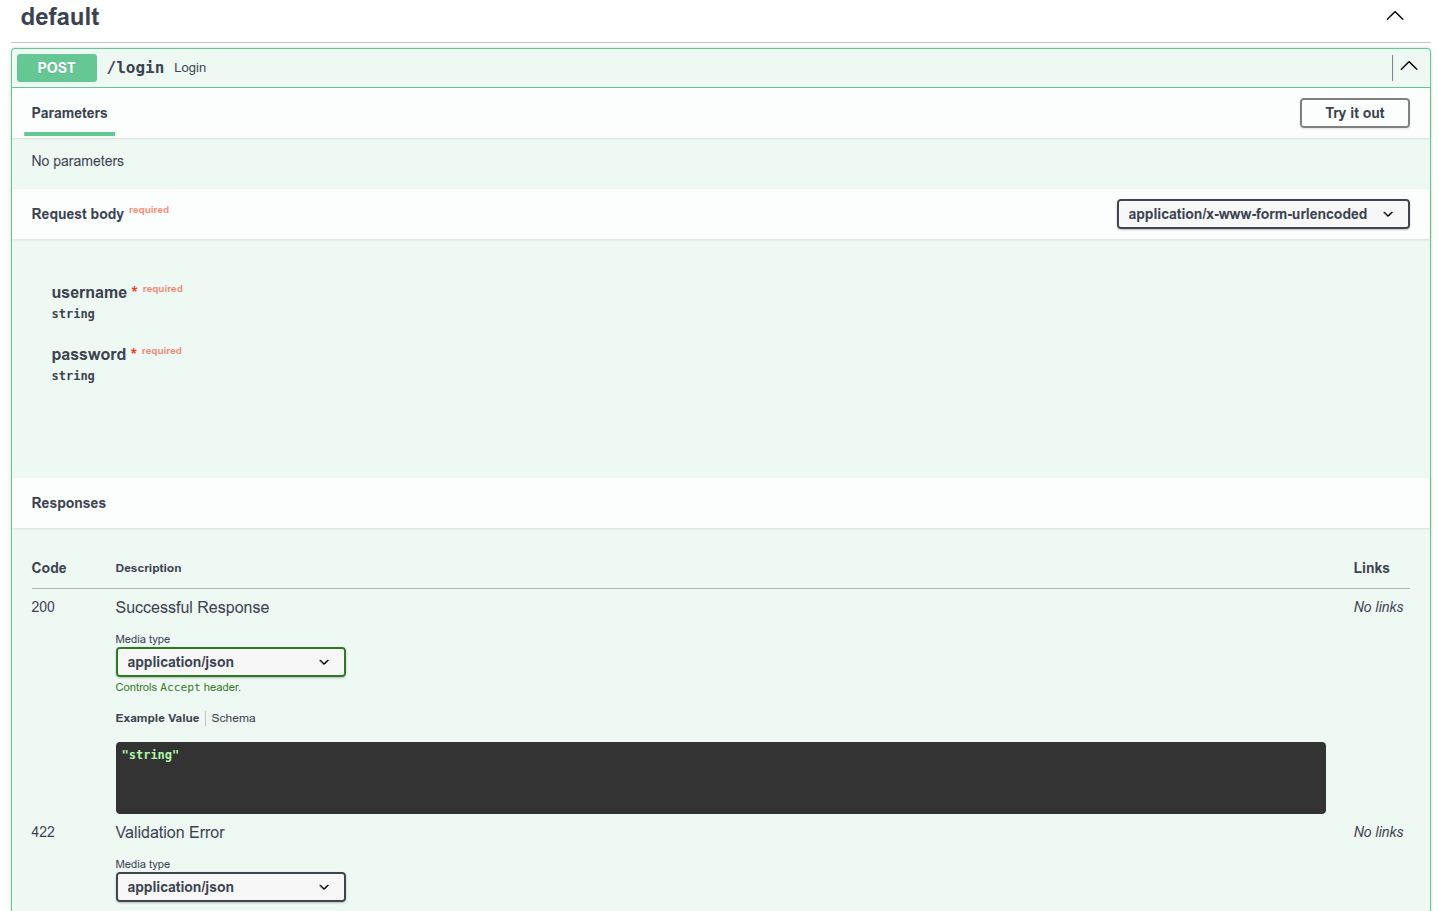
# 禁止额外的表单字段
在某些特殊使用情况下(可能并不常见), 可能希望将表单字段限制为仅在Pydantic模型中声明过的字段, 并禁止任何额外的字段. 自FastAPI版本0.114.0起支持此功能. 你可以使用Pydantic的模型配置来禁止(forbid)任何额外(extra)字段:
from typing import Annotated

from fastapi import FastAPI, Form
from pydantic import BaseModel

app = FastAPI()


class FormData(BaseModel):
    username: str
    password: str
    model_config = {"extra": "forbid"}


@app.post("/login")
async def login(data: Annotated[FormData, Form()]):
    return data
2
3
4
5
6
7
8
9
10
11
12
13
14
15
16
17
如果客户端尝试发送一些额外的数据, 他们将收到错误响应. 例如, 如果客户端尝试发送这样的表单字段:
username:Rickpassword:Portal Gunextra:Mr. Poopybutthole
他们将收到一条错误响应, 表明字段extra是不被允许的:
{
    "detail": [
        {
            "type": "extra_forbidden",
            "loc": ["body", "extra"],
            "msg": "Extra inputs are not permitted",
            "input": "Mr. Poopybutthole"
        }
    ]
}
2
3
4
5
6
7
8
9
10
# 总结
可以使用Pydantic模型在FastAPI中声明表单字段.
# 请求文件
File用于定义客户端的上传文件.
因为上传文件以表单数据形式发送, 所以接收上传文件, 需安装python-multipart.
# 导入 File
从fastapi导入File和UploadFile:
from fastapi import FastAPI, File, UploadFile

app = FastAPI()


@app.post("/files")
async def create_file(file: bytes = File()):
    return {"file_size": len(file)}


@app.post("/uploadfile")
async def create_upload_file(file: UploadFile):
    return {"filename": file.filename}
2
3
4
5
6
7
8
9
10
11
12
13
# 定义 File 参数
创建文件(File)参数的方式与Body和Form一样.
File是直接继承自Form的类. 注意, 从fastapi导入的Query, Path, File等项, 实际上是返回特定类的函数.
声明文件体必须使用File, 否则, FastAPI会把该参数当作查询参数或请求体(JSON)参数.
文件作为表单数据上传. 如果把路径操作函数的类型声明为bytes, FastAPI将以bytes形式读取和接收文件内容. 这种方式把文件的所有内容都存储在内存里, 适用于小型文件. 不过, 很多情况下, UploadFile更好用.
# 含 UploadFile 的文件参数
定义文件参数时使用UploadFile, UploadFile与bytes相比有更多的优势:
- 使用
spooled文件:- 存储在内存的文件超出最大上限时, FastAPI会把文件存入磁盘
- 这种方式更适用于处理图像, 视频, 二进制文件等大型文件, 好处是不会占用所有内存
- 可获取上传文件的元数据
- 自带file-like
async接口 - 暴露的PythonSpooledTemporaryFile(file-like对象). 其实就是Python文件, 可直接传递给其他预期
file-like对象的函数或支持库.
# UploadFile
UploadFile的属性如下:
filename: 上传文件名字符串(str), 例如,myimage.jpg;content_type: 内容类型(MIME类型/媒体类型)字符串(str), 例如,image/jpeg;file: SpooledTemporaryFile(file-like对象). 其实就是Python文件, 可直接传递给其他预期file-like对象的函数或支持库.
UploadFile支持以下async方法, (使用内部SpooledTemporaryFile)可调用相应的文件方法.
write(data): 把data(str或bytes)写入文件;read(size): 按指定数量的字节或字符(size(int))读取文件内容;seek(offset): 移动至文件offset(int)字节处的位置;- 例如,
await myfile.seek(0)移动到文件开头; - 例如,
await myfile.read()后, 需再次读取已读取内容时, 这种方法特别好用;
- 例如,
close(): 关闭文件
因为上述方法都是async方法, 要搭配await使用. 例如, 在async路径操作函数内, 要用以下方式读取文件内容: contents = await myfile.read(), 在普通def路径操作函数内, 则可以直接访问UploadFile.file, 例如: contents = myfile.file.read().
`async`技术细节
使用async方法时, FastAPI在线程池中执行文件方法, 并await操作完成.
Starlette技术细节
FastAPI的UploadFile直接继承自Starlette的UploadFile, 但添加了一些必要功能, 使之与Pydantic及FastAPI的其他部件兼容.
# 什么是表单数据
与JSON不同, HTML表单(<form></form>)项服务器发送数据通常使用特殊的编码. FastAPI要确保从正确的位置读取数据, 而不是读取JSON.
技术细节
不包含文件时, 表单数据一般用application/x-www-form-urlencoded媒体类型编码. 但表单包含文件时, 编码为multipart/form-data. 使用了File, FastAPI就知道要从请求体的正确位置获取文件. 编码和表单字段详见MDN Web 文档的 POST.
警告
可在一个路径操作中声明多个File和Form参数, 但不能同时声明要接收JSON的Body字段. 因为此时请求体的编码是multipart/form-data, 不是application/json. 这不是FastAPI的问题, 而是HTTP协议的规定.
# 可选文件上传
你可以通过使用标准类型注解并将None作为默认值的方式将一个文件参数设为可选:
from fastapi import FastAPI, File, UploadFile

app = FastAPI()


@app.post("/files/")
async def create_file(file: bytes | None = File(default=None)):
    if not file:
        return {"message": "No file sent"}
    else:
        return {"file_size": len(file)}


@app.post("/uploadfile/")
async def create_upload_file(file: UploadFile | None = None):
    if not file:
        return {"message": "No file sent"}
    else:
        return {"filename": file.filename}
2
3
4
5
6
7
8
9
10
11
12
13
14
15
16
17
18
19
# 带有额外元数据的 UploadFile
你也可以将File()与UploadFile一起使用, 例如, 设置额外的元数据:
from fastapi import FastAPI, File, UploadFile

app = FastAPI()


@app.post("/files/")
async def create_file(file: bytes = File(description="A file read as bytes")):
    if not file:
        return {"message": "No file sent"}
    else:
        return {"file_size": len(file)}


@app.post("/uploadfile/")
async def create_upload_file(file: UploadFile = File(description="A file read as UploadFile")):
    if not file:
        return {"message": "No file sent"}
    else:
        return {"filename": file.filename}
2
3
4
5
6
7
8
9
10
11
12
13
14
15
16
17
18
19
# 多文件上传
FastAPI支持同时上传多个文件. 可用同一个表单字段发送含多个文件的表单数据. 上传多个文件时, 要声明含bytes或UploadFile的列表(List):
from fastapi import FastAPI, File, UploadFile
from fastapi.responses import HTMLResponse

app = FastAPI()


@app.post("/files/")
async def create_files(file: list[bytes] = File()):
    return {"file_sizes": [len(f) for f in file]}


@app.post("/uploadfiles/")
async def create_upload_files(file: list[UploadFile]):
    return {
        "file_names": [f.filename for f in file],
    }

@app.get("/")
async def main():
    return HTMLResponse("""
    <html>
        <body>
            <h1>Upload Files</h1>
            <form action="/files/" enctype="multipart/form-data" method="post">
                <input name="file" type="file" multiple>
                <input type="submit">
            </form>
            <form action="/uploadfiles/" enctype="multipart/form-data" method="post">
                <input name="file" type="file" multiple>
                <input type="submit">
            </form>
        </body>
    </html>
    """)
2
3
4
5
6
7
8
9
10
11
12
13
14
15
16
17
18
19
20
21
22
23
24
25
26
27
28
29
30
31
32
33
34
接收的也是含bytes或UploadFile的列表(list).
技术细节
也可以使用from starlette.responses import HTMLResponse.
fastapi.responses其实与starlette.responses相同, 只是为了方便开发者调用. 实际上, 大多数FastAPI的响应都直接从Starlette调用.
# 带有额外元数据的多文件上传
和之前的方式一样, 你可以为File()设置额外参数, 即使是UploadFile:
from fastapi import FastAPI, File, UploadFile
from fastapi.responses import HTMLResponse

app = FastAPI()


@app.post("/files/")
async def create_files(
    files: list[bytes] = File(description="Multiple files as bytes"),
):
    return {"file_sizes": [len(file) for file in files]}


@app.post("/uploadfiles/")
async def create_upload_files(
    files: list[UploadFile] = File(description="Multiple files as UploadFile"),
):
    return {"filenames": [file.filename for file in files]}


@app.get("/")
async def main():
    content = """
<body>
<form action="/files/" enctype="multipart/form-data" method="post">
<input name="files" type="file" multiple>
<input type="submit">
</form>
<form action="/uploadfiles/" enctype="multipart/form-data" method="post">
<input name="files" type="file" multiple>
<input type="submit">
</form>
</body>
    """
    return HTMLResponse(content=content)
2
3
4
5
6
7
8
9
10
11
12
13
14
15
16
17
18
19
20
21
22
23
24
25
26
27
28
29
30
31
32
33
34
35
# 小结
本节介绍了如何用File把上传文件声明为(表单数据的)输入参数.
# 请求表单与文件
FastAPI支持同时使用File和Form定义文件和表单字段.
说明
接收上传文件和表单数据, 要预先安装python-multipart. 例如, pip install python-multipart.
# 导入 File 与 Form
from fastapi import FastAPI, File, Form, UploadFile

app = FastAPI()


@app.post("/files/")
async def create_file(
    file: bytes = File(), fileb: UploadFile = File(), token: str = Form()
):
    return {
        "file_size": len(file),
        "fileb_content_type": fileb.content_type,
        "token": token,
    }
2
3
4
5
6
7
8
9
10
11
12
13
14
# 定义 File 与 Form 参数
创建文件和表单参数的方式与Body和Query一样, 文件和表单字段作为表单数据上传与接收. 声明文件可以使用bytes或UploadFile.
警告
可在一个路径操作中声明多个File与Form参数, 但不能同时声明要接收JSON的Body字段. 因为此时请求体的编码为multipart/form-data, 不是application/json. 这不是FastAPI的问题, 而是HTTP协议的规定.
# 小结
在同一个请求中接收数据和文件时, 应同时使用File和Form.
# 处理错误
某些情况下, 需要向客户端返回错误提示. 这里所谓的客户端包括前端浏览器, 其他应用程序, 物联网设备等. 需要向客户端返回错误提示的场景主要如下:
- 客户端没有执行操作的权限
- 客户端没有访问资源的权限
- 客户端要访问的项目不存在
- 等等......
遇到这些情况时, 通常要返回4XX(400至499)HTTP状态码. 4XX状态码与表示请求成功的2XX(200至299)HTTP状态码类似. 只不过, 4XX状态码表示客户端发生的错误.
# 使用 HTTPException
向客户端返回HTTP错误响应, 可以使用HTTPException.
# 导入 HTTPException
from fastapi import FastAPI, HTTPException

app = FastAPI()


items = {"foo": "The Foo Wrestlers"}


@app.get("/items/{item_id}")
async def read_item(item_id: str):
    if item_id not in items:
        raise HTTPException(status_code=404, detail="Item not found")
    return {"item": items[item_id]}
2
3
4
5
6
7
8
9
10
11
12
13
# 触发 HTTPException
HTTPException是额外包含了和API有关数据的常规Python异常. 因为是Python异常, 所以不能return, 只能raise. 如在调用路径操作函数里的工具函数时, 触发了HTTPException, FastAPI就不再继续执行路径操作函数中的后续代码, 而是立即终止请求, 并把HTTPException的HTTP错误发送至客户端. 在介绍依赖项与安全的章节中, 可以了解更多用raise异常代替return值的优势. 本例中, 客户端用ID请求的item不存在时, 触发状态码为404的异常.
# 响应结果
请求为http://localhost:8000/items/foo(item_id为foo)时, 客户端会接收到HTTP状态码-200及如下JSON响应结果:
{
  "item": "The Foo Wrestlers"
}
2
3
但如果客户端请求http://localhost:8000/items/bar(item_id``bar不存在时), 则会接收到HTTP状态码-404(未找到错误)及如下JSON响应结果:
{
  "detail": "Item not found"
}
2
3
提示
触发HTTPException时, 可以用参数detail传递任何能转换为JSON的值, 不仅限于str. 还支持传递dict, list等数据结构. FastAPI能自动处理这些数据, 并将之转换为JSON.
# 添加自定义响应头
有些场景下要为HTTP错误添加自定义响应头. 例如, 出于某些方面的安全需要. 一般情况下可能不会需要在代码中直接使用响应头. 但对于某些高级应用场景, 还是需要添加自定义响应头:
from fastapi import FastAPI, HTTPException

app = FastAPI()


items = {"foo": "The Foo Wrestlers"}


@app.get("/items-header/{item_id}")
async def read_item(item_id: str):
    if item_id not in items:
        raise HTTPException(
            status_code=404,
            detail="Item not found",
            headers={"X-Error": "There goes my error"},
        )
    return {"item": items[item_id]}
2
3
4
5
6
7
8
9
10
11
12
13
14
15
16
17
# 安装自定义异常处理器
添加自定义处理器, 要使用Starlette的异常工具. 假设要触发的自定义异常叫作UnicornException. 且需要FastAPI实现全局处理该异常. 此时, 可以使用@app.exception_hander()添加自定义异常控制器:
from fastapi import FastAPI, Request
from fastapi.responses import JSONResponse


class UnicornException(Exception):
    def __init__(self, name: str):
        self.name = name


app = FastAPI()


@app.exception_handler(UnicornException)
async def unicorn_exception_handler(request: Request, exc: UnicornException):
    return JSONResponse(
        status_code=418,
        content={"message": f"Oops! {exc.name} did something. There goes a rainbow..."},
    )


@app.get("/unicorns/{name}")
async def read_unicorn(name: str):
    if name == "yolo":
        raise UnicornException(name=name)
    return {"unicorn_name": name}
2
3
4
5
6
7
8
9
10
11
12
13
14
15
16
17
18
19
20
21
22
23
24
25
请求/unicorns/yolo时, 路径操作会触发UnicornException. 但该异常将会被unicorn_exception_handler处理. 接收到的错误信息清晰明了, HTTP状态码为418, JSON内容如下:
{"message": "Oops! yolo did something. There goes a rainbow..."}
技术细节
from starlette.requests import Request和from starlette.responses import JSONResponse也可以用于导入Request和JSONResponse.
FastAPI提供了与starlette.responses相同的fastapi.responses作为快捷方式, 但大部分响应操作都可以直接从Starlette导入. 同理, Request也是如此.
# 覆盖默认异常处理器
FastAPI自带了一些默认异常处理器. 触发HTTPException或请求无效数据时, 这些处理器返回默认的JSON响应结果. 不过, 也可以使用自定义处理器覆盖默认异常处理器.
# 覆盖请求验证异常
请求中包含无效数据时, FastAPI内部会触发RequestValidationError. 该异常也内置了默认异常处理器. 覆盖默认异常处理器时需要导入RequestValidationError, 并用@app.exception_handler(RequestValidationError)装饰异常处理器. 这样, 异常处理器就可以接收Request与异常.
from fastapi import FastAPI, HTTPException
from fastapi.exceptions import RequestValidationError
from fastapi.responses import PlainTextResponse
from starlette.exceptions import HTTPException as StarletteHTTPException

app = FastAPI()


@app.exception_handler(StarletteHTTPException)
async def http_exception_handler(request, exc):
    return PlainTextResponse(str(exc.detail), status_code=exc.status_code)


@app.exception_handler(RequestValidationError)
async def validation_exception_handler(request, exc):
    return PlainTextResponse(str(exc), status_code=400)


@app.get("/items/{item_id}")
async def read_item(item_id: int):
    if item_id == 3:
        raise HTTPException(status_code=418, detail="Nope! I don't like 3.")
    return {"item_id": item_id}
2
3
4
5
6
7
8
9
10
11
12
13
14
15
16
17
18
19
20
21
22
23
# RequestValidationError vs ValidationError
RequestValidationError是Pydantic的ValidationError的子类.
FastAPI调用的就是RequestValidationError类, 因此, 如果在response_model中使用Pydantic模型, 且数据有错误时, 在日志中就会看到这个错误. 但客户端或用户看不到这个错误. 反之, 客户端接收到的是HTTP状态码为500的内部服务器错误. 这是因为在响应或代码(不是在客户端的请求里)中出现的PydanticValidationError是代码的BUG. 修复错误时, 客户端或用户不能访问错误的内部信息, 否则会造成安全隐患.
# 覆盖 HTTPException 错误处理器
同理, 也可以覆盖HTTPException处理器. 例如, 只为错误返回存文本响应, 而不是返回JSON格式的内容.
技术细节
还可以使用from starlette.response import PlainTextResponse.
FastAPI提供了与starlette.responses相同的fastapi.responses作为快捷方式, 但大部分响应都可以直接从Starlette导入.
# 使用 RequestValidationError 的请求体
RequestValidationError包含其接收到的无效数据请求的body. 开发时, 可以用这个请求体生成日志, 调试错误, 并返回给用户.
from fastapi import FastAPI, Request, status
from fastapi.encoders import jsonable_encoder
from fastapi.exceptions import RequestValidationError
from fastapi.responses import JSONResponse
from pydantic import BaseModel

app = FastAPI()


@app.exception_handler(RequestValidationError)
async def validation_exception_handler(request: Request, exc: RequestValidationError):
    return JSONResponse(
        status_code=status.HTTP_422_UNPROCESSABLE_ENTITY,
        content=jsonable_encoder({"detail": exc.errors(), "body": exc.body}),
    )


class Item(BaseModel):
    title: str
    size: int


@app.post("/items/")
async def create_item(item: Item):
    return item
2
3
4
5
6
7
8
9
10
11
12
13
14
15
16
17
18
19
20
21
22
23
24
25
现在试着发送一个无效的item, 例如:
{
  "title": "towel",
  "size": "XL"
}
2
3
4
收到的响应包含body信息, 并说明数据是无效的:
{
  "detail": [
    {
      "loc": [
        "body",
        "size"
      ],
      "msg": "value is not a valid integer",
      "type": "type_error.integer"
    }
  ],
  "body": {
    "title": "towel",
    "size": "XL"
  }
}
2
3
4
5
6
7
8
9
10
11
12
13
14
15
16
# FastAPI HTTPException vs Starlette HTTPException
FastAPI也提供了自有的HTTPException. FastAPI的HTTPException继承自Starlette的HTTPException错误类. 它们之间的唯一区别是, FastAPI的HTTPException可以在响应中添加响应头. OAuth2.0等安全工具需要在内部调用这些响应头. 因此你可以继续像平常一样在代码中触发FastAPI的HTTPException. 但注册异常处理器时, 应该注册到来自Starlette的HTTPException. 这样做是为了, 当Starlette的内部代码, 扩展或插件触发StarletteHTTPException时, 处理程序能够捕获, 并处理此异常.
注意, 本例代码中同时使用了这两个HTTPException, 此时, 要把Starlette的HTTPException命名为StarletteHTTPException:
from starlette.exceptions import HTTPException as StarletteHTTPException
# 复用FastAPI异常处理器
FastAPI支持先对异常进行某些处理, 然后再使用FastAPI中处理该异常的默认异常处理器. 从fastapi.exception_handlers中导入要复用的默认异常处理器:
from fastapi import FastAPI, HTTPException
from fastapi.exception_handlers import (
    http_exception_handler,
    request_validation_exception_handler,
)
from fastapi.exceptions import RequestValidationError
from starlette.exceptions import HTTPException as StarletteHTTPException

app = FastAPI()


@app.exception_handler(StarletteHTTPException)
async def custom_http_exception_handler(request, exc):
    print(f"OMG! An HTTP error!: {repr(exc)}")
    return await http_exception_handler(request, exc)


@app.exception_handler(RequestValidationError)
async def custom_validation_exception_handler(request, exc):
    print(f"OMG! The client sent invalid data!: {exc}")
    return await request_validation_exception_handler(request, exc)


@app.get("/items/{item_id}")
async def read_item(item_id: int):
    if item_id == 3:
        raise HTTPException(status_code=418, detail="Nope! I don't like 3.")
    return {"item_id": item_id}
2
3
4
5
6
7
8
9
10
11
12
13
14
15
16
17
18
19
20
21
22
23
24
25
26
27
28
虽然, 本例只是输出了夸大其词的错误信息. 但也足以说明, 可以在处理异常之后再复用默认的异常处理器.
# 路径操作配置
路径操作装饰器支持多种配置参数.
警告
以下参数应直接传递给路径操作装饰器, 不能传递给路径操作函数.
# status_code 状态码
status_code用于定义路径操作响应中的HTTP状态码. 可以直接传递int代码, 比如404. 如果记不住数字码的含义, 也可以用status的快捷常量.
from typing import Set, Union

from fastapi import FastAPI, status
from pydantic import BaseModel

app = FastAPI()


class Item(BaseModel):
    name: str
    description: Union[str, None] = None
    price: float
    tax: Union[float, None] = None
    tags: Set[str] = set()


@app.post("/items/", response_model=Item, status_code=status.HTTP_201_CREATED)
async def create_item(item: Item):
    return item
2
3
4
5
6
7
8
9
10
11
12
13
14
15
16
17
18
19
状态码在响应中使用, 并会被添加到OpenAPI概图.
技术细节
也可以使用from starlette import status导入状态码.
FastAPI的fastapi.status和starlette.status一样, 只是快捷方式. 实际上, fastapi.status直接继承自Starlette.
# tags 参数
tags参数的值是由str组成的list(一般只有一个str), tags用于为路径操作添加标签:
from typing import Set, Union
from fastapi import FastAPI
from pydantic import BaseModel

app = FastAPI()


class Item(BaseModel):
    name: str
    description: Union[str, None] = None
    price: float
    tax: Union[float, None] = None
    tags: Set[str] = set()


@app.post("/items/", response_model=Item, tags=["items"])
async def create_item(item: Item):
    return item


@app.get("/items/", tags=["items"])
async def read_items():
    return [{"name": "Foo", "price": 42}]


@app.get("/users/", tags=["users"])
async def read_users():
    return [{"username": "johndoe"}]
2
3
4
5
6
7
8
9
10
11
12
13
14
15
16
17
18
19
20
21
22
23
24
25
26
27
28
OpenAPI概图会自动添加标签, 供API文档接口使用:
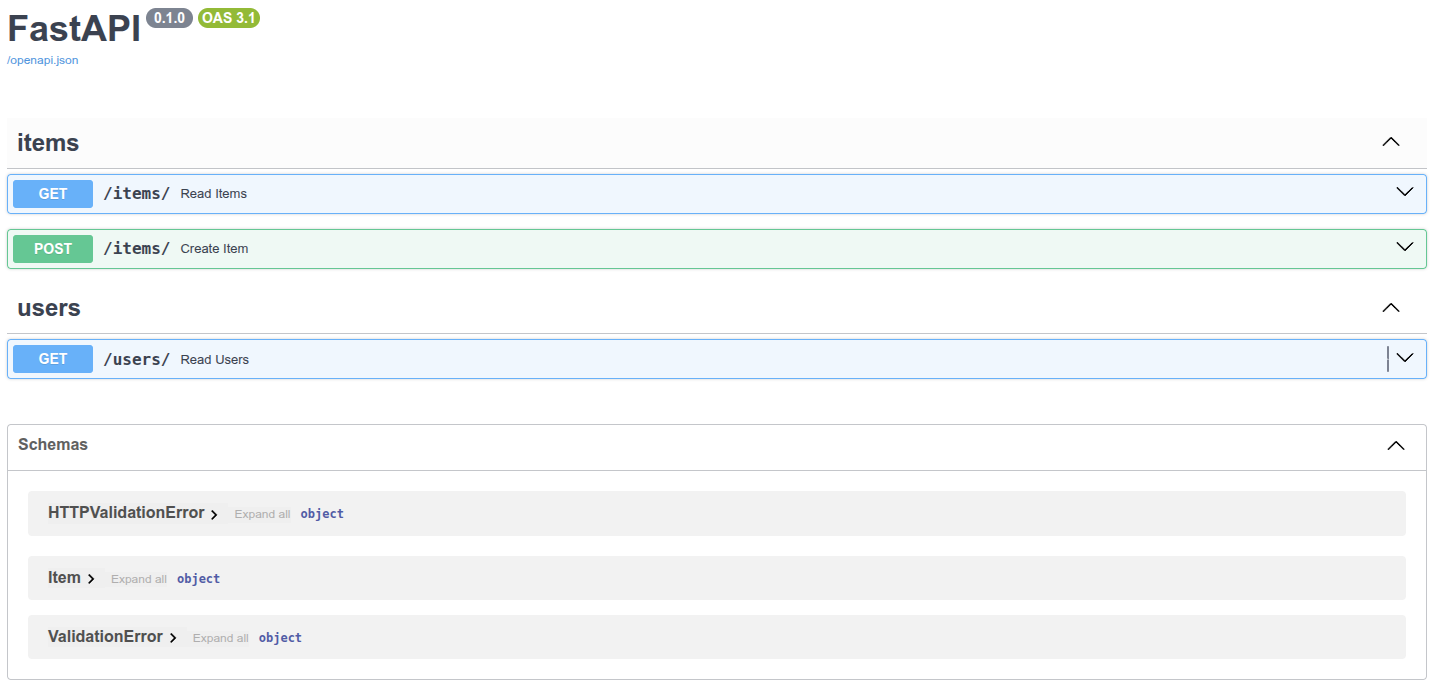
# summary 和 description 参数
路径装饰器还支持summary和description这两个参数:
from typing import Set, Union
from fastapi import FastAPI
from pydantic import BaseModel

app = FastAPI()


class Item(BaseModel):
    name: str
    description: Union[str, None] = None
    price: float
    tax: Union[float, None] = None
    tags: Set[str] = set()


@app.post(
    "/items/",
    response_model=Item,
    summary="创建Item",
    description="创建一个新的Item对象",
)
async def create_item(item: Item):
    return item
2
3
4
5
6
7
8
9
10
11
12
13
14
15
16
17
18
19
20
21
22
23
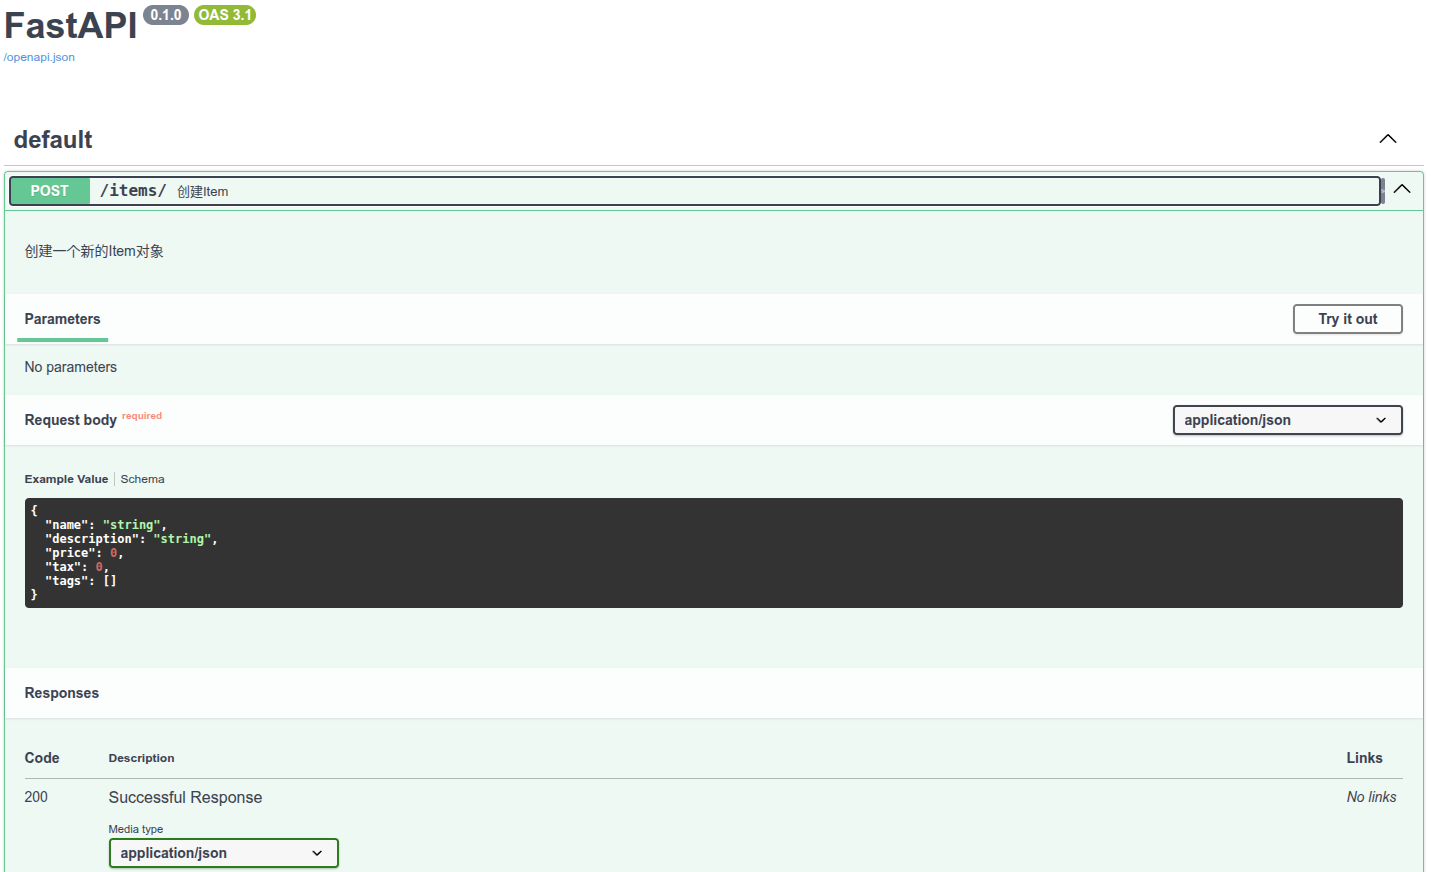
# 文档字符串(docstring)
描述内容比较长且占用多行时, 可以在函数的docstring中声明路径操作的描述, FastAPI支持从文档字符串中读取描述内容.
文档字符串支持Markdown, 能正确解析和显示Markdown的内容, 弹药注意文档字符串的缩进.
from typing import Set, Union
from fastapi import FastAPI
from pydantic import BaseModel

app = FastAPI()


class Item(BaseModel):
    name: str
    description: Union[str, None] = None
    price: float
    tax: Union[float, None] = None
    tags: Set[str] = set()


@app.post(
    "/items/",
    response_model=Item,
    summary="Create an item",
)
async def create_item(item: Item):
    """
    Create an item with all the information:

    - **name**: each item must have a name
    - **description**: a long description
    - **price**: required
    - **tax**: if the item doesn't have tax, you can omit this
    - **tags**: a set of unique tag strings for this item
    """
    return item
2
3
4
5
6
7
8
9
10
11
12
13
14
15
16
17
18
19
20
21
22
23
24
25
26
27
28
29
30
31
下图为Markdown文本在API文档中的显示效果:
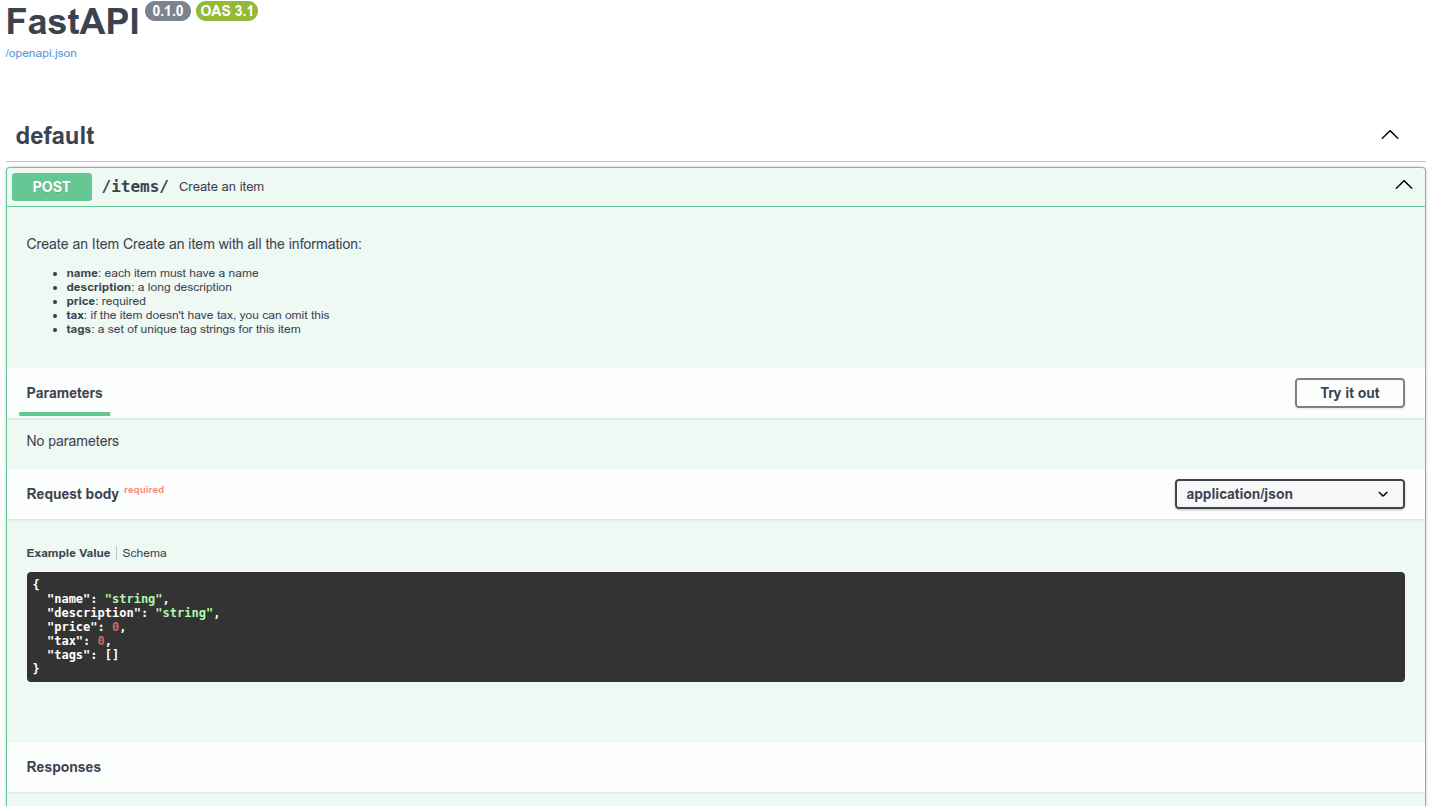
# 响应描述
response_description参数用于定义响应的描述说明:
from typing import Set, Union
from fastapi import FastAPI
from pydantic import BaseModel

app = FastAPI()


class Item(BaseModel):
    name: str
    description: Union[str, None] = None
    price: float
    tax: Union[float, None] = None
    tags: Set[str] = set()


@app.post(
    "/items/",
    response_model=Item,
    summary="Create an item",
    response_description="The created item",
)
async def create_item(item: Item):
    """
    Create an item with all the information:

    - **name**: each item must have a name
    - **description**: a long description
    - **price**: required
    - **tax**: if the item doesn't have tax, you can omit this
    - **tags**: a set of unique tag strings for this item
    """
    return item
2
3
4
5
6
7
8
9
10
11
12
13
14
15
16
17
18
19
20
21
22
23
24
25
26
27
28
29
30
31
32
说明
注意, response_description只用于描述响应, description一般则用于描述路径操作.
OpenAPI规定每个路径操作都要响应描述. 如果没有定义响应描述, FastAPI则自动生成内容为"Successful response"的响应描述.
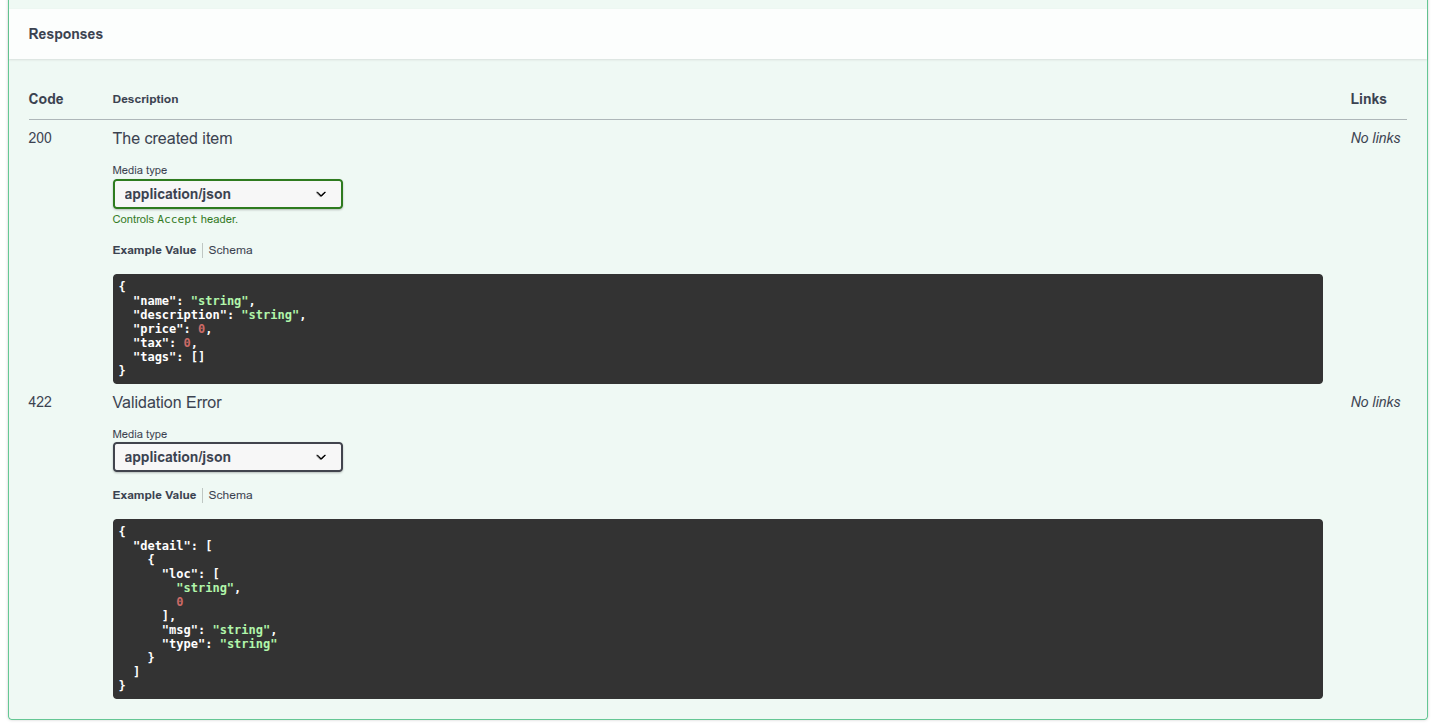
# 弃用路径操作
deprecated参数可以把路径操作标记为弃用, 无需直接删除:
from fastapi import FastAPI

app = FastAPI()


@app.get("/items/", tags=["items"])
async def read_items():
    return [{"name": "Foo", "price": 42}]


@app.get("/users/", tags=["users"])
async def read_users():
    return [{"username": "johndoe"}]


@app.get("/elements/", tags=["items"], deprecated=True)
async def read_elements():
    return [{"item_id": "Foo"}]
2
3
4
5
6
7
8
9
10
11
12
13
14
15
16
17
18
API文档会把该路径操作标记为弃用:
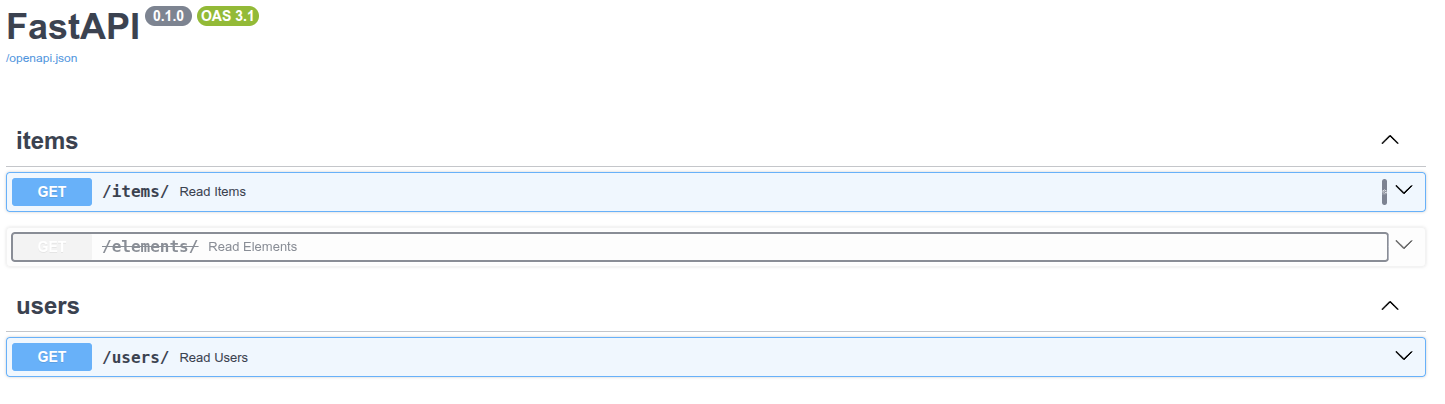
下图显示了正常路径操作与弃用路径操作的区别:
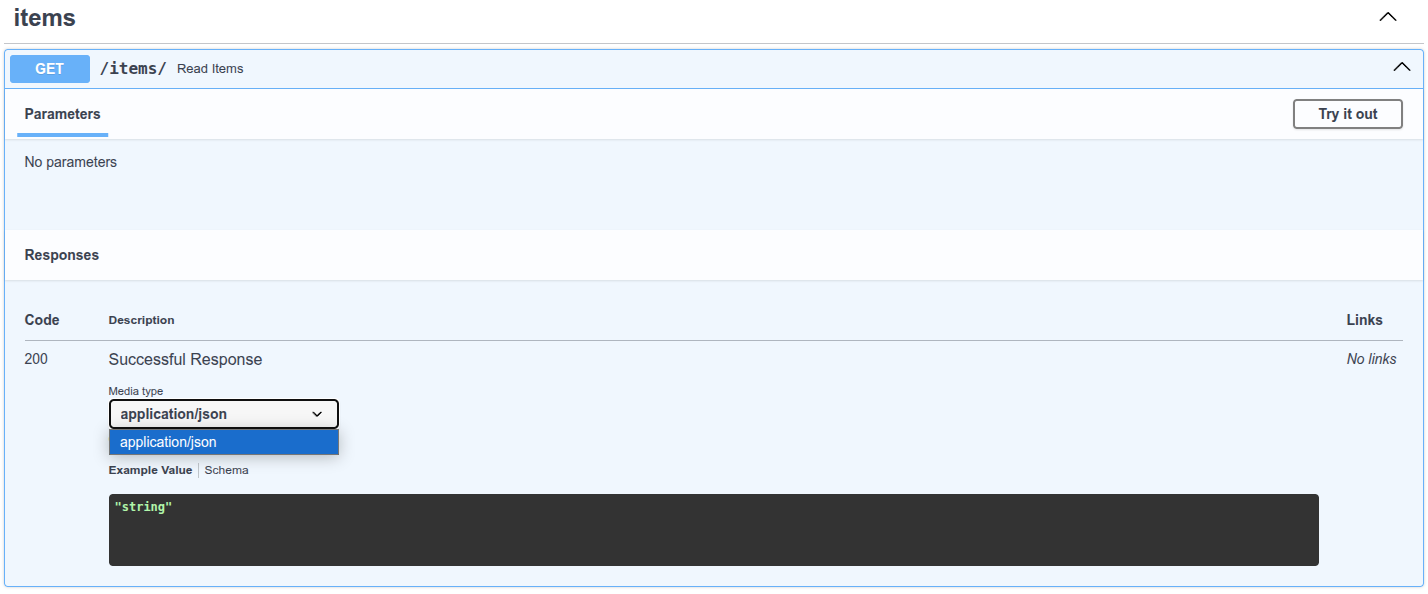
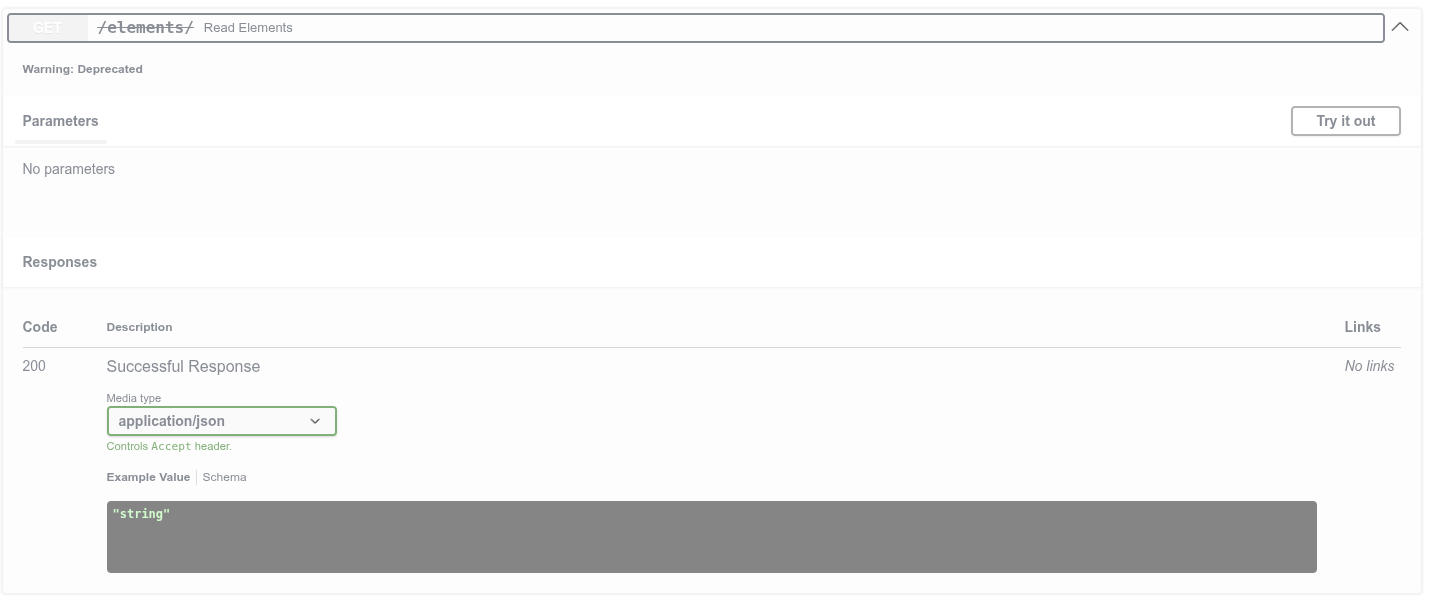
# 小结
通过传递参数给路径操作装饰器, 即可轻松地配置路径操作, 添加元数据.
# JSON 兼容编码器
在某些情况下, 你可能需要将数据类型(如Pydantic模型)转换为与JSON兼容的数据类型(如dict, list等). 比如, 如果你需要将其存储在数据库中. 对于这种要求, FastAPI提供了jsonable_encoder()函数.
# 使用 jsonable_encoder
让我们假设你有一个数据库名为fake_db, 它只能接收与JSON兼容的数据. 例如, 它不接收datetime这类的对象, 因为这些对象与JSON不兼容. 因此, datetime对象必须将转换为IOS格式化的str类型对象. 同样, 这个数据库也不会接收Pydantic模型(带有属性的对象), 而只接收dict. 对此你可以使用jsonable_encoder. 它接收一个对象, 比如Pydantic模型, 并会返回一个JSON兼容的版本:
from datetime import datetime

from fastapi import FastAPI
from fastapi.encoders import jsonable_encoder
from pydantic import BaseModel

fake_db = {}


class Item(BaseModel):
    title: str
    timestamp: datetime
    description: str | None = None


app = FastAPI()


@app.put("/items/{id}")
async def update_item(id: str, item: Item):
    json_compatible_item_data = jsonable_encoder(item)
    fake_db[id] = json_compatible_item_data
2
3
4
5
6
7
8
9
10
11
12
13
14
15
16
17
18
19
20
21
22
在这个例子中, 它将Pydantic模型转换为dict, 并将datetime转换为str. 调用它的结果后就可以使用Python标准编码中的json.dumps(). 这个操作不会返回一个包含JSON格式(作为字符串)数据的庞大的str. 它将返回一个Python标准数据结构(例如dict), 其值和子值都与JSON兼容.
jsonable_encoder实际上是FastAPI内部用来转换数据的. 但是它在许多其他场景中也很有用.
# 请求体-更新数据
# 用 PUT 更新数据
更新数据请用HTTP PUT操作. 把输入数据转换为以JSON格式存储的数据(比如, 使用NoSQL数据库时), 可以使用jsonable_encoder. 例如, 把datetime转换为str.
from typing import List, Union

from fastapi import FastAPI
from fastapi.encoders import jsonable_encoder
from pydantic import BaseModel

app = FastAPI()


class Item(BaseModel):
    name: Union[str, None] = None
    description: Union[str, None] = None
    price: Union[float, None] = None
    tax: float = 10.5
    tags: List[str] = []


items = {
    "foo": {"name": "Foo", "price": 50.2},
    "bar": {"name": "Bar", "description": "The bartenders", "price": 62, "tax": 20.2},
    "baz": {"name": "Baz", "description": None, "price": 50.2, "tax": 10.5, "tags": []},
}


@app.get("/items/{item_id}", response_model=Item)
async def read_item(item_id: str):
    return items[item_id]


@app.put("/items/{item_id}", response_model=Item)
async def update_item(item_id: str, item: Item):
    update_item_encoded = jsonable_encoder(item)
    items[item_id] = update_item_encoded
    return update_item_encoded
2
3
4
5
6
7
8
9
10
11
12
13
14
15
16
17
18
19
20
21
22
23
24
25
26
27
28
29
30
31
32
33
34
PUT用于接收替换现有数据的数据.
# 关于更新数据的警告
用PUT把数据项bar更新为一下内容时:
{
    "name": "Barz",
    "price": 3,
    "description": None,
}
2
3
4
5
因为上述数据未包含已存储的属性"tax": 20.2, 新的输入模型会把"tax": 10.5作为默认值. 因此, 本次操作把tax的值更新为10.5.
# 用 PATCH 进行部分更新
HTTP PATCH操作用于更新部分数据. 即, 只发送要更新的数据, 其余数据保持不变.
PATCH没有PUT知名, 也不怎么常用. 很多人甚至只用PUT实现部分更新. FastAPI对此没有任何限制, 可以随意互换使用这两种操作. 但本指南也会分别介绍这两种操作各自的用途.
# 使用Pydantic的 exclude_unset 参数
更新部分数据时, 可以在Pydantic模型的.dict()中使用exclude_unset参数. 比如, item.dict(exclude_unset=True). 这段代码生成的dict只包含创建item模型时显式设置的数据, 而不包括默认值. 然后再用它生成一个只含已设置(在请求中所发送)数据, 且省略了默认值的dict:
from typing import List, Union

from fastapi import FastAPI
from fastapi.encoders import jsonable_encoder
from pydantic import BaseModel

app = FastAPI()


class Item(BaseModel):
    name: Union[str, None] = None
    description: Union[str, None] = None
    price: Union[float, None] = None
    tax: float = 10.5
    tags: List[str] = []


items = {
    "foo": {"name": "Foo", "price": 50.2},
    "bar": {"name": "Bar", "description": "The bartenders", "price": 62, "tax": 20.2},
    "baz": {"name": "Baz", "description": None, "price": 50.2, "tax": 10.5, "tags": []},
}


@app.get("/items/{item_id}", response_model=Item)
async def read_item(item_id: str):
    return items[item_id]


@app.patch("/items/{item_id}", response_model=Item)
async def update_item(item_id: str, item: Item):
    stored_item_data = items[item_id]
    stored_item_model = Item(**stored_item_data)
    update_data = item.dict(exclude_unset=True)
    updated_item = stored_item_model.copy(update=update_data)
    items[item_id] = jsonable_encoder(updated_item)
    return updated_item
2
3
4
5
6
7
8
9
10
11
12
13
14
15
16
17
18
19
20
21
22
23
24
25
26
27
28
29
30
31
32
33
34
35
36
37
# 使用Pydantic的 update 参数
接下来, 用.copy()为已有模型创建调用update参数的副本, 该参数为包含更新数据的dict. 例如, stored_item_model.copy(update=update_data):
from typing import List, Union

from fastapi import FastAPI
from fastapi.encoders import jsonable_encoder
from pydantic import BaseModel

app = FastAPI()


class Item(BaseModel):
    name: Union[str, None] = None
    description: Union[str, None] = None
    price: Union[float, None] = None
    tax: float = 10.5
    tags: List[str] = []


items = {
    "foo": {"name": "Foo", "price": 50.2},
    "bar": {"name": "Bar", "description": "The bartenders", "price": 62, "tax": 20.2},
    "baz": {"name": "Baz", "description": None, "price": 50.2, "tax": 10.5, "tags": []},
}


@app.get("/items/{item_id}", response_model=Item)
async def read_item(item_id: str):
    return items[item_id]


@app.patch("/items/{item_id}", response_model=Item)
async def update_item(item_id: str, item: Item):
    stored_item_data = items[item_id]
    stored_item_model = Item(**stored_item_data)
    update_data = item.dict(exclude_unset=True)
    updated_item = stored_item_model.copy(update=update_data)
    items[item_id] = jsonable_encoder(updated_item)
    return updated_item
2
3
4
5
6
7
8
9
10
11
12
13
14
15
16
17
18
19
20
21
22
23
24
25
26
27
28
29
30
31
32
33
34
35
36
37
# 更新部分数据小结
简而言之, 更新部分数据应:
- 使用
PATCH而不是PUT(可选, 也可以用PUT); - 提取存储的数据;
- 把数据放入Pydantic模型;
- 生成不含输入模型默认值的
dict(使用exclude_unset参数);- 只更新用户设置过的值, 不用模型中的默认值覆盖已存储的值;
- 为已存储的模型创建副本, 用接收的数据更新其属性(使用
update参数);- 这种方式与Pydantic模型的
.dict()方法类似, 但能确保把值转换为适配JSON的数据类型, 例如, 把datetime转换为str
- 这种方式与Pydantic模型的
- 把数据保存至数据库
- 返回更新后的模型
实际上, HTTPPUT也可以完成相同的操作. 但本节以PATCH为例的原因是, 该操作就是为了这种用例创建的.
注意, 输入模型仍需验证. 因此, 如果希望接收的部分更新数据可以省略其他所有属性, 则要把模型中所有的属性标记为可选(使用默认值或None). 为了区分用于更新所有可选值的模型与用于创建包含必须值的模型, 请参照更多模型一节中的思路.
# 依赖项
# 依赖项介绍
FastAPI提供了简单易用, 但功能强大的依赖注入系统. 这个依赖系统设计的简单易用, 可以让开发人员轻松地把组件集成至FastAPI.
# 什么是依赖注入
编程中的依赖注入是声明代码(本文中为路径操作函数)运行所需的, 或要使用的依赖的一种方式. 然后, 由系统(本文中为FastAPI)负责执行任意需要的逻辑, 为代码提供这些依赖(注入依赖项).
依赖注入常用于以下场景:
- 共享业务逻辑(复用相同的代码逻辑)
- 共享数据库连接
- 实现安全, 验证, 角色权限
- 等 ... ... 上述场景均可以使用依赖注入, 将代码重复最小化.
# 第一步
接下来, 学习一个非常简单的例子, 尽管它过于简单, 不是很实用. 但通过这个例子, 可以初步了解依赖注入的工作机制.
# 创建依赖项
首先, 要关注的是依赖项. 依赖项就是一个函数, 且可以使用与路径操作函数相同的参数:
from typing import Union

from fastapi import Depends, FastAPI

app = FastAPI()


async def common_parameters(
    q: Union[str, None] = None, skip: int = 0, limit: int = 100
):
    return {"q": q, "skip": skip, "limit": limit}


@app.get("/items/")
async def read_items(commons: dict = Depends(common_parameters)):
    return commons


@app.get("/users/")
async def read_users(commons: dict = Depends(common_parameters)):
    return commons
2
3
4
5
6
7
8
9
10
11
12
13
14
15
16
17
18
19
20
21
大功告成, 只用了2行代码. 依赖项函数的形式和结构与路径操作函数一样. 因此, 可以把依赖项当作没有装饰器(即, 没有@app.get("/some-path"))的路径操作函数. 依赖项可以返回各种内容. 本例中依赖项预期接收如下参数:
- 类型为
str的可选参数q - 类型为
int的可选查询参数skip, 默认值是0 - 类型为
int的可选查询参数limit, 默认值是100然后, 依赖项函数返回包含这些值的dict.
# 导入 Depends
from typing import Union

from fastapi import Depends, FastAPI

app = FastAPI()


async def common_parameters(
    q: Union[str, None] = None, skip: int = 0, limit: int = 100
):
    return {"q": q, "skip": skip, "limit": limit}


@app.get("/items/")
async def read_items(commons: dict = Depends(common_parameters)):
    return commons


@app.get("/users/")
async def read_users(commons: dict = Depends(common_parameters)):
    return commons
2
3
4
5
6
7
8
9
10
11
12
13
14
15
16
17
18
19
20
21
# 声明依赖项
与在路径操作函数参数中使用Body, Query的方式相同, 声明依赖项需要使用Depends和一个新的参数:
from typing import Union

from fastapi import Depends, FastAPI

app = FastAPI()


async def common_parameters(
    q: Union[str, None] = None, skip: int = 0, limit: int = 100
):
    return {"q": q, "skip": skip, "limit": limit}


@app.get("/items/")
async def read_items(commons: dict = Depends(common_parameters)):
    return commons


@app.get("/users/")
async def read_users(commons: dict = Depends(common_parameters)):
    return commons
2
3
4
5
6
7
8
9
10
11
12
13
14
15
16
17
18
19
20
21
虽然, 在路径操作函数的参数中使用Depends的方式与Body, Query相同, 但Depends的工作方式略有不同. 这里只能传给Depends一个参数. 且该参数必须是可调用对象, 比如函数. 该函数接收的参数和路径操作函数的参数一样.
下一章介绍, 除了函数还有哪些对象可以用作依赖项.
接收到新的请求时, FastAPI执行如下操作:
- 用正确的参数调用依赖项函数(可依赖项)
- 获取函数返回的结果
- 把函数返回的结果赋值给路径操作函数的参数

这样, 只编写一次代码, FastAPI就可以为多个路径操作共享这段代码.
注意, 无需创建专门的类, 并将之传递给FastAPI以进行注册或执行类似的操作. 只要把它传递给Depends, FastAPI就知道该如何执行后续操作.
# 要不要使用 async?
FastAPI调用依赖项的方式与路径操作函数一样, 因此, 定义依赖项函数, 也要应用与路径操作函数相同的规则. 即, 既可以使用异步的async def, 也可以使用普通的def定义依赖项. 在普通的def路径操作函数中, 可以声明异步的async def依赖项; 也可以在异步的async def路径操作函数中声明普通的def依赖项. 上述这些操作都是可行的, FastAPI知道该怎么处理.
# 与OpenAPI集成
依赖项即子依赖项的所有请求声明, 验证和需求都可以集成至同一个OpenAPI概图. 所以, 交互文档里也会显示依赖项的所有信息:
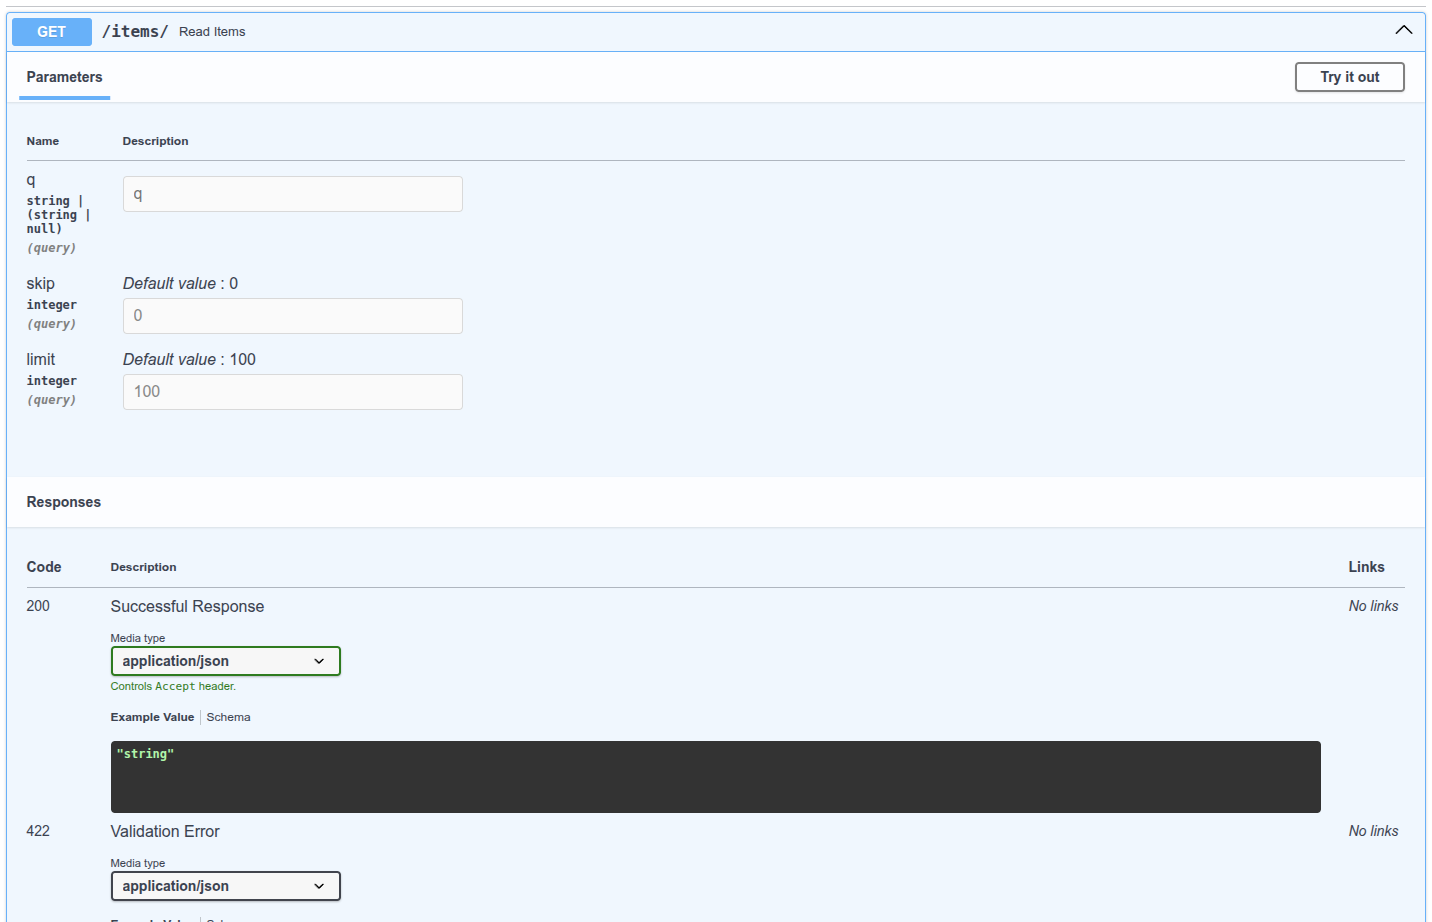
# 简单用法
观察一下就会发现, 只要路径和操作匹配, 就可以使用声明的路径操作函数. 然后, FastAPI会用正确的参数调用函数, 并提取请求中的数据. 实际上, 所有(或大多数)网络框架的工作方式都是这样的. 开发人员永远都不需要直接调用这些函数, 这些函数是有框架(在此为FastAPI)调用的.
通过依赖注入系统, 只要告诉FastAPI路径操作函数还要依赖其他在路径操作函数之前执行的内容, FastAPI就会执行函数代码, 并注入函数返回的结果. 其他与依赖注入概念相同的术语为:
- 资源(Resource)
- 提供方(Provider)
- 服务(Service)
- 可注入(Injectable)
- 组件(Component)
# FastAPI插件
依赖注入系统支持构建集成和插件. 但实际上, FastAPI根本不需要创建插件, 因为使用依赖项可以声明不限数量的, 可用于路径操作函数的集成与交互. 创建依赖项非常简单, 直观, 并且还支持导入Python包. 毫不夸张地说, 只要几行代码就可以把需要的Python包与API函数集成在一起.
下一章将详细介绍在关系型数据库, NoSQL数据库, 安全等方面使用依赖项的例子.
# FastAPI兼容性
依赖注入系统如此简洁的特性, 让FastAPI可以与下列系统兼容:
- 关系型数据库
- NoSQL数据库
- 外部支持库
- 外部API
- 认证和鉴权系统
- API使用监控系统
- 响应数据注入系统
- 等等......
# 简单而强大
虽然, 层级式依赖注入系统的定义与使用十分简单, 但它却非常强大. 比如, 可以定义依赖其他依赖项的依赖项. 最后, 依赖项层级树构建后, 依赖注入系统会处理所有依赖项及其子依赖项, 并为每一步操作提供(注入)结果.
比如, 下面4个API路径操作(端点):
/items/public//items/private//users/{user_id}/activate/items/pro/
开发人员可以使用依赖项及其子依赖项为这些路径操作添加不同的权限:
# 与OpenAPI集成
在声明需求时, 所有这些依赖项还会把参数, 验证等功能添加至路径操作. FastAPI负责把上述内容全部添加到OpenAPI概图, 并显示在交互文档中.
# 类作为依赖项
在深入探究依赖注入系统之前, 让我们升级之前的例子.
# 来自前一个例子的 dict
在前面的例子中, 我们从依赖项("可依赖对象")中返回了一个dict:
from fastapi import Depends, FastAPI

app = FastAPI()


async def common_parameters(q: str | None = None, skip: int = 0, limit: int = 100):
    return {"q": q, "skip": skip, "limit": limit}


@app.get("/items/")
async def read_items(commons: dict = Depends(common_parameters)):
    return commons


@app.get("/users/")
async def read_users(commons: dict = Depends(common_parameters)):
    return commons
2
3
4
5
6
7
8
9
10
11
12
13
14
15
16
17
但是后面我们在路径操作函数的参数commons中得到了一个dict. 我们知道编辑器不能为dict提供很多支持(比如补全), 因为编辑器不知道dict的键和值类型. 对此, 我们可以做得更好......
# 什么构成了依赖项?
到目前为止, 你看到的依赖项都被声明为函数. 但这并不是声明依赖项的唯一方法(尽管它可能是更常见的方法). 关键因素是依赖项应该是"可调用对象". Python中的"可调用对象"是指任何Python可以像函数一样"调用"的对象. 所以, 如果你有一个对象something(可能不是一个函数), 你可以"调用"它(执行它), 就像: something() 或者 something(some_argument, some_keyword_argument="foo") 这就是"可调用对象".
# 类作为依赖项
你可能会注意到, 要创建一个Python类的实例, 你可以使用相同的语法. 举个例子:
class Cat:
    def __init__(self, name: str):
        self.name = name


fluffy = Cat(name="Mr Fluffy")
2
3
4
5
6
在这个例子中, fluffy是一个Cat类的实例. 为了创建fluffy, 调用了Cat. 所以, Python类也是可调用对象. 因此, 在FastAPI中, 你可以使用一个Python类作为一个依赖项.
实际上FastAPI检查的是它是一个"可调用对象"(函数, 类或其他任何类型)以及定义的参数. 如果你在FastAPI中传递一个"可调用对象"作为依赖项, 它将分析该"可调用对象"的参数, 并以路径操作函数的参数的方式来处理它们. 包括子依赖项. 这也适用于完全没有参数的可调用对象. 这与不带参数的路径操作函数一样. 所以, 我们可以将上面的依赖项"可依赖对象"common_parameters更改为类CommonQueryParams:
from fastapi import Depends, FastAPI

app = FastAPI()


fake_items_db = [{"item_name": "Foo"}, {"item_name": "Bar"}, {"item_name": "Baz"}]


class CommonQueryParams:
    def __init__(self, q: str | None = None, skip: int = 0, limit: int = 100):
        self.q = q
        self.skip = skip
        self.limit = limit


@app.get("/items/")
async def read_items(commons: CommonQueryParams = Depends(CommonQueryParams)):
    response = {}
    if commons.q:
        response.update({"q": commons.q})
    items = fake_items_db[commons.skip : commons.skip + commons.limit]
    response.update({"items": items})
    return response
2
3
4
5
6
7
8
9
10
11
12
13
14
15
16
17
18
19
20
21
22
23
注意用于创建类实例的__init__方法:
from fastapi import Depends, FastAPI

app = FastAPI()


fake_items_db = [{"item_name": "Foo"}, {"item_name": "Bar"}, {"item_name": "Baz"}]


class CommonQueryParams:
    def __init__(self, q: str | None = None, skip: int = 0, limit: int = 100):
        self.q = q
        self.skip = skip
        self.limit = limit


@app.get("/items/")
async def read_items(commons: CommonQueryParams = Depends(CommonQueryParams)):
    response = {}
    if commons.q:
        response.update({"q": commons.q})
    items = fake_items_db[commons.skip : commons.skip + commons.limit]
    response.update({"items": items})
    return response
2
3
4
5
6
7
8
9
10
11
12
13
14
15
16
17
18
19
20
21
22
23
它与我们以前的common_parameters具有相同的参数:
from fastapi import Depends, FastAPI

app = FastAPI()


async def common_parameters(q: str | None = None, skip: int = 0, limit: int = 100):
    return {"q": q, "skip": skip, "limit": limit}


@app.get("/items/")
async def read_items(commons: dict = Depends(common_parameters)):
    return commons


@app.get("/users/")
async def read_users(commons: dict = Depends(common_parameters)):
    return commons
2
3
4
5
6
7
8
9
10
11
12
13
14
15
16
17
这些参数就是FastAPI用来"处理"依赖项的. 在两个例子下, 都有:
- 一个可选的
q查询参数, 是str类型 - 一个
skip查询参数, 是int类型, 默认值为0 - 一个
limit查询参数, 是int类型, 默认值为100
在两个例子下, 数据都将被转换, 验证, 在OpenAPI shema上文档化, 等等.
# 使用它
现在, 你可以使用这个类来声明你的依赖项了.
from fastapi import Depends, FastAPI

app = FastAPI()


fake_items_db = [{"item_name": "Foo"}, {"item_name": "Bar"}, {"item_name": "Baz"}]


class CommonQueryParams:
    def __init__(self, q: str | None = None, skip: int = 0, limit: int = 100):
        self.q = q
        self.skip = skip
        self.limit = limit


@app.get("/items/")
async def read_items(commons: CommonQueryParams = Depends(CommonQueryParams)):
    response = {}
    if commons.q:
        response.update({"q": commons.q})
    items = fake_items_db[commons.skip : commons.skip + commons.limit]
    response.update({"items": items})
    return response
2
3
4
5
6
7
8
9
10
11
12
13
14
15
16
17
18
19
20
21
22
23
FastAPI调用CommonQueryParams类. 这将创建该类的一个"实例", 该实例将作为参数commons被传递给你的函数.
# 类型注解 vs Depends
注意, 我们在上面的代码中编写了两次CommonQueryParams: commons: CommonQueryParams = Depends(CommonQueryParams) 最后的CommonQueryParams ... = Depends(CommonQueryParams) 实际上是FastAPI用来知道依赖项是什么的. FastAPI将从依赖项中提取声明的参数, 这才是FastAPI实际调用的.
本例中, 第一个CommonQueryParams: commons: CommonQueryParams ... 对于FastAPI没有任何特殊的意义. FastAPI不会使用它进行数据转换, 验证等(因为对于这, 它使用= Depends(CommonQueryParams)). 实际上可以这样编写: commons = Depends(CommonQueryParams) 就像:
from fastapi import Depends, FastAPI

app = FastAPI()


fake_items_db = [{"item_name": "Foo"}, {"item_name": "Bar"}, {"item_name": "Baz"}]


class CommonQueryParams:
    def __init__(self, q: str | None = None, skip: int = 0, limit: int = 100):
        self.q = q
        self.skip = skip
        self.limit = limit


@app.get("/items/")
async def read_items(commons=Depends(CommonQueryParams)):
    response = {}
    if commons.q:
        response.update({"q": commons.q})
    items = fake_items_db[commons.skip : commons.skip + commons.limit]
    response.update({"items": items})
    return response
2
3
4
5
6
7
8
9
10
11
12
13
14
15
16
17
18
19
20
21
22
23
但是声明类型是被鼓励的, 因为那样你的编辑器就会知道将传递什么作为参数commons, 然后它可以帮助你完成代码, 类型检查, 等等:

# 快捷方式
但是你可以看到, 我们在这里有一些代码重复了, 编写了CommonQueryParams两次: commons: CommonQueryParams = Depends(CommonQueryParams) FastAPI为这些情况提供了一个快捷方式, 在这些情况下, 依赖项明确地是一个类, FastAPI将"调用"它来创建类本身的一个实例.
对于这些特定的情况, 你可以跟随以下操作, 不是写成这样: commons: CommonQueryParams = Depends(CommonQueryParams) 而是这样写: commons: CommonQueryParams = Depends().
你声明依赖项作为参数的类型, 并使用Depends()作为该函数的参数的"默认"值(在=之后), 而在Depends()中没有任何参数, 而不是在Depends(CommonQueryParams)编写完整的类. 同样的例子看起来像这样:
from fastapi import Depends, FastAPI

app = FastAPI()


fake_items_db = [{"item_name": "Foo"}, {"item_name": "Bar"}, {"item_name": "Baz"}]


class CommonQueryParams:
    def __init__(self, q: str | None = None, skip: int = 0, limit: int = 100):
        self.q = q
        self.skip = skip
        self.limit = limit


@app.get("/items/")
async def read_items(commons: CommonQueryParams = Depends()):
    response = {}
    if commons.q:
        response.update({"q": commons.q})
    items = fake_items_db[commons.skip : commons.skip + commons.limit]
    response.update({"items": items})
    return response
2
3
4
5
6
7
8
9
10
11
12
13
14
15
16
17
18
19
20
21
22
23
FastAPI会知道怎么处理. 如果这看起来更加混乱而不是更加有帮助, 那么请忽略它, 你不需要它. 这只是一个快捷方式. 因为FastAPI关心的是帮助你减少代码重复.
# 子依赖项
FastAPI支持创建含子依赖项的依赖项. 并且, 可以按需声明任意深度的子依赖项嵌套层级. FastAPI负责处理解析不同深度的子依赖项.
# 第一层依赖项
下列代码创建了第一层依赖项:
from typing import Union

from fastapi import Cookie, Depends, FastAPI

app = FastAPI()


def query_extractor(q: Union[str, None] = None):
    return q


def query_or_cookie_extractor(
    q: str = Depends(query_extractor),
    last_query: Union[str, None] = Cookie(default=None),
):
    if not q:
        return last_query
    return q


@app.get("/items/")
async def read_query(query_or_default: str = Depends(query_or_cookie_extractor)):
    return {"q_or_cookie": query_or_default}
2
3
4
5
6
7
8
9
10
11
12
13
14
15
16
17
18
19
20
21
22
23
这段代码声明了类型为str的可选查询参数q, 然后返回这个查询参数. 这个函数很简单(不过也没什么用), 但却有助于让我们专注于了解子依赖项的工作方式.
# 第二层依赖项
接下来, 创建另一个依赖项函数, 并同时用该依赖项自身再声明一个依赖项(所以这也是一个依赖项):
from typing import Union

from fastapi import Cookie, Depends, FastAPI

app = FastAPI()


def query_extractor(q: Union[str, None] = None):
    return q


def query_or_cookie_extractor(
    q: str = Depends(query_extractor),
    last_query: Union[str, None] = Cookie(default=None),
):
    if not q:
        return last_query
    return q


@app.get("/items/")
async def read_query(query_or_default: str = Depends(query_or_cookie_extractor)):
    return {"q_or_cookie": query_or_default}
2
3
4
5
6
7
8
9
10
11
12
13
14
15
16
17
18
19
20
21
22
23
这里重点说明一下声明的参数:
- 尽管该函数自身是依赖项, 但还声明了另一个依赖项(它依赖于其他对象)
- 该函数依赖
query_extractor, 并把query_extractor的返回值赋给参数q
- 该函数依赖
- 同时, 该函数还声明了类型是
str的可选cookie(last_query)- 用户未提供查询参数
q时, 则使用上次使用后保存在cookie中的查询.
- 用户未提供查询参数
# 使用依赖项
接下来, 就可以使用依赖项:
from typing import Union

from fastapi import Cookie, Depends, FastAPI

app = FastAPI()


def query_extractor(q: Union[str, None] = None):
    return q


def query_or_cookie_extractor(
    q: str = Depends(query_extractor),
    last_query: Union[str, None] = Cookie(default=None),
):
    if not q:
        return last_query
    return q


@app.get("/items/")
async def read_query(query_or_default: str = Depends(query_or_cookie_extractor)):
    return {"q_or_cookie": query_or_default}
2
3
4
5
6
7
8
9
10
11
12
13
14
15
16
17
18
19
20
21
22
23
注意, 这里在路径操作函数中只声明了一个依赖项, 即query_or_cookie_extractor. 但FastAPI必须先处理query_extractor, 以便在调用query_or_cookie_extractor时使用query_extractor返回的结果.

# 多次使用同一个依赖项
如果在同一个路径操作多次声明了同一个依赖项, 例如, 多个依赖项共用一个子依赖项, FastAPI在处理同一请求时, 只调用一次该子依赖项.
FastAPI不会为同一个请求多次调用同一个依赖项, 而是把依赖项的返回值进行缓存, 并把它传递给同一请求中所有需要使用该返回值的依赖项.
在高级使用场景中, 如果不想使用缓存值, 而是为需要在同一请求的每一步操作(多次)中都实际调用依赖项, 可以把Depends的参数use_cache的值设置为False:
async def needy_dependency(fresh_value: str = Depends(get_value, use_cache=False)):
    return {"fresh_value": fresh_value}
2
# 小结
千万别被本章里这些花里胡哨的词藻吓到了, 其实依赖注入系统非常简单. 依赖注入无非是与路径操作函数一样的函数罢了. 但它依然非常强大, 能够声明任意嵌套深度的图或树状的依赖结构.
这些简单的例子现在看上去虽然没有什么实用价值, 但在安全一章中, 你会了解到这些例子的用途. 以及这些例子所能节省的代码量.
# 路径操作装饰器依赖项
有时, 我们并不需要在路径操作函数中使用依赖项的返回值. 或者说, 有些依赖项不返回值. 但仍要执行或解析该依赖项. 对于这种情况, 不必在声明路径操作函数的参数时使用Depends, 而是可以在路径操作装饰器中添加一个由dependencies组成的list.
# 在路径操作装饰器中添加 dependencies 参数
路径操作装饰器支持可选参数dependencies. 该参数的值是由Depend()组成的list:
from fastapi import Depends, FastAPI, Header, HTTPException

app = FastAPI()


async def verify_token(x_token: str = Header()):
    if x_token != "fake-super-secret-token":
        raise HTTPException(status_code=400, detail="X-Token header invalid")


async def verify_key(x_key: str = Header()):
    if x_key != "fake-super-secret-key":
        raise HTTPException(status_code=400, detail="X-Key header invalid")
    return x_key


@app.get("/items/", dependencies=[Depends(verify_token), Depends(verify_key)])
async def read_items():
    return [{"item": "Foo"}, {"item": "Bar"}]
2
3
4
5
6
7
8
9
10
11
12
13
14
15
16
17
18
19
路径操作装饰器依赖项(以下简称为"路径装饰器依赖项")的执行或解析方式和普通依赖项一样, 但就算这些依赖项会返回值, 它们的值也不会传递给路径操作函数.
有些编辑器会检查代码中没使用过的函数参数, 并显示错误提示. 在路径操作装饰器中使用dependencies参数, 可以确保在执行依赖项的同时, 避免编辑器显示错误提示. 使用路径装饰器依赖项还可以避免开发新人误会代码中包含无用的未使用参数.
本例中, 使用的是自定义响应头X-Key和X-Token, 但实际开发中, 尤其是在实现安全措施时, 最好使用FastAPI内置的安全工具(详见下一章).
# 依赖项错误和返回值
路径装饰器依赖项也可以使用普通的依赖项函数.
# 依赖项的需求项
路径装饰器依赖项可以声明请求的需求项(比如响应头)或其他子依赖项:
from fastapi import Depends, FastAPI, Header, HTTPException

app = FastAPI()


async def verify_token(x_token: str = Header()):
    if x_token != "fake-super-secret-token":
        raise HTTPException(status_code=400, detail="X-Token header invalid")


async def verify_key(x_key: str = Header()):
    if x_key != "fake-super-secret-key":
        raise HTTPException(status_code=400, detail="X-Key header invalid")
    return x_key


@app.get("/items/", dependencies=[Depends(verify_token), Depends(verify_key)])
async def read_items():
    return [{"item": "Foo"}, {"item": "Bar"}]
2
3
4
5
6
7
8
9
10
11
12
13
14
15
16
17
18
19
# 触发异常
路径装饰器依赖项与正常的依赖项一样, 可以raise异常:
from fastapi import Depends, FastAPI, Header, HTTPException

app = FastAPI()


async def verify_token(x_token: str = Header()):
    if x_token != "fake-super-secret-token":
        raise HTTPException(status_code=400, detail="X-Token header invalid")


async def verify_key(x_key: str = Header()):
    if x_key != "fake-super-secret-key":
        raise HTTPException(status_code=400, detail="X-Key header invalid")
    return x_key


@app.get("/items/", dependencies=[Depends(verify_token), Depends(verify_key)])
async def read_items():
    return [{"item": "Foo"}, {"item": "Bar"}]
2
3
4
5
6
7
8
9
10
11
12
13
14
15
16
17
18
19
# 返回值
无论路径装饰器依赖项是否返回值, 路径操作都不会使用这些值. 因此, 可以复用在其他位置使用过的, (能返回值的)普通依赖项, 即使没有使用这个值, 也会执行该依赖项:
from fastapi import Depends, FastAPI, Header, HTTPException

app = FastAPI()


async def verify_token(x_token: str = Header()):
    if x_token != "fake-super-secret-token":
        raise HTTPException(status_code=400, detail="X-Token header invalid")


async def verify_key(x_key: str = Header()):
    if x_key != "fake-super-secret-key":
        raise HTTPException(status_code=400, detail="X-Key header invalid")
    return x_key


@app.get("/items/", dependencies=[Depends(verify_token), Depends(verify_key)])
async def read_items():
    return [{"item": "Foo"}, {"item": "Bar"}]
2
3
4
5
6
7
8
9
10
11
12
13
14
15
16
17
18
19
# 为一组路径操作定义依赖项
稍后, 大型应用-多文件一章中会介绍如何使用多个文件创建大型应用程序, 在这一章中, 你将了解到如何为一组路径操作声明单个dependencies参数.
# 全局依赖项
接下来, 我们将学习如何为FastAPI应用程序添加全局依赖项, 创建应用于每个路径操作的依赖项.
# 全局依赖项
有时, 我们要为整个应用添加依赖项. 通过与定义路径装饰器依赖项类似的方式, 可以把依赖项添加至整个FastAPI应用. 这样一来, 就可以为所有路径操作应用该依赖项:
from fastapi import Depends, FastAPI, Header, HTTPException


async def verify_token(x_token: str = Header()):
    if x_token != "fake-super-secret-token":
        raise HTTPException(status_code=400, detail="X-Token header invalid")


async def verify_key(x_key: str = Header()):
    if x_key != "fake-super-secret-key":
        raise HTTPException(status_code=400, detail="X-Key header invalid")
    return x_key


app = FastAPI(dependencies=[Depends(verify_token), Depends(verify_key)])


@app.get("/items/")
async def read_items():
    return [{"item": "Portal Gun"}, {"item": "Plumbus"}]


@app.get("/users/")
async def read_users():
    return [{"username": "Rick"}, {"username": "Morty"}]
2
3
4
5
6
7
8
9
10
11
12
13
14
15
16
17
18
19
20
21
22
23
24
25
路径装饰器依赖项一章的思路均适用于全局依赖项, 在本例中, 这些依赖项可以用于应用中的所有路径操作.
# 为一组路径操作定义依赖项
稍后, 大型应用-多文件一章中会介绍如何使用多个文件创建大型应用程序, 在这一章中, 你将了解到如何为一组路径操作声明单个dependencies参数.
# 使用yield的依赖项
FastAPI支持在完成后执行一些额外步骤的依赖项. 为此, 你需要使用yield而不是return, 然后再编写这些额外的步骤(代码).
确保在每个依赖项中只使用一次yield
技术细节
任何一个可以与以下内容一起使用的函数:
都可以作为FastAPI的依赖项. 实际上, FastAPI内部就使用了这两个装饰器.
# 使用 yield 的数据库依赖项
例如, 你可以使用这种方式创建一个数据库会话, 并在完成后关闭它. 在发送响应之前, 只会执行yield语句及之前的代码:
async def get_db():
    db = DBSession()
    try:
        yield db
    finally:
        db.close()
2
3
4
5
6
生成的值会注入到路由函数和其他依赖项中:
async def get_db():
    db = DBSession()
    try:
        yield db
    finally:
        db.close()
2
3
4
5
6
yield语句后面的代码会在创建响应后, 发送响应前执行:
async def get_db():
    db = DBSession()
    try:
        yield db
    finally:
        db.close()
2
3
4
5
6
你可以使用async或普通函数. FastAPI会像处理普通依赖一样, 对每个依赖做正确的处理.
# 使用 yield 和 try 的依赖项
如果在包含yield的依赖中声明使用try代码块, 你会捕获到使用依赖时抛出的任何异常. 例如, 如果某段代码在另一个依赖中或在路由函数中使用数据库事务"回滚"或产生任何其他错误, 你将会在依赖中捕获到异常. 因此, 你可以使用except SomeException在依赖中捕获特定的异常. 同样, 你也可以使用finally来确保退出步骤得到执行, 无论是否存在异常.
async def get_db():
    db = DBSession()
    try:
        yield db
    finally:
        db.close()
2
3
4
5
6
# 使用 yield 的子依赖项
你可以声明任意数量和层级的树状依赖, 而且它们中的任何一个或所有的都可以使用yield. FastAPI会确保每个带有yield的依赖中的"退出代码"按正确顺序运行. 例如, dependency_c可以依赖于dependency_b, 而dependency_b则依赖于dependency_a.
from typing import Annotated

from fastapi import Depends


async def dependency_a():
    dep_a = generate_dep_a()
    try:
        yield dep_a
    finally:
        dep_a.close()


async def dependency_b(dep_a: Annotated[DepA, Depends(dependency_a)]):
    dep_b = generate_dep_b()
    try:
        yield dep_b
    finally:
        dep_b.close(dep_a)


async def dependency_c(dep_b: Annotated[DepB, Depends(dependency_b)]):
    dep_c = generate_dep_c()
    try:
        yield dep_c
    finally:
        dep_c.close(dep_b)
2
3
4
5
6
7
8
9
10
11
12
13
14
15
16
17
18
19
20
21
22
23
24
25
26
27
所有这些依赖都可以使用yield. 在这种情况下, dependency_c在执行其推出代码时需要dependency_b(此处称为dep_b)的值仍然可用. 而dependency_b反过来则需要dependency_a(此处称为dep_a)的值在其退出代码中可用.
from typing import Annotated

from fastapi import Depends


async def dependency_a():
    dep_a = generate_dep_a()
    try:
        yield dep_a
    finally:
        dep_a.close()


async def dependency_b(dep_a: Annotated[DepA, Depends(dependency_a)]):
    dep_b = generate_dep_b()
    try:
        yield dep_b
    finally:
        dep_b.close(dep_a)


async def dependency_c(dep_b: Annotated[DepB, Depends(dependency_b)]):
    dep_c = generate_dep_c()
    try:
        yield dep_c
    finally:
        dep_c.close(dep_b)
2
3
4
5
6
7
8
9
10
11
12
13
14
15
16
17
18
19
20
21
22
23
24
25
26
27
同样, 你可以混合使用带有yield或return的依赖. 你也可以声明一个依赖于多个带有yield的依赖, 等等. 你可以拥有任何你想要的依赖组合. FastAPI将确保按正确的顺序运行所有内容.
技术细节
这是由Python的上下文管理器完成的. FastAPI在内部使用它们来实现这一点.
# 包含 yield 和 HTTPException 的依赖项
你可以使用带有yield的依赖项, 并且可以包含try代码块用于捕获异常. 同样, 你可以在yield之后的退出代码中抛出一个HTTPException或类似的异常.
这是一种相对高级的技巧, 在大多数情况下你并不需要使用它, 因为你可以在其他代码中抛出异常(包括HTTPException), 例如在路由函数中. 但是如果你需要, 你也可以在依赖项中做到这一点.
你还可以创建一个自定义异常处理器用于捕获异常(同时也可以抛出另一个HTTPException).
# 包含 yield 和 except 的依赖项
如果你在包含yield的依赖项中使用except捕获了一个异常, 然后你没有重新抛出该异常(或抛出一个新异常), 与在普通的Python代码中相同, FastAPI不会注意到发生了异常.
from typing import Annotated

from fastapi import Depends, FastAPI, HTTPException

app = FastAPI()


class InternalError(Exception):
    pass


def get_username():
    try:
        yield "Rick"
    except InternalError:
        print("Oops, we didn't raise again, Britney 😱")


@app.get("/items/{item_id}")
def get_item(item_id: str, username: Annotated[str, Depends(get_username)]):
    if item_id == "portal-gun":
        raise InternalError(
            f"The portal gun is too dangerous to be owned by {username}"
        )
    if item_id != "plumbus":
        raise HTTPException(
            status_code=404, detail="Item not found, there's only a plumbus here"
        )
    return item_id
2
3
4
5
6
7
8
9
10
11
12
13
14
15
16
17
18
19
20
21
22
23
24
25
26
27
28
29
在示例代码的情况下, 客户端将会受到HTTP 500 Internal Server Error的响应, 因为我们没有抛出HTTPException或者类似的异常, 并且服务器也不会有任何日志或者其他提示来告诉我们错误是什么.
# 在包含 yield 和 except 的依赖项中一定要 raise
如果你在使用yield的依赖项中捕获到了一个异常, 你应该再次抛出捕获到的异常, 除非你抛出HTTPException或类似的其他异常, 你可以使用raise再次抛出捕获到的异常.
from typing import Annotated

from fastapi import Depends, FastAPI, HTTPException

app = FastAPI()


class InternalError(Exception):
    pass


def get_username():
    try:
        yield "Rick"
    except InternalError:
        print("We don't swallow the internal error here, we raise again 😎")
        raise


@app.get("/items/{item_id}")
def get_item(item_id: str, username: Annotated[str, Depends(get_username)]):
    if item_id == "portal-gun":
        raise InternalError(
            f"The portal gun is too dangerous to be owned by {username}"
        )
    if item_id != "plumbus":
        raise HTTPException(
            status_code=404, detail="Item not found, there's only a plumbus here"
        )
    return item_id
2
3
4
5
6
7
8
9
10
11
12
13
14
15
16
17
18
19
20
21
22
23
24
25
26
27
28
29
30
现在客户端同样会得到HTTP 500 Internal Server Error响应, 但是服务器日志会记录下我们自定义的InternalError.
# 使用 yield 的依赖项的执行
执行顺序大致如下时序图所示. 时间轴从上到下, 每一列都代表交互或者代码执行的一部分.
只会向客户端发送一次响应, 可能是一个错误响应, 也可能是来自路由函数的响应. 在发送了其中一个响应之后, 就无法再发送其他响应了.
这个时序图展示了HTTPException, 除此之外你也可以抛出任何你在使用yield的依赖项中或者自定义异常处理器中捕获的异常.
如果你引发任何异常, 它将传递给使用yield的依赖项, 包括HTTPException. 在大多数情况下你应当从使用yield的依赖项中重新抛出捕获的异常或者一个新的异常来确保它会被正确的处理.
# 包含 yield, HTTPException, except 的依赖项和后台任务
注意
你大概率不需要了解这些技术细节, 可以跳过这一章节继续阅读后续的内容.
如果你使用的FastAPI的版本早于0.106.0, 并且在使用后台任务中使用了包含yield的依赖项中的资源, 那么这些细节会对你有一些用处.
# 包含 yield 和 except 的依赖项的技术细节
在FastAPI 0.110.0版本之前, 如果使用了一个包含yield的依赖项, 你在依赖项中使用except捕获了一个异常, 但是你没有再次抛出该异常, 这个异常会被自动抛出/转发到异常处理器或者内部服务错误处理器.
# 后台任务和使用 yield 的依赖项的技术细节
在FastAPI 0.106.0版本之前, 在yield后面抛出异常是不可行的, 因为yield之后的退出代码是在响应被发送之后再执行, 这个时候异常处理器已经执行过了. 这样设计的目的主要是为了允许在后台任务重使用被依赖项yield的对象, 因为退出代码会在后台任务结束后再执行. 然而这也意味着在等待响应通过网络传输的同时, 非必要的持有一个yield依赖项中的资源(例如数据库连接), 这一行为在FastAPI 0.106.0被改变了.
除此之外, 后台任务通常是一组独立的逻辑, 应该被单独处理, 并且使用它自己的资源(例如它自己的数据库连接). 这样也会让你的代码更加简洁.
如果你之前依赖于这一行为, 那么现在你应该在后台任务中创建并使用它自己的资源, 不要在内部使用属于yield依赖项的资源. 例如, 你应该在后台任务中创建一个新的数据库会话用于查询数据, 而不是使用相同的会话. 你应该将对象的ID作为参数传递给后台任务函数, 然后在该函数中重新获取该对象, 而不是直接将数据库对象作为参数.
# 上下文管理器
# 什么是"上下文管理器"
"上下文管理器"是你可以在with语句中使用的任何Python对象. 例如, 你可以使用with读取文件:
with open("./somefile.txt") as f:
    contents = f.read()
    print(contents)
2
3
在底层, open("./somefile.txt")创建了一个被称为"上下文管理器"的对象. 当with代码块结束时, 它会确保关闭文件, 即使发生了异常也是如此. 当你使用yield创建一个依赖项时, FastAPI会在内部将其转换为上下文管理器, 并与其他相关工具结合使用.
# 在使用 yield 的依赖项中使用上下文管理器
注意
这是一个更为"高级"的想法. 如果你刚开始使用FastAPI, 你可以暂时跳过它.
在Python中, 你可以通过创建一个带有__enter__()核__exit__()方法的类来创建上下文管理器. 你也可以在FastAPI的yield依赖项中通过with或者async with语句来使用它们:
class MySuperContextManager:
    def __init__(self):
        self.db = DBSession()

    def __enter__(self):
        return self.db

    def __exit__(self, exc_type, exc_value, traceback):
        self.db.close()


async def get_db():
    with MySuperContextManager() as db:
        yield db
2
3
4
5
6
7
8
9
10
11
12
13
14
另一种创建上下文管理器的方法是:
- @contextlib.contextmanager或者
- @contextlib.asynccontextmanager
使用它们装饰一个只有单个
yield的函数. 这就是FastAPI内部对于yield依赖项的处理方式. 但是你不需要为FastAPI的依赖项使用这些装饰器(而且也不应该). FastAPI会在内部为你处理这些.
# 安全性
# 安全性介绍
有许多方法可以处理安全性, 身份认证和授权等问题. 而且这通常是一个复杂而困难的话题. 在许多框架和系统中, 仅处理安全性和身份认证就会花费大量的精力和代码(在许多情况下, 可能占编写的所有代码的50%或更多).
FastAPI提供了多种工具, 可帮助你以标准的方式轻松, 快速地处理安全性, 而无需研究和学习所有的安全规范. 如果你不关心这些术语, 而只需要立即通过基于用户名和密码的身份认证来增加安全性, 请跳转到下一章.
# OAuth2
OAuth2是一个规范, 它定义了几种处理身份认证和授权的方法. 它是一个相当广泛的规范, 涵盖了一些复杂的使用场景. 它包括了使用第三方进行身份认证的方法. 这就是所有带有使用Facebook, Google, Twitter, Github登录的系统背后所使用的机制.
# OAuth1
有一个OAuth1, 它与OAuth2完全不同, 并且更为复杂, 因为它直接包含了有关如何加密通信的规范. 如今它已经不是很流行, 没有被广泛使用了. OAuth2没有指定如何加密通信, 它期望你为应用程序使用HTTPS进行通信.
在有关部署的章节中, 你将了解如何使用Traefik和Let's Encrypt免费设置HTTPS.
# OpenID Connect
OpenID Connect是另一个基于OAuth2的规范. 它只是扩展了OAuth2, 并明确了一些在OAuth2中相对模糊的内容, 以尝试使其更具互操作性. 例如, Google登录使用OpenID Connect(底层使用OAuth2). 但是Facebook登录不支持OpenID Connect. 它具有自己的OAuth2风格.
# OpenID(非OpenID Connect)
还有一个OpenID规范. 它试图解决与OpenID Connect相同的问题, 但它不基于OAuth2. 因此, 它是一个完整的附加系统. 如今它已经不是很流行, 没有广泛使用了.
# OpenAPI
OpenAPI(以前称为Swagger)是用于构建API的开放规范(先已成为Linux Foundation的一部分). FastAPI基于OpenAPI. 这就是使多个自动交互式文档界面, 代码生成等称为可能的原因. OpenAPI有一种定义多个安全方案的方法. 通过使用它们, 你可以利用所有这些基于标准的工具, 包括这些交互式文档系统.
OpenAPI定义了一下安全方案:
apiKey: 一个特定应用程序的秘钥, 可以来自:- 查询参数
- 请求头
- cookie
http: 标准的HTTP身份认证系统, 包括:bearer: 一个值为Bearer加令牌字符串的Authorization请求头. 这是从OAuth2继承的.- HTTP Basic认证方式
- HTTP Digest, 等等
oauth2: 所有的OAuth2处理安全性的方式(称为流程). *以下几种流程适合构建OAuth2身份认证的提供者(例如Google, Facebook, Twitter, Github等):implicit,clientCredentials,authorizationCode.- 但是有一个特定的流程可以完美地用于直接在同一应用程序中处理身份认证:
password: 接下来几章将介绍它的示例.
- 但是有一个特定的流程可以完美地用于直接在同一应用程序中处理身份认证:
openIdConnect: 提供了一种定义如何自动发现OAuth2身份认证数据的方法.- 此自动发现机制是OpenID Connect规范中定义的内容.
集成其他身份认证/授权提供者(例如Google, Facebook, Twitter, GitHub等)也是可能的, 而且较为容易.
最复杂的问题是创建一个像这样的身份认证/授权提供程序, 但是FastAPI为你提供了轻松完成任务的工具, 同时为你解决了重活.
# FastAPI实用工具
FastAPI在fastapi.security模块中为每个安全方案提供了几种工具, 这些工具简化了这些安全机制的使用方法. 在下一章中, 你将看到如何使用FastAPI所提供的工具为你的API增加安全性. 而且你还将看到它如何自动地被集成到交互式文档系统中.
# 安全-第一步
假设后端API在某个域. 前端在另一个域, 或(移动应用中)在同一个域的不同路径下. 并且, 前端要使用后端的username和password验证用户身份. 固然, FastAPI支持OAuth2身份验证. 但为了节省开发者的时间, 不要只为了查找很少的内容, 不得不阅读冗长的规范文档. 我们建议使用FastAPI的安全工具.
# 概览
首先, 看看下面的代码是怎么运行的, 然后再回过来了解其背后的原理.
# 创建 main.py
from typing import Annotated

from fastapi import Depends, FastAPI
from fastapi.security import OAuth2PasswordBearer

app = FastAPI()

oauth2_scheme = OAuth2PasswordBearer(tokenUrl="token")


@app.get("/items/")
async def read_items(token: Annotated[str, Depends(oauth2_scheme)]):
    return {"token": token}
2
3
4
5
6
7
8
9
10
11
12
13
# 运行
说明
先安装python-multipart, 安装命令: pip install python-multipart. 这是因为OAuth2使用表单数据发送username和password.
uvicorn main:app --reload
# 查看文档
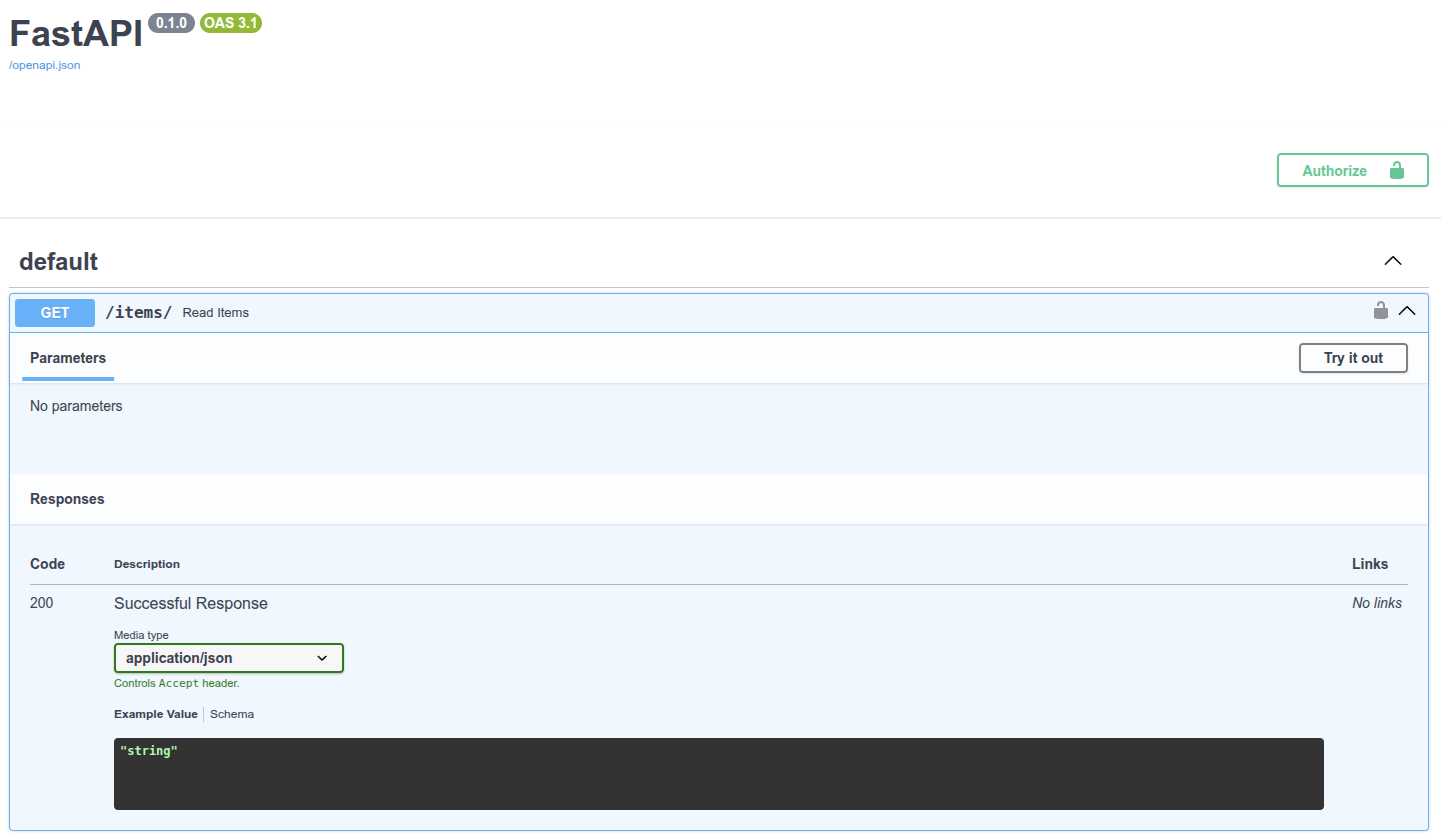
Authorize 按钮
路径操作的右上角也出现了一个可以点击的小锁图标.
点击Authorize按钮, 弹出授权表单, 输入username与password及其他可选字段:
目前, 在表单中输入内容不会有任何反应, 后文会介绍相关内容.
虽然此文档不是给前端最终用户使用的, 但这个自动工具非常实用, 可在文档中与所有API交互. 前端团队(可能就是开发者本人)可以使用本工具. 第三方系统也可以调用本工具. 开发者也可以用它来调试, 检测, 测试应用.
# 密码流
现在, 我们回过头来介绍这段代码的原理. Password流是OAuth2定义的, 用于处理安全与身份验证的方式(流). OAuth2的设计目标是为了让后端或API独立于服务器验证用户身份. 但在本例中, FastAPI应用会处理API与身份验证. 下面, 我们来看一下简化的运行流程:
- 用户在前端输入
username与password, 并点击回车 - (用户浏览器中运行的)前端把
username与password发送至API中指定的URL(使用tokenUrl="token"声明) - API检查
username与password, 并用令牌(Token)响应(暂未实现此功能) - 令牌只是用于验证用户的字符串
- 一般来说, 令牌会在一段时间后过期
- 过期后, 用户要再次登录
- 这样一来, 就算令牌被人窃取, 风险也较低. 因为它与永久秘钥不同, 在绝大多数情况下, 不会长期有效.
- 前端临时将令牌存储在某个位置
- 用户点击前端, 前往前端应用的其他部件
- 前端需要从API中提取更多数据
- 为指定的端点(Endpoint)进行身份验证
- 因此, 用API验证身份时, 要发送值为
Bearer+令牌 的请求头Authorization - 加入令牌为
foobar,Authorization请求头就是:Bearer foobar
# FastAPI的 Oauth2PasswordBearer
FastAPI提供了不同抽象级别的安全工具. 本例使用OAuth2的Password流以及Bearer令牌(Token). 为此要使用OAuth2PasswordBearer类.
Bearer令牌不是唯一的选择. 但它是最适合这个用例的方案. 甚至可以说, 它是适用于绝大多数用例的最佳方案, 除非你是OAuth2的专家, 知道为什么其它方案更合适. 本例中, FastAPI还提供了构建工具.
创建OAuth2PasswordBearer的类实例时, 要传递tokenUrl参数. 该参数包含客户端(用户浏览器中运行的前端)的URL, 用于发送username与password, 并获取令牌.
from fastapi import Depends, FastAPI
from fastapi.security import OAuth2PasswordBearer

app = FastAPI()

oauth2_scheme = OAuth2PasswordBearer(tokenUrl="token")


@app.get("/items/")
async def read_items(token: str = Depends(oauth2_scheme)):
    return {"token": token}
2
3
4
5
6
7
8
9
10
11
在此, tokenUrl="token"指向的是暂未创建的相对URLtoken. 这个相对URL相当于./token.
因为使用的是相对URL, 如果API位于https://example.com/, 则指向https://example.com/token. 但如果API位于https://example.com/api/v1/, 它指向的就是https://example.com/api/v1/token.
使用相对URL非常重要, 可以确保应用在遇到使用代理这样的高级用例时, 也能正常运行.
该参数不会创建端点或路径操作, 但会声明客户端用来获取令牌的URL/token. 此信息用于OpenAPI及API文档. 接下来, 学习如何创建实际的路径操作.
说明
严苛的Pythonista可能不喜欢用tokenUrl这种命名风格代替token_url.
这种命名风格是因为要使用与OpenAPI规范中相同的名字. 以便在深入校验安全方案时, 能通过复制粘贴查找更多相关信息.
oauth2_scheme变量是OAuth2PasswordBearer的实例, 也是可调用项. 以如下方式调用:
oauth2_scheme(some, parameters)
因此, Depends可以调用oauth2_scheme变量.
# 使用
接下来, 使用Depends把oauth2_scheme传入依赖项.
from fastapi import Depends, FastAPI
from fastapi.security import OAuth2PasswordBearer

app = FastAPI()

oauth2_scheme = OAuth2PasswordBearer(tokenUrl="token")


@app.get("/items/")
async def read_items(token: str = Depends(oauth2_scheme)):
    return {"token": token}
2
3
4
5
6
7
8
9
10
11
该依赖项使用字符串(str)接收路径操作函数的参数token. FastAPI使用依赖项在OpenAPI概图(及API文档)中定义安全方案.
技术细节
FastAPI使用(在依赖项中声明的)类OAuth2PasswordBearer在OpenAPI中定义安全方案, 这是因为它继承自fastapi.security.oauth2.OAuth2, 而该类又是继承自fastapi.security.base.SecurityBase.
所有与OpenAPI(及API文档)集成的安全工具都继承自SecurityBase, 这就是为什么FastAPI能把他们集成至OpenAPI的原因.
# 实现的操作
FastAPI校验请求中的Authorization请求头, 核对请求头的值是不是由 Bearer + 令牌 组成, 并返回令牌字符串(str).
如果没有找到Authorization请求头, 或请求头的值不是 Bearer + 令牌 . FastAPI直接返回401错误状态码(UNAUTHORIZED).
开发者不需要检查错误信息, 查看令牌是否存在, 只要该函数能够执行, 函数中就会包含令牌字符串. 正如下图所示, API文档已经包含了这项功能:
目前, 暂时还没有实现验证令牌是否有效的功能, 不过后文很快会介绍.
# 小结
如上, 只要多写三四行代码, 就可以添加基础的安全表单.
# 获取当前用户
上一章中, (基于依赖注入系统的)安全系统向路径操作函数传递了str类型的token:
from fastapi import Depends, FastAPI
from fastapi.security import OAuth2PasswordBearer

app = FastAPI()

oauth2_scheme = OAuth2PasswordBearer(tokenUrl="token")


@app.get("/items/")
async def read_items(token: str = Depends(oauth2_scheme)):
    return {"token": token}
2
3
4
5
6
7
8
9
10
11
但这并不实用, 接下来, 我们学习如何返回当前用户.
# 创建用户模型
首先, 创建Pydantic用户模型. 与使用Pydantic声明请求体相同, 并且可在任何位置使用:
from typing import Union

from fastapi import Depends, FastAPI
from fastapi.security import OAuth2PasswordBearer
from pydantic import BaseModel

app = FastAPI()

oauth2_scheme = OAuth2PasswordBearer(tokenUrl="token")


class User(BaseModel):
    username: str
    email: Union[str, None] = None
    full_name: Union[str, None] = None
    disabled: Union[bool, None] = None


def fake_decode_token(token):
    return User(
        username=token + "fakedecoded", email="john@example.com", full_name="John Doe"
    )


async def get_current_user(token: str = Depends(oauth2_scheme)):
    user = fake_decode_token(token)
    return user


@app.get("/users/me")
async def read_users_me(current_user: User = Depends(get_current_user)):
    return current_user
2
3
4
5
6
7
8
9
10
11
12
13
14
15
16
17
18
19
20
21
22
23
24
25
26
27
28
29
30
31
32
# 创建 get_current_user 依赖项
创建get_current_user依赖项. 还记得依赖项支持子依赖项吗? get_current_user使用oauth2_scheme作为依赖项. 与之前直接在路径操作中的做法相同, 新的get_current_user依赖项从子依赖项oauth2_scheme中接收str类型的token:
from typing import Union

from fastapi import Depends, FastAPI
from fastapi.security import OAuth2PasswordBearer
from pydantic import BaseModel

app = FastAPI()

oauth2_scheme = OAuth2PasswordBearer(tokenUrl="token")


class User(BaseModel):
    username: str
    email: Union[str, None] = None
    full_name: Union[str, None] = None
    disabled: Union[bool, None] = None


def fake_decode_token(token):
    return User(
        username=token + "fakedecoded", email="john@example.com", full_name="John Doe"
    )


async def get_current_user(token: str = Depends(oauth2_scheme)):
    user = fake_decode_token(token)
    return user


@app.get("/users/me")
async def read_users_me(current_user: User = Depends(get_current_user)):
    return current_user
2
3
4
5
6
7
8
9
10
11
12
13
14
15
16
17
18
19
20
21
22
23
24
25
26
27
28
29
30
31
32
# 获取用户
get_current_user使用创建的(伪)工具函数, 该函数接收str类型的令牌, 并返回Pydantic的User模型:
from typing import Union

from fastapi import Depends, FastAPI
from fastapi.security import OAuth2PasswordBearer
from pydantic import BaseModel

app = FastAPI()

oauth2_scheme = OAuth2PasswordBearer(tokenUrl="token")


class User(BaseModel):
    username: str
    email: Union[str, None] = None
    full_name: Union[str, None] = None
    disabled: Union[bool, None] = None


def fake_decode_token(token):
    return User(
        username=token + "fakedecoded", email="john@example.com", full_name="John Doe"
    )


async def get_current_user(token: str = Depends(oauth2_scheme)):
    user = fake_decode_token(token)
    return user


@app.get("/users/me")
async def read_users_me(current_user: User = Depends(get_current_user)):
    return current_user
2
3
4
5
6
7
8
9
10
11
12
13
14
15
16
17
18
19
20
21
22
23
24
25
26
27
28
29
30
31
32
# 注入当前用户
在路径操作的Depends中使用get_current_user:
from typing import Union

from fastapi import Depends, FastAPI
from fastapi.security import OAuth2PasswordBearer
from pydantic import BaseModel

app = FastAPI()

oauth2_scheme = OAuth2PasswordBearer(tokenUrl="token")


class User(BaseModel):
    username: str
    email: Union[str, None] = None
    full_name: Union[str, None] = None
    disabled: Union[bool, None] = None


def fake_decode_token(token):
    return User(
        username=token + "fakedecoded", email="john@example.com", full_name="John Doe"
    )


async def get_current_user(token: str = Depends(oauth2_scheme)):
    user = fake_decode_token(token)
    return user


@app.get("/users/me")
async def read_users_me(current_user: User = Depends(get_current_user)):
    return current_user
2
3
4
5
6
7
8
9
10
11
12
13
14
15
16
17
18
19
20
21
22
23
24
25
26
27
28
29
30
31
32
注意, 此处把current_user的类型声明为Pydantic的User模型. 这有助于在函数内部使用代码补全和类型检查.
还记得请求体也是使用Pydantic模型声明的吧. 放心, 因为使用了Depends, FastAPI不会搞混.
依赖系统的这种设计方式可以支持不同的的依赖项返回同一个User模型. 而不是局限于只能有一个返回该类型数据的依赖项.
# 其它模型
接下来, 直接在路径操作函数中获取当前用户, 并用Depends在依赖注入系统中处理安全机制. 开发者可以使用任何模型或数据满足安全需求(本例中是Pydantic的User模型). 而且, 不局限于只能使用特定的数据模型, 类或类型.
不想再模型中使用username, 而是使用id和email? 当然可以, 这些工具也支持. 只想使用字符串? 或字典? 甚至是数据库类模型的实例? 工作方式都一样. 实际上, 就算登录应用的不是用户, 而是只拥有访问令牌的机器人, 程序或其它系统? 工作方式也一样. 尽管使用应用所需的任何模型, 类, 数据库. FastAPI通过依赖注入系统都能帮你搞定.
# 代码大小
这个示例看起来有些冗长. 毕竟这个文件同时包含了安全, 数据模型的工具函数, 以及路径操作等代码. 但, 关键是: 安全和依赖注入的代码只需要写一次. 就算写的再复杂, 也只是在一个位置写一次就够了. 所以, 要多复杂就可以写多复杂. 但是, 就算有数千个端点(路径操作), 它们都可以使用同一个安全系统. 而且, 所有端点(或它们的任何部件)都可以利用这些依赖项或任何其他依赖项. 所有路径操作只需3行代码就可以了:
from typing import Union

from fastapi import Depends, FastAPI
from fastapi.security import OAuth2PasswordBearer
from pydantic import BaseModel

app = FastAPI()

oauth2_scheme = OAuth2PasswordBearer(tokenUrl="token")


class User(BaseModel):
    username: str
    email: Union[str, None] = None
    full_name: Union[str, None] = None
    disabled: Union[bool, None] = None


def fake_decode_token(token):
    return User(
        username=token + "fakedecoded", email="john@example.com", full_name="John Doe"
    )


async def get_current_user(token: str = Depends(oauth2_scheme)):
    user = fake_decode_token(token)
    return user


@app.get("/users/me")
async def read_users_me(current_user: User = Depends(get_current_user)):
    return current_user
2
3
4
5
6
7
8
9
10
11
12
13
14
15
16
17
18
19
20
21
22
23
24
25
26
27
28
29
30
31
32
# 小结
现在, 我们可以直接在路径操作函数中获取当前用户. 至此, 安全的内容已经讲了一半. 只要再为用户或客户端的路径操作添加真正发送username和password的功能就可以了.
# OAuth2实现简单的 Password 和 Bearer 验证
本章添加上一章示例中欠缺的部分, 实现完整的安全流.
# 获取 username 和 password
首先, 使用FastAPI安全工具获取username和password. OAuth2规范要求使用密码流时, 客户端或用户必须以表单数据形式发送username和password字段. 不过也不用担心, 前端仍可以显示终端用户所需的名称. 数据库模型也可以使用所需的名称. 但对于登录路径操作, 则要使用兼容规范的username和password, (例如, 实现与API文档集成). 该规范要求必须以表单数据形式发送username和password, 因此, 不能使用JSON对象.
# Scope(作用域)
OAuth2还支持客户端发送scope表单字段. 虽然表单字段的名称是scope(单数), 但实际上, 它是以空格分隔的, 由多个scope组成的长字符串. 作用域只是不带空格的字符串. 常用于声明指定安全权限, 例如:
- 常见用例为,
users:read或users:write - 脸书和Instagram使用
instagram_basic - 谷歌使用
https://www.googleapis.com/auth/drive
OAuth2中, 作用域只是声明指定权限的字符串. 是否使用冒号:等符号, 或是不是URL并不重要. 这些细节只是特定的实现方式. 对OAuth2来说, 都只是字符串而已.
# 获取 username 和 password 的代码
接下来, 使用FastAPI工具获取用户名与密码.
# OAuth2PasswordRequestForm
首先, 导入OAuth2PasswordRequestForm, 然后, 在/token路径操作中, 用Depends把该类作为依赖项.
from typing import Union

from fastapi import Depends, FastAPI, HTTPException, status
from fastapi.security import OAuth2PasswordBearer, OAuth2PasswordRequestForm
from pydantic import BaseModel

fake_users_db = {
    "johndoe": {
        "username": "johndoe",
        "full_name": "John Doe",
        "email": "johndoe@example.com",
        "hashed_password": "fakehashedsecret",
        "disabled": False,
    },
    "alice": {
        "username": "alice",
        "full_name": "Alice Wonderson",
        "email": "alice@example.com",
        "hashed_password": "fakehashedsecret2",
        "disabled": True,
    },
}

app = FastAPI()


def fake_hash_password(password: str):
    return "fakehashed" + password


oauth2_scheme = OAuth2PasswordBearer(tokenUrl="token")


class User(BaseModel):
    username: str
    email: Union[str, None] = None
    full_name: Union[str, None] = None
    disabled: Union[bool, None] = None


class UserInDB(User):
    hashed_password: str


def get_user(db, username: str):
    if username in db:
        user_dict = db[username]
        return UserInDB(**user_dict)


def fake_decode_token(token):
    # This doesn't provide any security at all
    # Check the next version
    user = get_user(fake_users_db, token)
    return user


async def get_current_user(token: str = Depends(oauth2_scheme)):
    user = fake_decode_token(token)
    if not user:
        raise HTTPException(
            status_code=status.HTTP_401_UNAUTHORIZED,
            detail="Invalid authentication credentials",
            headers={"WWW-Authenticate": "Bearer"},
        )
    return user


async def get_current_active_user(current_user: User = Depends(get_current_user)):
    if current_user.disabled:
        raise HTTPException(status_code=400, detail="Inactive user")
    return current_user


@app.post("/token")
async def login(form_data: OAuth2PasswordRequestForm = Depends()):
    user_dict = fake_users_db.get(form_data.username)
    if not user_dict:
        raise HTTPException(status_code=400, detail="Incorrect username or password")
    user = UserInDB(**user_dict)
    hashed_password = fake_hash_password(form_data.password)
    if not hashed_password == user.hashed_password:
        raise HTTPException(status_code=400, detail="Incorrect username or password")

    return {"access_token": user.username, "token_type": "bearer"}


@app.get("/users/me")
async def read_users_me(current_user: User = Depends(get_current_active_user)):
    return current_user
2
3
4
5
6
7
8
9
10
11
12
13
14
15
16
17
18
19
20
21
22
23
24
25
26
27
28
29
30
31
32
33
34
35
36
37
38
39
40
41
42
43
44
45
46
47
48
49
50
51
52
53
54
55
56
57
58
59
60
61
62
63
64
65
66
67
68
69
70
71
72
73
74
75
76
77
78
79
80
81
82
83
84
85
86
87
88
89
90
OAuth2PasswordRequestForm是用一下几项内容声明表单请求体的类依赖项:
usernamepassword- 可选的
scope字段, 由多个空格分隔的字符串组成的长字符串 - 可选的
grant_type
实际上, OAuth2规范要求grant_type字段使用固定值password, 但OAuth2PasswordRequestForm没有作强制约束.
如需强制使用固定值password, 则不要用OAuth2PasswordRequestForm, 而是用OAuth2PasswordRequestFormStrict.
- 可选的
client_id(本例未使用) - 可选的
client_secret(本例未使用)
OAuth2PasswordRequestForm与OAuth2PasswordBearer一样, 都不是FastAPI的特殊类. FastAPI把OAuth2PasswordBearer识别为安全方案. 因此, 可以通过这种方式把它添加至OpenAPI. 但OAuth2PasswordRequestForm只是可以自行编写的依赖项, 也可以直接声明Form参数. 但由于这种用例很常见, FastAPI为了简便, 就直接提供了对它的支持.
# 使用表单数据
OAuth2PasswordRequestForm类依赖项的实例没有以空格分隔的长字符串属性scope, 但它支持scopes属性, 由已发送的scope字符串列表组成.
现在, 即可使用表单字段username, 从伪数据库中获取用户数据. 如果不存在指定用户, 则返回错误信息, 提示用户或密码错误. 本例使用HTTPException显示此错误.
from typing import Union

from fastapi import Depends, FastAPI, HTTPException, status
from fastapi.security import OAuth2PasswordBearer, OAuth2PasswordRequestForm
from pydantic import BaseModel

fake_users_db = {
    "johndoe": {
        "username": "johndoe",
        "full_name": "John Doe",
        "email": "johndoe@example.com",
        "hashed_password": "fakehashedsecret",
        "disabled": False,
    },
    "alice": {
        "username": "alice",
        "full_name": "Alice Wonderson",
        "email": "alice@example.com",
        "hashed_password": "fakehashedsecret2",
        "disabled": True,
    },
}

app = FastAPI()


def fake_hash_password(password: str):
    return "fakehashed" + password


oauth2_scheme = OAuth2PasswordBearer(tokenUrl="token")


class User(BaseModel):
    username: str
    email: Union[str, None] = None
    full_name: Union[str, None] = None
    disabled: Union[bool, None] = None


class UserInDB(User):
    hashed_password: str


def get_user(db, username: str):
    if username in db:
        user_dict = db[username]
        return UserInDB(**user_dict)


def fake_decode_token(token):
    # This doesn't provide any security at all
    # Check the next version
    user = get_user(fake_users_db, token)
    return user


async def get_current_user(token: str = Depends(oauth2_scheme)):
    user = fake_decode_token(token)
    if not user:
        raise HTTPException(
            status_code=status.HTTP_401_UNAUTHORIZED,
            detail="Invalid authentication credentials",
            headers={"WWW-Authenticate": "Bearer"},
        )
    return user


async def get_current_active_user(current_user: User = Depends(get_current_user)):
    if current_user.disabled:
        raise HTTPException(status_code=400, detail="Inactive user")
    return current_user


@app.post("/token")
async def login(form_data: OAuth2PasswordRequestForm = Depends()):
    user_dict = fake_users_db.get(form_data.username)
    if not user_dict:
        raise HTTPException(status_code=400, detail="Incorrect username or password")
    user = UserInDB(**user_dict)
    hashed_password = fake_hash_password(form_data.password)
    if not hashed_password == user.hashed_password:
        raise HTTPException(status_code=400, detail="Incorrect username or password")

    return {"access_token": user.username, "token_type": "bearer"}


@app.get("/users/me")
async def read_users_me(current_user: User = Depends(get_current_active_user)):
    return current_user
2
3
4
5
6
7
8
9
10
11
12
13
14
15
16
17
18
19
20
21
22
23
24
25
26
27
28
29
30
31
32
33
34
35
36
37
38
39
40
41
42
43
44
45
46
47
48
49
50
51
52
53
54
55
56
57
58
59
60
61
62
63
64
65
66
67
68
69
70
71
72
73
74
75
76
77
78
79
80
81
82
83
84
85
86
87
88
89
90
# 校验密码
至此, 我们已经从数据库中获取了用户数据, 但尚未校验密码. 接下来, 首先将数据放入Pydantic的UserInDB模型. 注意: 永远不要保存明文密码, 本例暂时先试用(伪)哈希密码系统. 如果密码不匹配, 则返回与上面相同的错误.
# 密码哈希
哈希是指, 将指定内容(本例中为密码)转换为形似乱码的字节序列(其实就是字符串). 每次传入完全相同的内容(比如, 完全相同的密码)时, 得到的都是完全相同的乱码. 但这个乱码无法转换回传入的密码.
为什么使用密码哈希?
原因很简单, 加入数据库被盗, 窃贼无法获取用户的明文密码, 得到的知识哈希值. 这样一来, 窃贼就无法在其他应用中使用窃取的密码, 要知道, 很多用户在所有系统中都使用相同的密码, 风险超大.
# 关于 **user_dict
UserInDB(**user_dict)是指: 直接把user_dict的键与值当做关键字参数传递, 等效于:
UserInDB(
    username = user_dict["username"],
    email = user_dict["email"],
    full_name = user_dict["full_name"],
    disabled = user_dict["disabled"],
    hashed_password = user_dict["hashed_password"],
)
2
3
4
5
6
7
说明
user_dict的说明, 详见更多模型一章.
# 返回Token
token端点的响应必须是JSON对象. 响应返回的内容应该包含token_type. 本例中用的是BearerToken, 因此, Token类型应该是bearer. 返回内容还应包含access_token字段, 它是包含权限Token的字符串. 本例只是简单的演示, 返回的Token就是username, 但这种方式极不安全.
下一章介绍使用哈希密码和JWT Token的真正安全机制. 但现在, 仅关注所需的特定细节.
按规范的要求, 应像本示例一样, 返回带有access_token和token_type的JSON对象. 这是开发者必须在代码中自行完成的工作, 并且要确保使用这些JSON的键. 这几乎是唯一需要开发者牢记在心, 并按规范要求正确执行的事. FastAPI则负责处理其他的工作.
# 更新依赖项
接下来, 更新依赖项. 使之仅在当前用户为激活状态下, 才能获取current_user. 为此, 要再创建一个依赖项get_current_active_user, 此依赖项以get_current_user依赖项为基础. 如果用户不存在, 或状态为未激活, 这两个依赖项都会返回HTTP错误. 因此, 在端点中, 只有当用户存在, 通过身份验证, 且状态为激活时, 才能获取该用户.
from typing import Union

from fastapi import Depends, FastAPI, HTTPException, status
from fastapi.security import OAuth2PasswordBearer, OAuth2PasswordRequestForm
from pydantic import BaseModel

fake_users_db = {
    "johndoe": {
        "username": "johndoe",
        "full_name": "John Doe",
        "email": "johndoe@example.com",
        "hashed_password": "fakehashedsecret",
        "disabled": False,
    },
    "alice": {
        "username": "alice",
        "full_name": "Alice Wonderson",
        "email": "alice@example.com",
        "hashed_password": "fakehashedsecret2",
        "disabled": True,
    },
}

app = FastAPI()


def fake_hash_password(password: str):
    return "fakehashed" + password


oauth2_scheme = OAuth2PasswordBearer(tokenUrl="token")


class User(BaseModel):
    username: str
    email: Union[str, None] = None
    full_name: Union[str, None] = None
    disabled: Union[bool, None] = None


class UserInDB(User):
    hashed_password: str


def get_user(db, username: str):
    if username in db:
        user_dict = db[username]
        return UserInDB(**user_dict)


def fake_decode_token(token):
    # This doesn't provide any security at all
    # Check the next version
    user = get_user(fake_users_db, token)
    return user


async def get_current_user(token: str = Depends(oauth2_scheme)):
    user = fake_decode_token(token)
    if not user:
        raise HTTPException(
            status_code=status.HTTP_401_UNAUTHORIZED,
            detail="Invalid authentication credentials",
            headers={"WWW-Authenticate": "Bearer"},
        )
    return user


async def get_current_active_user(current_user: User = Depends(get_current_user)):
    if current_user.disabled:
        raise HTTPException(status_code=400, detail="Inactive user")
    return current_user


@app.post("/token")
async def login(form_data: OAuth2PasswordRequestForm = Depends()):
    user_dict = fake_users_db.get(form_data.username)
    if not user_dict:
        raise HTTPException(status_code=400, detail="Incorrect username or password")
    user = UserInDB(**user_dict)
    hashed_password = fake_hash_password(form_data.password)
    if not hashed_password == user.hashed_password:
        raise HTTPException(status_code=400, detail="Incorrect username or password")

    return {"access_token": user.username, "token_type": "bearer"}


@app.get("/users/me")
async def read_users_me(current_user: User = Depends(get_current_active_user)):
    return current_user
2
3
4
5
6
7
8
9
10
11
12
13
14
15
16
17
18
19
20
21
22
23
24
25
26
27
28
29
30
31
32
33
34
35
36
37
38
39
40
41
42
43
44
45
46
47
48
49
50
51
52
53
54
55
56
57
58
59
60
61
62
63
64
65
66
67
68
69
70
71
72
73
74
75
76
77
78
79
80
81
82
83
84
85
86
87
88
89
90
说明
此处返回值为Bearer的响应头WWW-Authenticate也是规范的一部分. 任何401 UNAUTHORIZED HTTP(错误)状态码都应返回WWW-Authenticate响应头. 本例中, 因为使用的是Bearer Token, 该响应头的值应为Bearer. 实际上, 忽略这个附加响应头, 也不会有什么问题. 之所以在此提供这个附加响应头, 是为了复合规范的要求. 说不定什么时候, 就有工具用得上它, 而且, 开发者和用户也可能用得上. 这就是遵循标准的好处......
# 实际效果
# 身份验证
点击Authorize按钮. 使用以下凭证: 用户名: johndoe 密码: secret
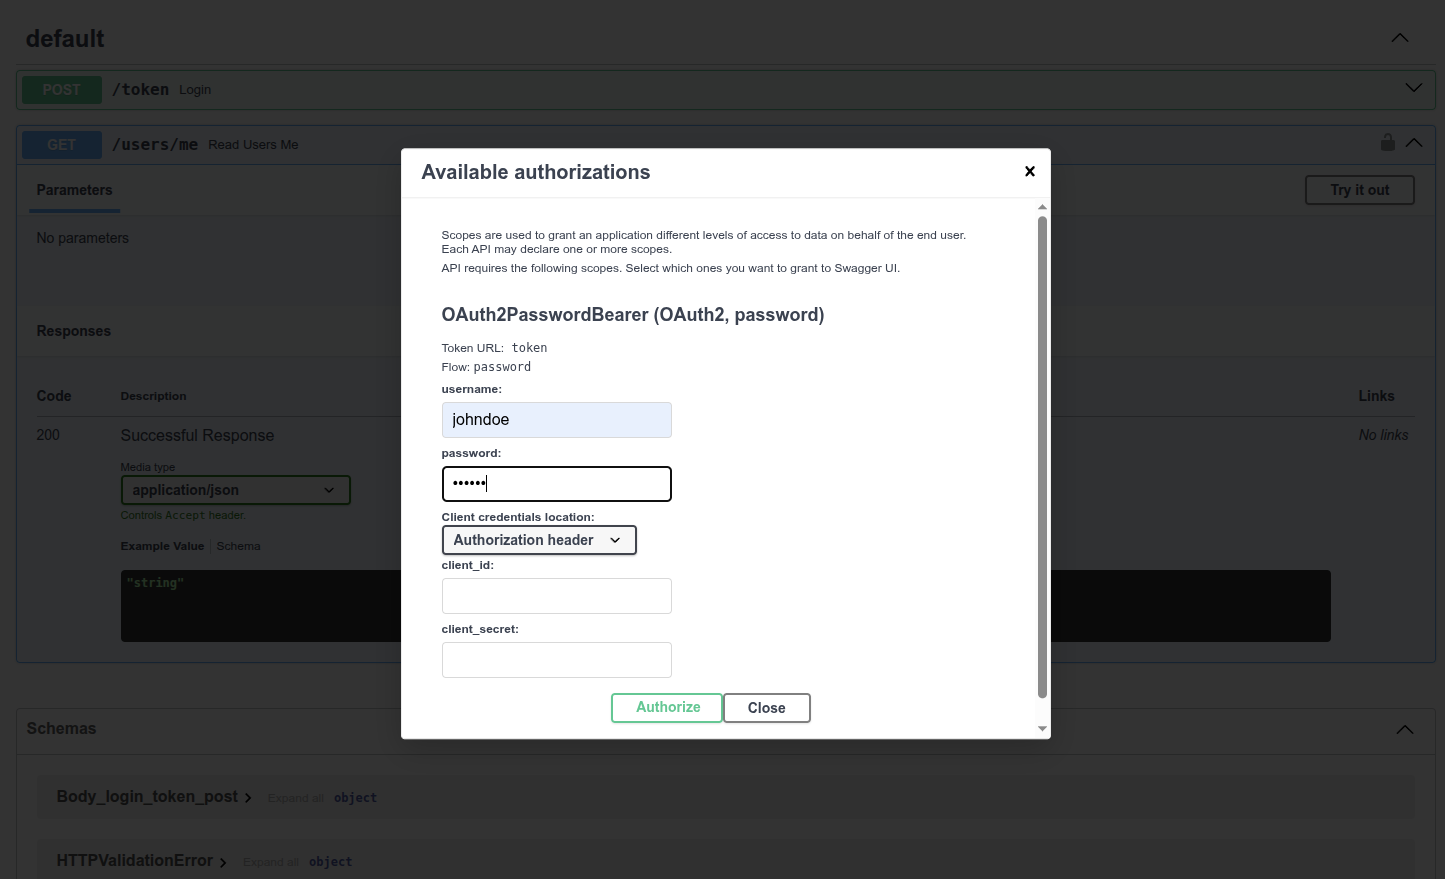
通过身份验证后, 显示下图所示的内容:
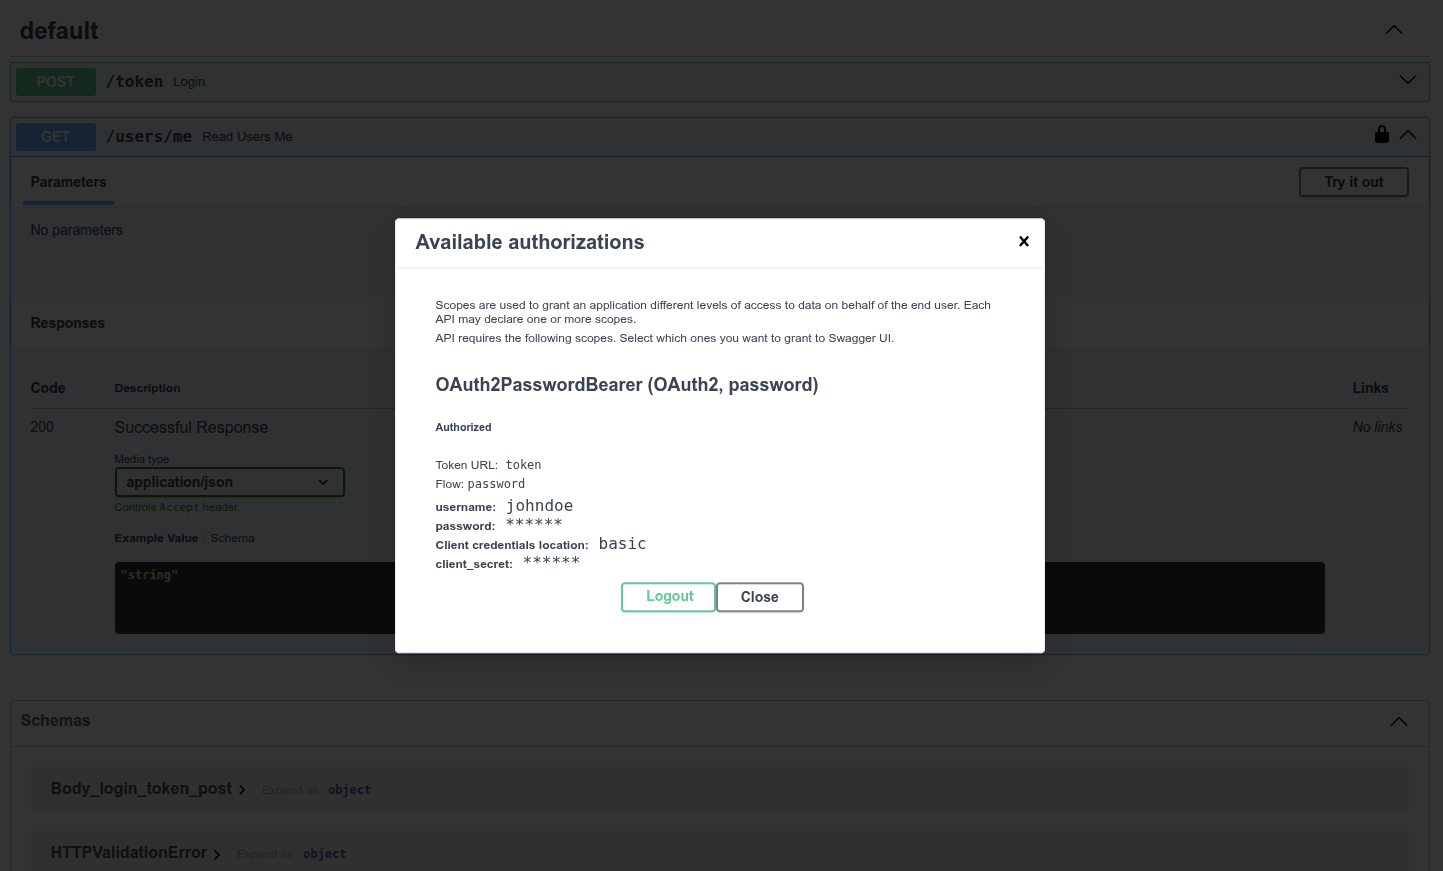
# 获取当前用户数据
使用/users/me路径的GET操作. 可以提取如下当前用户数据.
{
  "username": "johndoe",
  "email": "johndoe@example.com",
  "full_name": "John Doe",
  "disabled": false,
  "hashed_password": "fakehashedsecret"
}
2
3
4
5
6
7
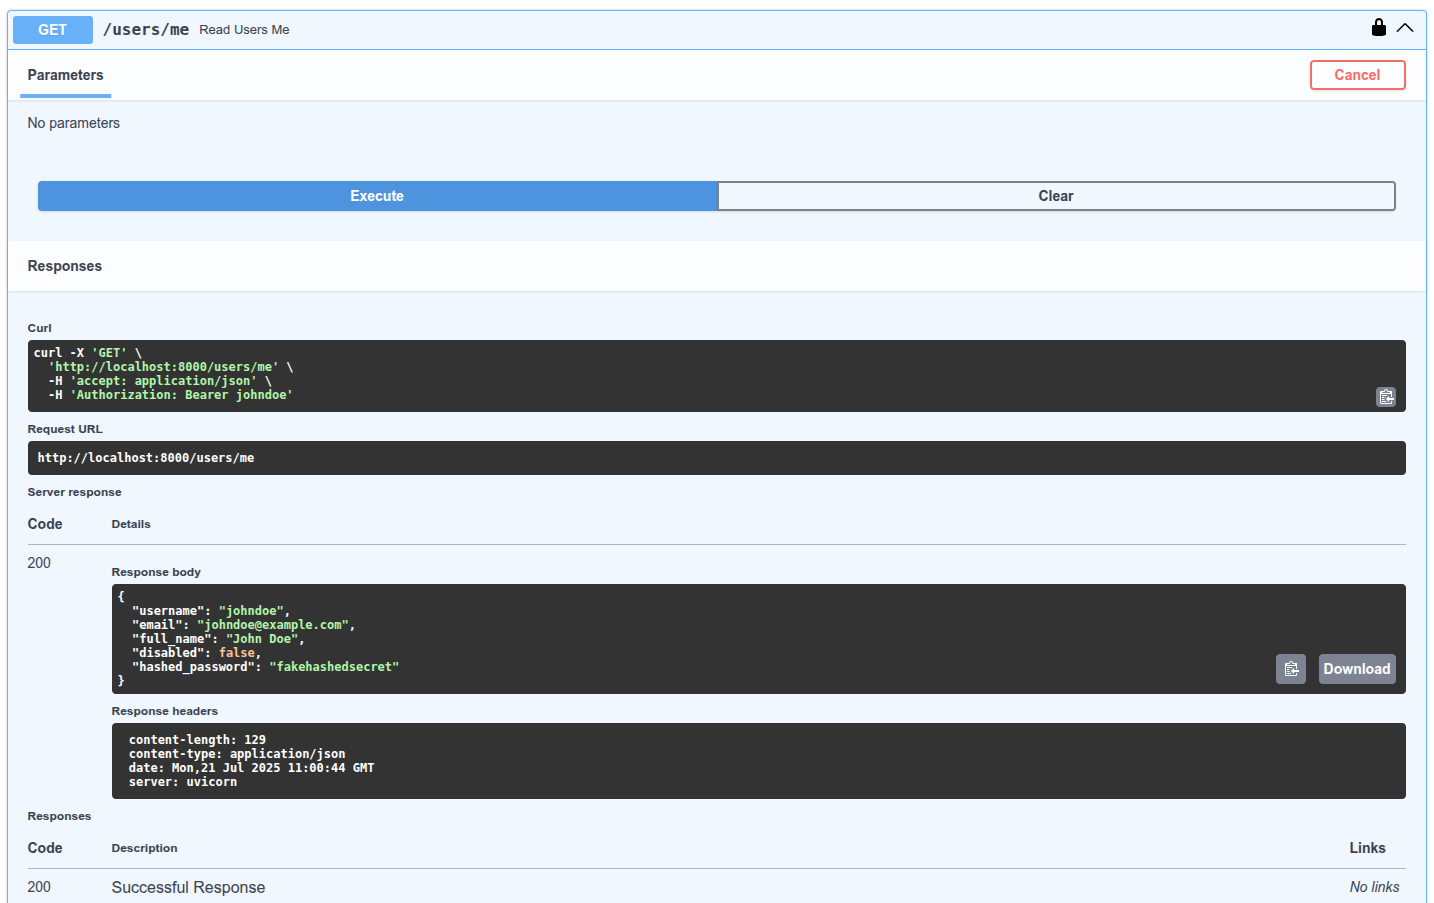
# 未激活用户
测试未激活用户, 输入以下信息, 进行身份验证: 用户名: alice 密码: secret2 然后, 执行/users/me路径的GET操作. 显示下列未激活用户错误信息:
{
  "detail": "Inactive user"
}
2
3
# 小结
使用本章的工具实现基于username和password的完整API安全系统. 这些工具让安全系统兼容任何数据库, 用户及数据模型. 唯一欠缺的是, 它仍然是不安全的. 下一章, 介绍使用密码哈希支持库与JWT令牌实现真正的安全机制.
# Oauth2 实现密码哈希与 Bearer JWT 令牌验证
至此, 我们已经编写了所有安全流, 本章学习如何使用JWT令牌(Token)和安全密码哈希(Hash)实现真正的安全机制. 本章的示例代码真正实现了在应用的数据库中保存哈希密码等功能. 接下来, 我们紧接上一章, 继续完善安全机制.
# JWT 简介
JWT即JSON网络令牌(JSON Web Tokens). JWT是一种将JSON对象编码为没有空格, 且难以理解的长字符串的标准. JWT的内容如下所示:
eyJhbGciOiJIUzI1NiIsInR5cCI6IkpXVCJ9.eyJzdWIiOiIxMjM0NTY3ODkwIiwibmFtZSI6IkpvaG4gRG9lIiwiaWF0IjoxNTE2MjM5MDIyfQ.SflKxwRJSMeKKF2QT4fwpMeJf36POk6yJV_adQssw5c
JWT字符串没有加密, 任何人都能用它恢复原始信息. 但JWT使用了签名机制. 接受令牌时, 可以用签名校验令牌. 使用JWT创建有效期为一周的令牌. 第二天, 用户持令牌再次访问时, 仍为登录状态. 令牌一周后过期, 届时, 用户身份验证就会失败. 只有再次登录, 才能获得新的令牌. 如果用户(或第三方)篡改令牌的过期时间, 因为签名不匹配会导致身份验证失败.
如果深入了解JWT令牌, 了解它的工作方式, 请参阅https://jwt.io/.
# 安装 PyJWT
安装PyJWT, 在Python中生成和校验JWT令牌: pip install pyjwt
如果你打算使用类似RSA或ECDSA的数字签名算法, 你应该安装加密库依赖项pyjwt[crypto]. 你可以在PyJWT Installation docs获得更多信息.
# 密码哈希
哈希是指把特定内容(本例中为密码)转换为乱码形式的字节序列(其实就是字符串). 每次传入完全相同的内容时(比如, 完全相同的密码), 返回的都是完全相同的乱码. 但这个乱码无法转换回传入的密码.
# 为什么使用密码哈希
原因很简单, 加入数据库被盗, 窃贼无法获取用户的明文密码, 得到的只是哈希值. 这样一来, 窃贼就无法在其它应用中使用窃取的密码(要知道, 很多用户在所有系统中都使用相同的密码, 风险超大).
# 安装 passlib
Passlib是处理密码哈希的Python包. 它支持很多安全哈希算法及配套工具. 本教程推荐的算法是Bcrypt. 因此, 请先安装附带Bcrypt的Passlib:
pip install passlib[bcrypt]
passlib甚至可以读取Django, Flask的安全插件等工具创建的密码. 例如, 把Django应用的数据共享给FastAPI应用的数据库. 或利用同一个数据库, 可以逐步把应用从Django迁移到FastAPI. 并且, 用户可以同时从Django应用或FastAPI应用登录.
# 密码哈希与校验
从passlib导入所需工具. 创建用于密码哈希和身份校验的PassLib上下文.
PassLib上下文还支持使用不同哈希算法的功能, 包括只能校验的已弃用旧算法等. 例如, 用它读取和校验其它系统(如Django)生成的密码, 但要使用其它算法, 如Bcrypt, 生成新的哈希密码. 同时, 这些功能都是兼容的.
接下来, 创建三个工具函数, 其中一个函数用于哈希用户的密码. 第一个函数用于校验接收的密码是否匹配存储的哈希值. 第三个函数用于身份验证, 并返回用户.
from datetime import datetime, timedelta, timezone
from typing import Annotated

import jwt
from fastapi import Depends, FastAPI, HTTPException, status
from fastapi.security import OAuth2PasswordBearer, OAuth2PasswordRequestForm
from jwt.exceptions import InvalidTokenError
from passlib.context import CryptContext
from pydantic import BaseModel

# to get a string like this run:
# openssl rand -hex 32
SECRET_KEY = "09d25e094faa6ca2556c818166b7a9563b93f7099f6f0f4caa6cf63b88e8d3e7"
ALGORITHM = "HS256"
ACCESS_TOKEN_EXPIRE_MINUTES = 30


fake_users_db = {
    "johndoe": {
        "username": "johndoe",
        "full_name": "John Doe",
        "email": "johndoe@example.com",
        "hashed_password": "$2b$12$EixZaYVK1fsbw1ZfbX3OXePaWxn96p36WQoeG6Lruj3vjPGga31lW",
        "disabled": False,
    }
}


class Token(BaseModel):
    access_token: str
    token_type: str


class TokenData(BaseModel):
    username: str | None = None


class User(BaseModel):
    username: str
    email: str | None = None
    full_name: str | None = None
    disabled: bool | None = None


class UserInDB(User):
    hashed_password: str


pwd_context = CryptContext(schemes=["bcrypt"], deprecated="auto")

oauth2_scheme = OAuth2PasswordBearer(tokenUrl="token")

app = FastAPI()


def verify_password(plain_password, hashed_password):
    return pwd_context.verify(plain_password, hashed_password)


def get_password_hash(password):
    return pwd_context.hash(password)


def get_user(db, username: str):
    if username in db:
        user_dict = db[username]
        return UserInDB(**user_dict)


def authenticate_user(fake_db, username: str, password: str):
    user = get_user(fake_db, username)
    if not user:
        return False
    if not verify_password(password, user.hashed_password):
        return False
    return user


def create_access_token(data: dict, expires_delta: timedelta | None = None):
    to_encode = data.copy()
    if expires_delta:
        expire = datetime.now(timezone.utc) + expires_delta
    else:
        expire = datetime.now(timezone.utc) + timedelta(minutes=15)
    to_encode.update({"exp": expire})
    encoded_jwt = jwt.encode(to_encode, SECRET_KEY, algorithm=ALGORITHM)
    return encoded_jwt


async def get_current_user(token: Annotated[str, Depends(oauth2_scheme)]):
    credentials_exception = HTTPException(
        status_code=status.HTTP_401_UNAUTHORIZED,
        detail="Could not validate credentials",
        headers={"WWW-Authenticate": "Bearer"},
    )
    try:
        payload = jwt.decode(token, SECRET_KEY, algorithms=[ALGORITHM])
        username = payload.get("sub")
        if username is None:
            raise credentials_exception
        token_data = TokenData(username=username)
    except InvalidTokenError:
        raise credentials_exception
    user = get_user(fake_users_db, username=token_data.username)
    if user is None:
        raise credentials_exception
    return user


async def get_current_active_user(
    current_user: Annotated[User, Depends(get_current_user)],
):
    if current_user.disabled:
        raise HTTPException(status_code=400, detail="Inactive user")
    return current_user


@app.post("/token")
async def login_for_access_token(
    form_data: Annotated[OAuth2PasswordRequestForm, Depends()],
) -> Token:
    user = authenticate_user(fake_users_db, form_data.username, form_data.password)
    if not user:
        raise HTTPException(
            status_code=status.HTTP_401_UNAUTHORIZED,
            detail="Incorrect username or password",
            headers={"WWW-Authenticate": "Bearer"},
        )
    access_token_expires = timedelta(minutes=ACCESS_TOKEN_EXPIRE_MINUTES)
    access_token = create_access_token(
        data={"sub": user.username}, expires_delta=access_token_expires
    )
    return Token(access_token=access_token, token_type="bearer")


@app.get("/users/me/", response_model=User)
async def read_users_me(
    current_user: Annotated[User, Depends(get_current_active_user)],
):
    return current_user


@app.get("/users/me/items/")
async def read_own_items(
    current_user: Annotated[User, Depends(get_current_active_user)],
):
    return [{"item_id": "Foo", "owner": current_user.username}]
2
3
4
5
6
7
8
9
10
11
12
13
14
15
16
17
18
19
20
21
22
23
24
25
26
27
28
29
30
31
32
33
34
35
36
37
38
39
40
41
42
43
44
45
46
47
48
49
50
51
52
53
54
55
56
57
58
59
60
61
62
63
64
65
66
67
68
69
70
71
72
73
74
75
76
77
78
79
80
81
82
83
84
85
86
87
88
89
90
91
92
93
94
95
96
97
98
99
100
101
102
103
104
105
106
107
108
109
110
111
112
113
114
115
116
117
118
119
120
121
122
123
124
125
126
127
128
129
130
131
132
133
134
135
136
137
138
139
140
141
142
143
144
145
146
147
查看新的(伪)数据库fake_users_db, 就能看到哈希后的密码: $2b$12$EixZaYVK1fsbw1ZfbX3OXePaWxn96p36WQoeG6Lruj3vjPGga31lW.
# 处理JWT令牌
导入已安装的模块. 创建用于JWT令牌签名的随机密钥. 使用以下命令, 生成安全的随机密钥:
openssl rand -hex 32
# 09d25e094faa6ca2556c818166b7a9563b93f7099f6f0f4caa6cf63b88e8d3e7
2
然后, 把生成的密钥复制到变量SECRET_KEY, 注意, 不要使用本例所示的密钥. 创建指定JWT令牌签名算法的变量ALGORITHM, 本例中的值为HS256. 创建设置令牌过期时间的变量. 定义令牌端点响应的Pydantic模型. 创建生成新的访问令牌的工具函数.
from datetime import datetime, timedelta, timezone
from typing import Union

import jwt
from fastapi import Depends, FastAPI, HTTPException, status
from fastapi.security import OAuth2PasswordBearer, OAuth2PasswordRequestForm
from jwt.exceptions import InvalidTokenError
from passlib.context import CryptContext
from pydantic import BaseModel

# to get a string like this run:
# openssl rand -hex 32
SECRET_KEY = "09d25e094faa6ca2556c818166b7a9563b93f7099f6f0f4caa6cf63b88e8d3e7"
ALGORITHM = "HS256"
ACCESS_TOKEN_EXPIRE_MINUTES = 30


fake_users_db = {
    "johndoe": {
        "username": "johndoe",
        "full_name": "John Doe",
        "email": "johndoe@example.com",
        "hashed_password": "$2b$12$EixZaYVK1fsbw1ZfbX3OXePaWxn96p36WQoeG6Lruj3vjPGga31lW",
        "disabled": False,
    }
}


class Token(BaseModel):
    access_token: str
    token_type: str


class TokenData(BaseModel):
    username: Union[str, None] = None


class User(BaseModel):
    username: str
    email: Union[str, None] = None
    full_name: Union[str, None] = None
    disabled: Union[bool, None] = None


class UserInDB(User):
    hashed_password: str


pwd_context = CryptContext(schemes=["bcrypt"], deprecated="auto")

oauth2_scheme = OAuth2PasswordBearer(tokenUrl="token")

app = FastAPI()


def verify_password(plain_password, hashed_password):
    return pwd_context.verify(plain_password, hashed_password)


def get_password_hash(password):
    return pwd_context.hash(password)


def get_user(db, username: str):
    if username in db:
        user_dict = db[username]
        return UserInDB(**user_dict)


def authenticate_user(fake_db, username: str, password: str):
    user = get_user(fake_db, username)
    if not user:
        return False
    if not verify_password(password, user.hashed_password):
        return False
    return user


def create_access_token(data: dict, expires_delta: Union[timedelta, None] = None):
    to_encode = data.copy()
    if expires_delta:
        expire = datetime.now(timezone.utc) + expires_delta
    else:
        expire = datetime.now(timezone.utc) + timedelta(minutes=15)
    to_encode.update({"exp": expire})
    encoded_jwt = jwt.encode(to_encode, SECRET_KEY, algorithm=ALGORITHM)
    return encoded_jwt


async def get_current_user(token: str = Depends(oauth2_scheme)):
    credentials_exception = HTTPException(
        status_code=status.HTTP_401_UNAUTHORIZED,
        detail="Could not validate credentials",
        headers={"WWW-Authenticate": "Bearer"},
    )
    try:
        payload = jwt.decode(token, SECRET_KEY, algorithms=[ALGORITHM])
        username = payload.get("sub")
        if username is None:
            raise credentials_exception
        token_data = TokenData(username=username)
    except InvalidTokenError:
        raise credentials_exception
    user = get_user(fake_users_db, username=token_data.username)
    if user is None:
        raise credentials_exception
    return user


async def get_current_active_user(current_user: User = Depends(get_current_user)):
    if current_user.disabled:
        raise HTTPException(status_code=400, detail="Inactive user")
    return current_user


@app.post("/token")
async def login_for_access_token(
    form_data: OAuth2PasswordRequestForm = Depends(),
) -> Token:
    user = authenticate_user(fake_users_db, form_data.username, form_data.password)
    if not user:
        raise HTTPException(
            status_code=status.HTTP_401_UNAUTHORIZED,
            detail="Incorrect username or password",
            headers={"WWW-Authenticate": "Bearer"},
        )
    access_token_expires = timedelta(minutes=ACCESS_TOKEN_EXPIRE_MINUTES)
    access_token = create_access_token(
        data={"sub": user.username}, expires_delta=access_token_expires
    )
    return Token(access_token=access_token, token_type="bearer")


@app.get("/users/me/", response_model=User)
async def read_users_me(current_user: User = Depends(get_current_active_user)):
    return current_user


@app.get("/users/me/items/")
async def read_own_items(current_user: User = Depends(get_current_active_user)):
    return [{"item_id": "Foo", "owner": current_user.username}]
2
3
4
5
6
7
8
9
10
11
12
13
14
15
16
17
18
19
20
21
22
23
24
25
26
27
28
29
30
31
32
33
34
35
36
37
38
39
40
41
42
43
44
45
46
47
48
49
50
51
52
53
54
55
56
57
58
59
60
61
62
63
64
65
66
67
68
69
70
71
72
73
74
75
76
77
78
79
80
81
82
83
84
85
86
87
88
89
90
91
92
93
94
95
96
97
98
99
100
101
102
103
104
105
106
107
108
109
110
111
112
113
114
115
116
117
118
119
120
121
122
123
124
125
126
127
128
129
130
131
132
133
134
135
136
137
138
139
140
141
# 更新依赖项
更新get_current_user以接收与之前相同的令牌, 但这里用的是JWT令牌. 解码并校验接收到的令牌, 然后, 返回当前用户. 如果令牌无效, 则直接返回HTTP错误.
# 更新 /token 路径操作
用令牌过期时间创建timedelta对象. 创建并返回真正的JWT访问令牌.
# JWT sub 的技术细节
JWT规范还包括sub键, 值是令牌的主题. 该键是可选的, 但要把用户标识放在这个键里, 所以本例使用了该键. 除了识别用户与许可用户在API上直接执行操作之外, JWT还可能用于其他事情.
例如, 识别汽车或博客. 接着, 为实体添加权限, 比如驾驶(汽车)或编辑(博客). 然后, 把JWT令牌交给用户(或机器人), 他们就可以执行驾驶汽车, 或编辑博客等操作. 无需注册账户, 只要有API生成的JWT令牌就可以. 同理, JWT可以用于更复杂的场景. 在这些情况下, 多个实体ID可能是相同的, 以IDfoo为例, 用户的ID是foo, 车的ID是foo, 博客的ID也是foo.
为了避免ID冲突, 在给用户创建JWT令牌时, 可以为sub键的值加上前缀, 例如username:. 因此, 在本例中, sub的值可以是: username:johndoe. 注意, 划重点, sub键在整个应用中应该只有一个唯一的标识符, 而且应该是字符串.
# 检查
运行服务器并访问文档: http://localhost:8000/docs. 可以看到如下用户界面:
用与上一章同样的方式实现应用授权. 使用如下凭证: 用户名: johndoe 密码: secret.
检查
注意, 代码中没有明文密码secret, 只保存了它的哈希值.

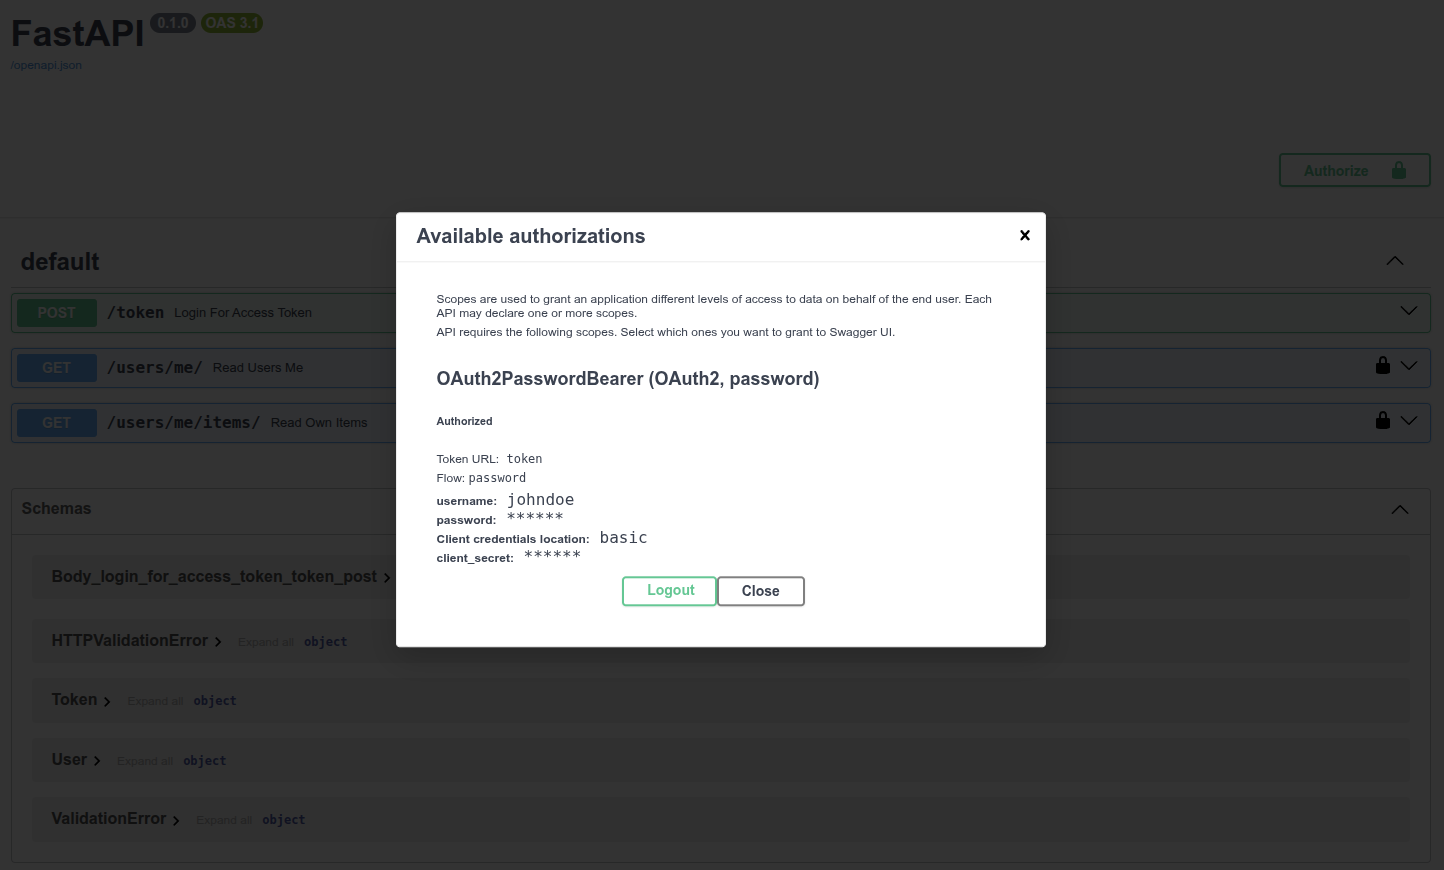
调用/users/me/端点, 收到下面的响应:
{
  "username": "johndoe",
  "email": "johndoe@example.com",
  "full_name": "John Doe",
  "disabled": false
}
2
3
4
5
6
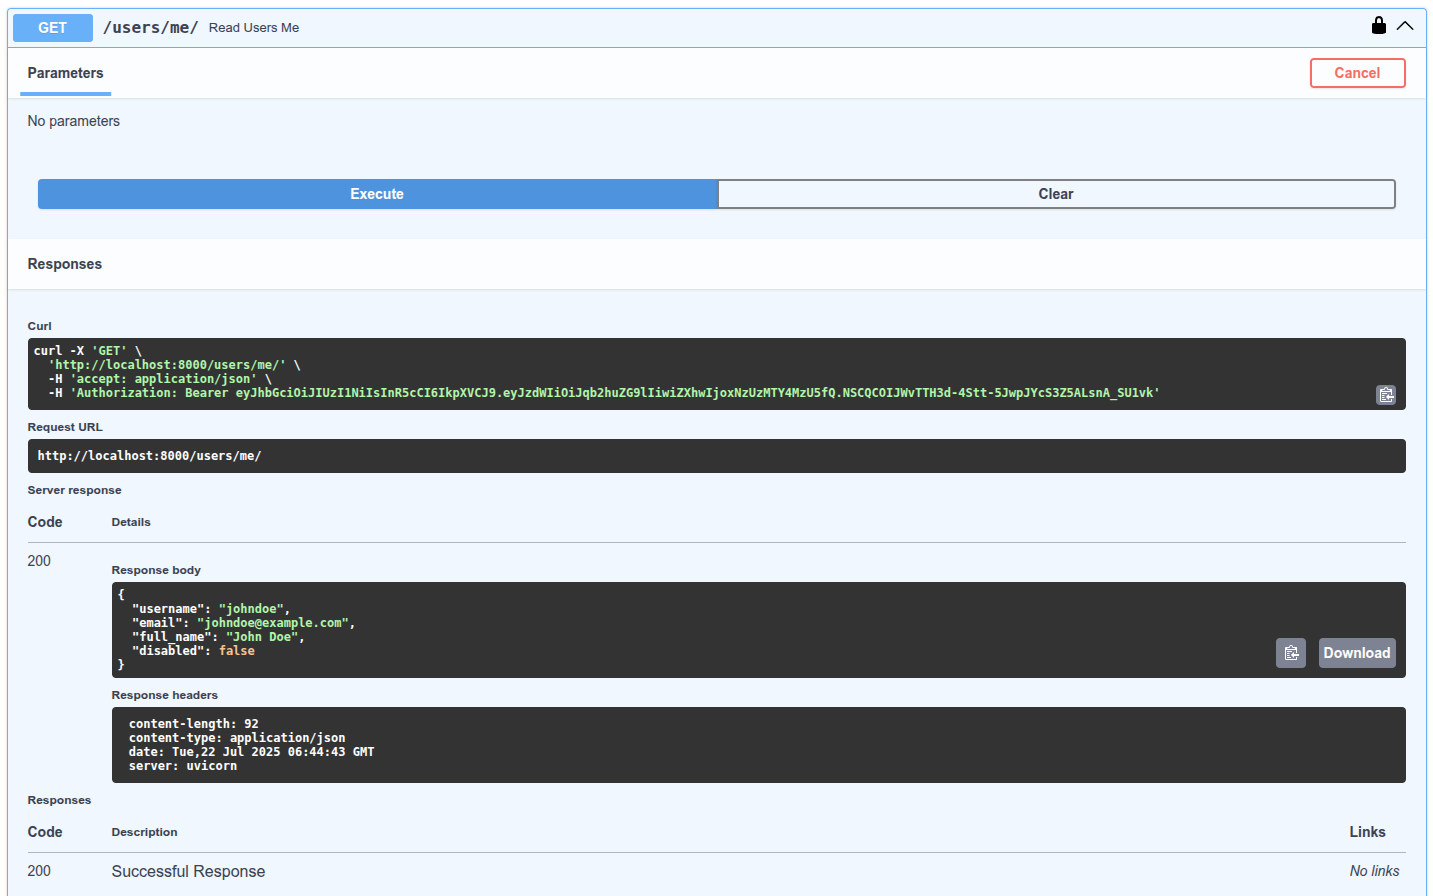
打开浏览器的开发者工具, 查看数据是怎么发送的, 而且数据里只包含了令牌, 只有验证用户的第一个请求才发送密码, 并获取访问令牌, 但之后不会再发送密码:

注意, 请求中Authorization响应头的值以Bearer开头.
# scopes 高级用法
OAuth2支持scopes(作用域). scopes为JWT令牌添加指定权限. 让持有令牌的用户或第三方在指定限制条件下与API交互. 高级用户指南中将介绍如何使用scopes, 及如何把scopes集成至FastAPI.
# 小结
至此, 你可以使用OAuth2和JWT等标准配置安全的FastAPI应用. 几乎在所有框架中, 处理安全问题很快都会变得非常复杂. 有些包为了简化安全流, 不得不在数据模型, 数据库和功能上做出妥协. 而有些过于简化的软件包其实存在了安全隐患.
FastAPI不向任何数据库, 数据模型或工具做妥协. 开发者可以灵活选择最适合项目的安全机制. 还可以直接使用passlib和PyJWT等维护良好, 使用广泛的包, 这是因为FastAPI不需要任何复杂机制, 就能集成外部的包. 而且, FastAPI还提供了一些工具, 在不影响灵活, 稳定和安全的前提下, 尽可能地简化安全机制. FastAPI还支持以相对简单的方式, 使用OAuth2等安全, 标准的协议.
高级用户指南中详细介绍了OAuth2 scopes的内容, 遵循同样的标准, 实现更精密的权限系统. OAuth2的作用域是脸书, 谷歌, GitHub, 微软, 推特等第三方验证应用使用的机制, 让用户授权第三方应用与API交互.
# 中间件
你可以向FastAPI应用添加中间件. "中间件"是一个函数, 它在每个请求被特定的路径操作处理之前, 以及在每个响应返回之前工作.
- 它接收你的应用程序的每一个请求
- 然后它可以对这个请求做一些事情或者执行任何需要的代码
- 然后它将请求传递给应用程序的其他部分(通过某种路径操作)
- 然后它获取应用程序生产的响应(通过某种路径操作)
- 它可以对该响应做些什么或者执行任何需要的代码
- 然后它返回这个响应
技术细节
如果你使用了yield关键字依赖, 依赖中的退出代码将在执行中间件后执行. 如果有任何后台任务(稍后记录), 它们将在执行中间件后运行.
# 创建中间件
要创建中间件你可以在函数的顶部使用装饰器@app.middleware("http"). 中间件参数接收如下参数:
request.- 一个函数
call_next它将接收request作为参数.- 这个函数将
request传递给相应的路径操作. - 然后它将返回由相应的路径操作生成的
response.
- 这个函数将
- 然后你可以在返回
reponse前进一步修改它.
import time

from fastapi import FastAPI, Request

app = FastAPI()


@app.middleware("http")
async def add_process_time_header(request: Request, call_next):
    start_time = time.perf_counter()
    response = await call_next(request)
    process_time = time.perf_counter() - start_time
    response.headers["X-Process-Time"] = str(process_time)
    return response
2
3
4
5
6
7
8
9
10
11
12
13
14
请记住可以用'X-'前缀添加专有自定义请求头.
但是如果你想让浏览器中的客户端看到你的自定义请求头, 你需要把他们加到CORS配置CORS(Cross-Origin Resource Sharing)的expose_headers参数中, 在Starlette's CORS docs文档中.
技术细节
你也可以使用from starlette.requests import Request. FastAPI为了开发者方便提供了该对象, 但其实它直接来自于Starlette.
# 在 response 的前和后
在任何路径收到request前, 可以添加要和请求一起运行的代码. 也可以在响应生成但是返回之前添加代码. 例如你可以添加自定义请求头X-Process-Time包含以秒为单位的接收请求和生成响应的时间:
import time

from fastapi import FastAPI, Request

app = FastAPI()


@app.middleware("http")
async def add_process_time_header(request: Request, call_next):
    start_time = time.perf_counter()
    response = await call_next(request)
    process_time = time.perf_counter() - start_time
    response.headers["X-Process-Time"] = str(process_time)
    return response
2
3
4
5
6
7
8
9
10
11
12
13
14
# 其他中间件
你可以稍后在Advanced User Guide: Advanced Middleware阅读更多关于中间件的教程. 你将在下一节中学习如何使用中间件处理CORS.
# CORS 跨域资源共享
CORS或者跨资源共享指浏览器中运行的前端拥有与后端通信的JavaScript代码, 而后端处于与前端不同的源的情况.
# 源
源是协议(http, https), 域(myapp.com, localhost, localhost.tiangolo.com)以及端口(80, 443, 8080)的组合.
因此, 这些都是不同的源:
http://localhosthttps://localhosthttp://localhost:8080
即使它们都在localhost中, 但是它们使用不同的协议或者端口, 所以它们都是不同的源.
# 步骤
假设你的浏览器中有一个前端运行在http://localhost:8080, 并且它的JavaScript正在尝试与运行在http://localhost的后端通信(因为我们没有指定端口, 浏览器会采用默认的端口80).
然后, 浏览器会向后端发送一个HTTP OPTIONS 请求, 如果后端发送适当的headers来授权来自这个不同源(http://localhost:8080)的通信, 浏览器将允许前端的JavaScript向后端发送请求. 为此, 后端必须有一个允许的源列表. 在这种情况下, 它必须包含http://localhost:8080, 前端才能正常工作.
# 通配符
也可以使用"*"(一个通配符)声明这个列表, 表示全部都是允许的. 但这仅允许某些类型的通信, 不包括所有涉及凭据的内容: 像Cookies以及那些使用Bearer令牌的授权headers等.
因此, 为了一切能正常工作, 最好显式地指定允许的源.
# 使用 CORSMiddleware
你可以在FastAPI应用中使用CORSMiddleware来配置它.
- 导入
CORSMiddleware. - 创建一个允许的源列表(由字符串组成).
- 将其作为中间件添加到你的FastAPI应用中.
你也可以指定后端是否允许:
- 凭证(授权headers, Cookies)等
- 特定的HTTP方法(
POST,PUT)或者使用通配符"*"允许所有方法. - 特定的HTTP headers或者使用通配符
"*"允许所有headers.
from fastapi import FastAPI
from fastapi.middleware.cors import CORSMiddleware

app = FastAPI()

origins = [
    "http://localhost.tiangolo.com",
    "https://localhost.tiangolo.com",
    "http://localhost",
    "http://localhost:8080",
]

app.add_middleware(
    CORSMiddleware,
    allow_origins=origins,
    allow_credentials=True,
    allow_methods=["*"],
    allow_headers=["*"],
)


@app.get("/")
async def main():
    return {"message": "Hello World"}
2
3
4
5
6
7
8
9
10
11
12
13
14
15
16
17
18
19
20
21
22
23
24
默认情况下, 这个CORSMiddleware实现所使用的默认参数较为保守, 所以你需要显式地启用特定的源, 方法或者headers, 以便浏览器能够在跨域上下文中使用它们.
支持以下参数:
allow_origins: 一个允许跨域请求的源列表. 例如,['https://example.org', 'https://www.example.org']. 你可以使用['*']允许任何源.allow_origin_regex: 一个正则表达式字符串, 匹配的源允许跨域请求. 例如,https://.*\.example\.org.allow_methods: 一个允许跨域请求的HTTP方法列表, 默认为[GET]. 你可以使用['*']来允许所有标准方法.allow_headers: 一个允许跨域请求的HTTP请求头列表. 默认为[]. 你可以使用['*']允许所有的请求头.Accept,Accept-Language,Content-Language以及Content-Type请求头总是允许CORS请求.allow_credentials: 指示跨域请求支持cookies. 默认是False. 另外, 允许凭证时allow_origins不能设定为['*'], 必须指定源.expose_headers: 指示可以被浏览器访问的响应头. 默认为[].max_age: 设定浏览器缓存CORS响应的最长时间, 单位是秒. 默认为600.
中间件响应两种特定类型的HTTP请求......
# CORS预检请求
这是些带有Origin和Access-Control-Request-Method请求头的OPTIONS请求. 在这种情况下, 中间件将拦截传入的请求并进行响应, 出于提供信息的目的返回一个使用了适当的CORS headers的200或400响应.
# 简单请求
任何带有Origin请求头的请求. 在这种情况下, 中间件将像平常一样传递请求, 但是在响应中包含适当的CORS headers.
# 更多信息
更多关于CORS的信息, 请查看Mozilla CORS文档.
你也可以使用from starlette.middleware.cors import CORSMiddleware.
出于方便, FastAPI在fastapi.middleware中为开发者提供了几个中间件. 但是大多数可用的中间件都是直接来自Starlette.
# SQL 关系性数据库
FastAPI并不要求你使用SQL(关系型)数据库. 你可以使用任何想用的数据库. 这里, 我们来看一个使用SQLModel的示例. SQLModel是基于SQLAlchemy和Pydantic构建的. 它由FastAPI的同一作者制作, 旨在完美匹配需要使用SQL数据库的FastAPI应用程序.
你可以使用任何其他你想要的SQL或NoSQL数据库(在某些情况下称为"ORM"), FastAPI不会强迫你使用任何东西.
由于SQLModel基于SQLAlchemy, 因此你可以轻松使用任何由SQLAlchemy支持的数据库(这也让它们被SQLModel支持), 例如:
- PostgreSQL
- MySQL
- SQLite
- Oracle
- Microsoft SQL Server等.
在这个例子中, 我们将使用SQLite, 因为它使用单个文件, 并且Python对其有集成支持. 因此, 你可以直接复制这个例子并运行. 之后, 对于您的生产应用程序, 你可能会想要使用像PostgreSQL这样的数据库服务器.
有一个使用FastAPI和PostgreSQL的官方的项目生成器, 其中包括了前端和更多工具: https://github.com/fastapi/full-stack-fastapi-template.
这是一个非常简单和简短的数据. 如果你想了解一般的数据库, SQL或更高级的功能, 请查看SQLModel文档.
# 安装 SQLModel
首先, 确保你创建并激活了虚拟环境, 然后安装了sqlmodel:
pip install sqlmodel
# 创建含有单一模型的应用程序
我们首先创建应用程序的最简单的第一个版本, 只有一个SQLModel模型. 稍后我们将通过下面的多个模型提高其安全性和多功能性.
# 创建模型
导入SQLModel并创建一个数据库模型:
from typing import Annotated
from fastapi import Depends, FastAPI, HTTPException, Query
from sqlmodel import Field, Session, SQLModel, create_engine, select
class Hero(SQLModel, table=True):
id: int | None = Field(default=None, primary_key=True)
name: str = Field(index=True)
age: int | None = Field(default=None, index=True)
secret_name: str
2
3
4
5
6
7
8
9
10
11
Hero类与Pydantic模型非常相似(实际上, 从底层来看, 它确实就是一个Pydantic模型). 有一些区别:
table=True会告诉SQLModel这这是一个表模型, 它应该表示SQL数据库中的一个表, 而不仅仅是一个数据模型(就像其他常规的Pydantic类一样).Field(primary_key=True)会告诉SQLModelid是SQL数据库中的主键(你可以在SQLModel)文档中了解更多关于SQL主键的信息. 把类型设置为int | None, SQLModel就能知道该列在SQL数据库中应该是INTEGER类型, 并且应该是NULLABLE.Field(index=True)会告诉SQLModel应该为此列创建一个SQL索引, 这样在读取按此列过滤的数据时, 程序能在数据库进行更快的查找. SQLModel会知道声明为str的内容将是类型为TEXT(或VARCHAR, 具体取决于数据库)的SQL列.
# 创建引擎
SQLModel的引擎engine(实际上它是一个SQLAlchemy engine)是用来与数据库保持连接的. 你只需要构建一个engine, 来让你的所有代码连接到同一个数据库.
# Code above omitted
sqlite_file_name = "database.db"
sqlite_url = f"sqlite:///{sqlite_file_name}"
connect_args = {"check_same_thread": False}
engine = create_engine(sqlite_url, connect_args=connect_args)
# Code below omitted
2
3
4
5
6
7
8
9
使用check_same_thread=False可以让FastAPI在不同线程中使用同一个SQLite数据库. 这很有必要, 因为单个请求可能会使用多个线程(例如在依赖项中). 不用担心, 我们会按照代码结构确保每个请求使用一个单独的SQLModel会话, 这实际上就是check_same_thread想要实现的.
# 创建表
然后, 我们来添加一个函数, 使用SQLModel.metadata.create_all(engine)为所有表模型创建表.
# Code above omitted
def create_db_and_tables():
SQLModel.metadata.create_all(engine)
# Code below omitted
2
3
4
5
6
# 创建会话(Session)依赖项
Session会存储内存中的对象并跟踪数据中所需更改的内容, 然后它使用engine与数据库进行通信. 我们会使用yield创建一个FastAPI依赖项, 为每个请求提供一个新的Session. 这确保我们每个请求使用一个单独的会话. 然后我们创建一个Annotated的依赖项SessionDep来简化其他也会用到此依赖的代码.
# Code above omitted
def get_session():
with Session(engine) as session:
yield session
SessionDep = Annotated[Session, Depends(get_session)]
# Code below omitted
2
3
4
5
6
7
8
9
10
# 在启动时创建数据库表
我们会在应用程序启动时创建数据库表.
# Code above omitted
app = FastAPI()
@app.on_event("startup")
def on_startup():
create_db_and_tables()
# Code below omitted
2
3
4
5
6
7
8
9
10
此处, 在应用程序启动事件中, 我们创建了表. 而对于生产环境, 你可能会用一个能够在启动应用程序之前运行的迁移脚本.
SQLModel将会拥有封装Alembic的迁移工具, 但目前你可以直接使用Alembic.
# 创建Hero类
因为每个SQLModel模型同时也是一个Pydantic模型, 所以你可以在与Pydantic模型相同的类型注释中使用它. 例如, 如果你声明的一个类型为Hero的参数, 它将从JSON主体中读取参数. 同样, 你可以将其声明为函数的返回类型, 然后数据的结构就会显示在自动生成的API文档界面中.
# Code above omitted
@app.post("/heroes/")
def create_hero(hero: Hero, session: SessionDep) -> Hero:
session.add(hero)
session.commit()
session.refresh(hero)
return hero
# Code below omitted
2
3
4
5
6
7
8
9
10
这里, 我们使用SessionDep依赖项(一个Session)将新的Hero添加到Session实例中, 提交更改到数据库, 刷新hero中的数据, 并返回它.
# 读取Hero类
我们可以使用select()从数据库中读取Hero类, 并利用limit和offset来对结果进行分页.
# Code above omitted
@app.get("/heroes/")
def read_heroes(
session: SessionDep,
offset: int = 0,
limit: Annotated[int, Query(le=100)] = 100,
) -> list[Hero]:
heroes = session.exec(select(Hero).offset(offset).limit(limit)).all()
return heroes
# Code below omitted
2
3
4
5
6
7
8
9
10
11
12
# 读取单个Hero
我们可以读取单个Hero
# Code above omitted
@app.get("/heroes/{hero_id}")
def read_hero(hero_id: int, session: SessionDep) -> Hero:
hero = session.get(Hero, hero_id)
if not hero:
raise HTTPException(status_code=404, detail="Hero not found")
return hero
# Code below omitted
2
3
4
5
6
7
8
9
10
# 删除单个Hero
我们也可以删除单个Hero
# Code above omitted
@app.delete("/heroes/{hero_id}")
def delete_hero(hero_id: int, session: SessionDep):
hero = session.get(Hero, hero_id)
if not hero:
raise HTTPException(status_code=404, detail="Hero not found")
session.delete(hero)
session.commit()
return {"ok": True}
2
3
4
5
6
7
8
9
10
# 运行应用程序
fastapi dev main.py
然后再/docsUI中, 你能够看到FastAPI会用这些模型来记录API, 并且还会用它们来序列化和验证数据.
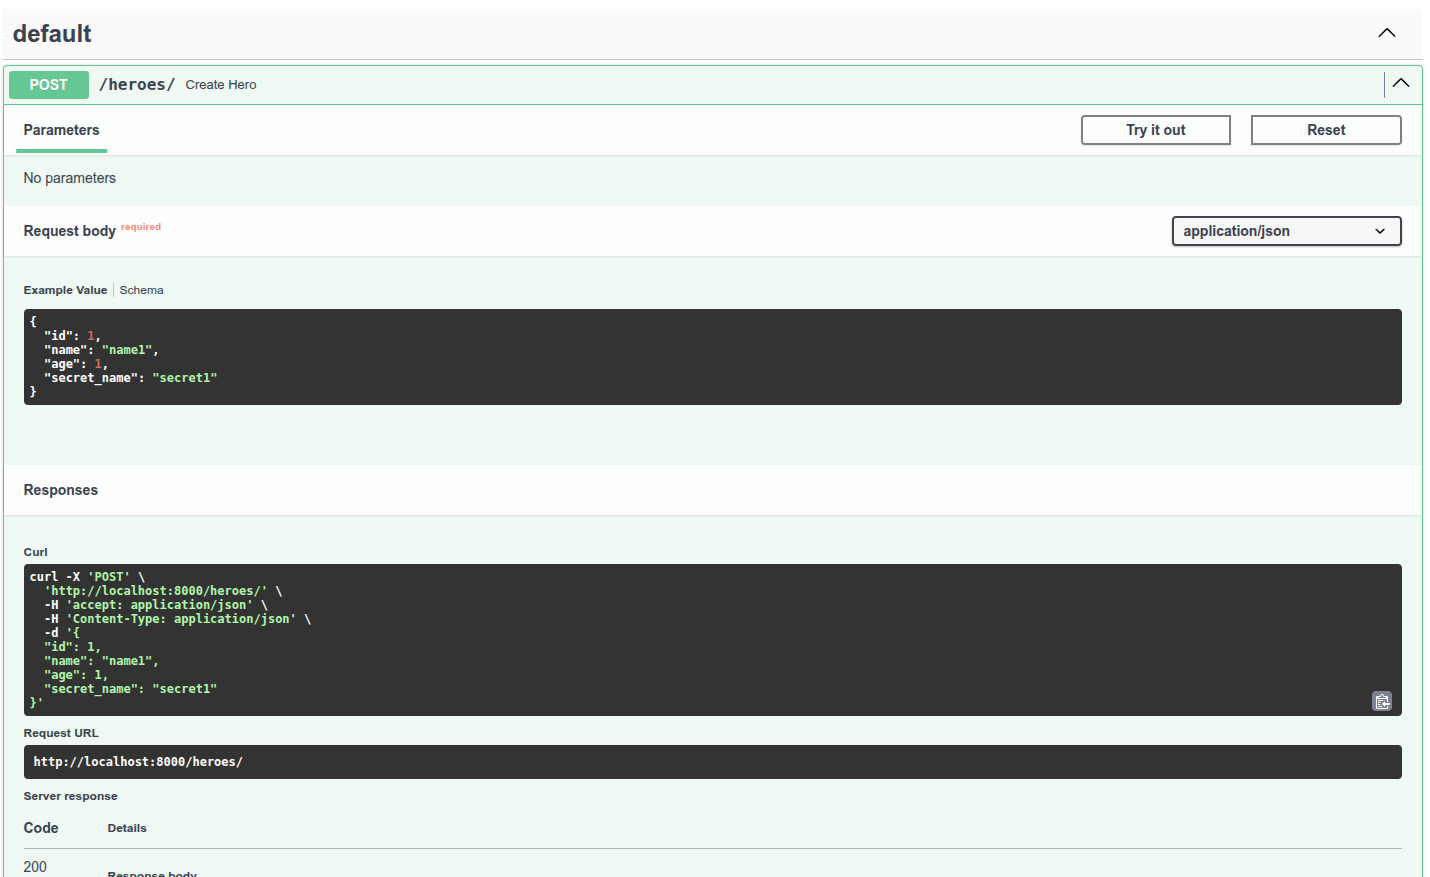
# 更新应用程序以支持多个模型
现在让我们稍微重构一下这个应用, 以提高安全性和多功能性. 如果你查看之前的应用程序, 你可以在UI界面中看到, 到目前为止, 由客户端决定要创建的Hero的id值. 我们不应该允许这样做, 因为它们可能会覆盖我们在数据库中已经分配的id. 决定id的行为应该由后端或数据库来完成, 而非客户端. 此外, 我们为hero创建了一个secret_name, 但到目前为止, 我们在各处都返回了它, 这就不太秘密了......, 我们将通过添加一些额外的模型来解决这些问题, 而SQLModel将在这里大放异彩.
# 创建多个模型
在SQLModel中, 任何含有table=True属性的模型类都是一个表模型. 任何不含有table=True属性的模型类都是数据模型, 这些实际上只是Pydantic模型(附带一些小的额外功能). 有了SQLModel, 我们就可以利用继承来在所有情况下避免重复所有字段.
# HeroBase - 基类
我们从一个HeroBase模型开始, 该模型具有所有模型共享的字段:
nameage
# Code above omitted
class HeroBase(SQLModel):
name: str = Field(index=True)
age: int | None = Field(default=None, index=True)
# Code below omitted
2
3
4
5
6
7
# Hero - 表模型
接下来, 我们创建Hero, 实际的表模型, 并添加那些不总是在其他模型中的额外字段:
idsecret_name
因为Hero继承自HeroBase, 所以它也包含了在HeroBase中声明过的字段. 因此Hero的所有字段为:
idnameagesecret_name
# Code above omitted
class HeroBase(SQLModel):
name: str = Field(index=True)
age: int | None = Field(default=None, index=True)
class Hero(HeroBase, table=True):
id: int | None = Field(default=None, primary_key=True)
secret_name: str
# Code below omitted
2
3
4
5
6
7
8
9
10
11
12
# HeroPublic - 公共数据模型
接下来, 我们创建一个HeroPublic模型, 这是将返回给API客户端的模型. 它包含了与HeroBase相同的字段, 因此不会包括secret_name. 终于, 我们英雄(hero)的身份得到了保护! 它还重新声明了id: int. 这样我们便与API客户单建立了一种约定, 使他们始终可以期待id存在并且是一个整数int(永远不会是None).
确保返回模型始终提供一个值并且始终是int(而不是None)对API客户端非常有用, 他们可以在这种确定性下编写更简单的代码.
此外, 自动生成的客户端将拥有更简洁的接口, 这样与你的API交互的开发者就能够更轻松地使用API.
HeroPublic中的所有字段都与HeroBase中的相同, 其中id声明为int(不是None):
idnameage
# Code above omitted
class HeroBase(SQLModel):
name: str = Field(index=True)
age: int | None = Field(default=None, index=True)
class Hero(HeroBase, table=True):
id: int | None = Field(default=None, primary_key=True)
secret_name: str
class HeroPublic(HeroBase):
id: int
# Code below omitted
2
3
4
5
6
7
8
9
10
11
12
13
14
15
16
# HeroCreate - 用于创建hero的数据模型
现在我们创建一个HeroCreate模型, 这是用于验证客户数据的模型. 它不仅拥有与HeroBase相同的字段, 还有secret_name. 现在, 当客户端创建一个新的hero时, 他们会发送secret_name, 它会被存储到数据库中, 但这些secret_name不会通过API返回给客户端.
这应当是密码被处理的方式: 接收密码, 但不要通过API返回它们. 在存储密码之前, 你还应该对密码的值进行哈希处理, 绝不要以明文形式存储它们.
HeroCreate的字段包括:
nameagesecret_name
# Code above omitted
class HeroBase(SQLModel):
name: str = Field(index=True)
age: int | None = Field(default=None, index=True)
class Hero(HeroBase, table=True):
id: int | None = Field(default=None, primary_key=True)
secret_name: str
class HeroPublic(HeroBase):
id: int
class HeroCreate(HeroBase):
secret_name: str
# Code below omitted
2
3
4
5
6
7
8
9
10
11
12
13
14
15
16
17
18
19
20
# HeroUpdate - 用于更新hero的数据模型
在之前的应用程序中, 我们没有办法更新hero, 但现在又了多个模型, 我们便能做到这一点了.
HeroUpdate数据模型有些特殊, 它包含创建hero所需的所有相同字段, 但所有字段都是可选的(它们都有默认值). 这样, 当你更新一个hero时, 你可以只发送你想要更新的字段. 因为所有字段实际上都发生了变化(类型现在包括None, 并且它们现在有一个默认值None), 我们需要重新声明它们. 我们会重新声明所有字段, 因此我们并不是真的需要从HeroBase继承. 我会让它继承只是为了保持一致, 但这并不是必要的. 这更多是个人喜好的问题.
HeroUpdate的字段包括:
nameagesecret_name
# Code above omitted
class HeroBase(SQLModel):
name: str = Field(index=True)
age: int | None = Field(default=None, index=True)
class Hero(HeroBase, table=True):
id: int | None = Field(default=None, primary_key=True)
secret_name: str
class HeroPublic(HeroBase):
id: int
class HeroCreate(HeroBase):
secret_name: str
class HeroUpdate(HeroBase):
name: str | None = None
age: int | None = None
secret_name: str | None = None
# Code below omitted
2
3
4
5
6
7
8
9
10
11
12
13
14
15
16
17
18
19
20
21
22
23
24
25
26
# 使用 HeroCreate 创建并返回 HeroPublic
既然我们有了多个模型, 我们就可以对使用它们的应用程序部分进行更新. 我们在请求中接收到一个HeroCreate数据模型, 然后从中创建一个Hero表模型. 这个新的表模型Hero会包含客户端发送的字段, 以及一个由数据库生成的id. 然后我们将与函数中相同的表模型Hero返回, 但是由于我们使用HeroPublic数据模型声明了response_model, FastAPI会使用HeroPublic来验证和序列化数据.
# Code above omitted
@app.post("/heroes/", response_model=HeroPublic)
def create_hero(hero: HeroCreate, session: SessionDep):
db_hero = Hero.model_validate(hero)
session.add(db_hero)
session.commit()
session.refresh(db_hero)
return db_hero
# Code below omitted
2
3
4
5
6
7
8
9
10
11
现在我们使用response_model=HeroPublic来代替返回类型注释-> HeroPublic, 因为我们返回的值实际上并不是HeroPublic类型.
如果我们声明了-> HeroPublic, 你的编辑器和代码检查工具会抱怨(但也确实理所应当)你返回了一个Hero而不是一个HeroPublic.
通过response_model的声明, 我们让FastAPI按照它自己的方式处理, 而不会干扰类型注解以及编辑器和其他工具提供的帮助.
# 用 HeroPublic 读取 Hero
我们可以像之前一样读取Hero. 同样, 使用response_model=list[HeroPublic]确保正确地验证和序列化数据.
# Code above omitted
@app.get("/heroes/", response_model=list[HeroPublic])
def read_heroes(
session: SessionDep,
offset: int = 0,
limit: Annotated[int, Query(le=100)] = 100,
):
heroes = session.exec(select(Hero).offset(offset).limit(limit)).all()
return heroes
# Code below omitted
2
3
4
5
6
7
8
9
10
11
12
# 用 HeroPublic 读取单个 Hero
可以读取单个hero.
# Code above omitted
@app.get("/heroes/{hero_id}", response_model=HeroPublic)
def read_hero(hero_id: int, session: SessionDep):
hero = session.get(Hero, hero_id)
if not hero:
raise HTTPException(status_code=404, detail="Hero not found")
return hero
# Code below omitted
2
3
4
5
6
7
8
9
10
# 用 HeroUpdate 更新单个 Hero
我们可以更新单个hero. 为此, 我们会使用HTTP的PATCH操作. 在代码中, 我们会得到一个dict, 其中包含客户端发送的所有数据, 只有客户端发送的数据, 并排除了任何一个仅仅作为默认值存在的值. 为此, 我们使用exclude_unset=True. 这是最主要的技巧. 然后我们会使用hero_db.sqlmodel_update(hero_data), 来利用hero_data的数据更新hero_db.
# Code above omitted
@app.patch("/heroes/{hero_id}", response_model=HeroPublic)
def update_hero(hero_id: int, hero: HeroUpdate, session: SessionDep):
hero_db = session.get(Hero, hero_id)
if not hero_db:
raise HTTPException(status_code=404, detail="Hero not found")
hero_data = hero.model_dump(exclude_unset=True)
hero_db.sqlmodel_update(hero_data)
session.add(hero_db)
session.commit()
session.refresh(hero_db)
return hero_db
# Code below omitted
2
3
4
5
6
7
8
9
10
11
12
13
14
15
# (又一次)删除单个 Hero
删除一个hero基本保持不变.
# Code above omitted
@app.delete("/heroes/{hero_id}")
def delete_hero(hero_id: int, session: SessionDep):
hero = session.get(Hero, hero_id)
if not hero:
raise HTTPException(status_code=404, detail="Hero not found")
session.delete(hero)
session.commit()
return {"ok": True}
2
3
4
5
6
7
8
9
10
# (又一次)运行应用程序
fastapi dev main.py
你会在/docsAPI UI看到它现在已经更新, 并且在进行创建hero等操作时, 它不会再期望从客户端接收id数据.
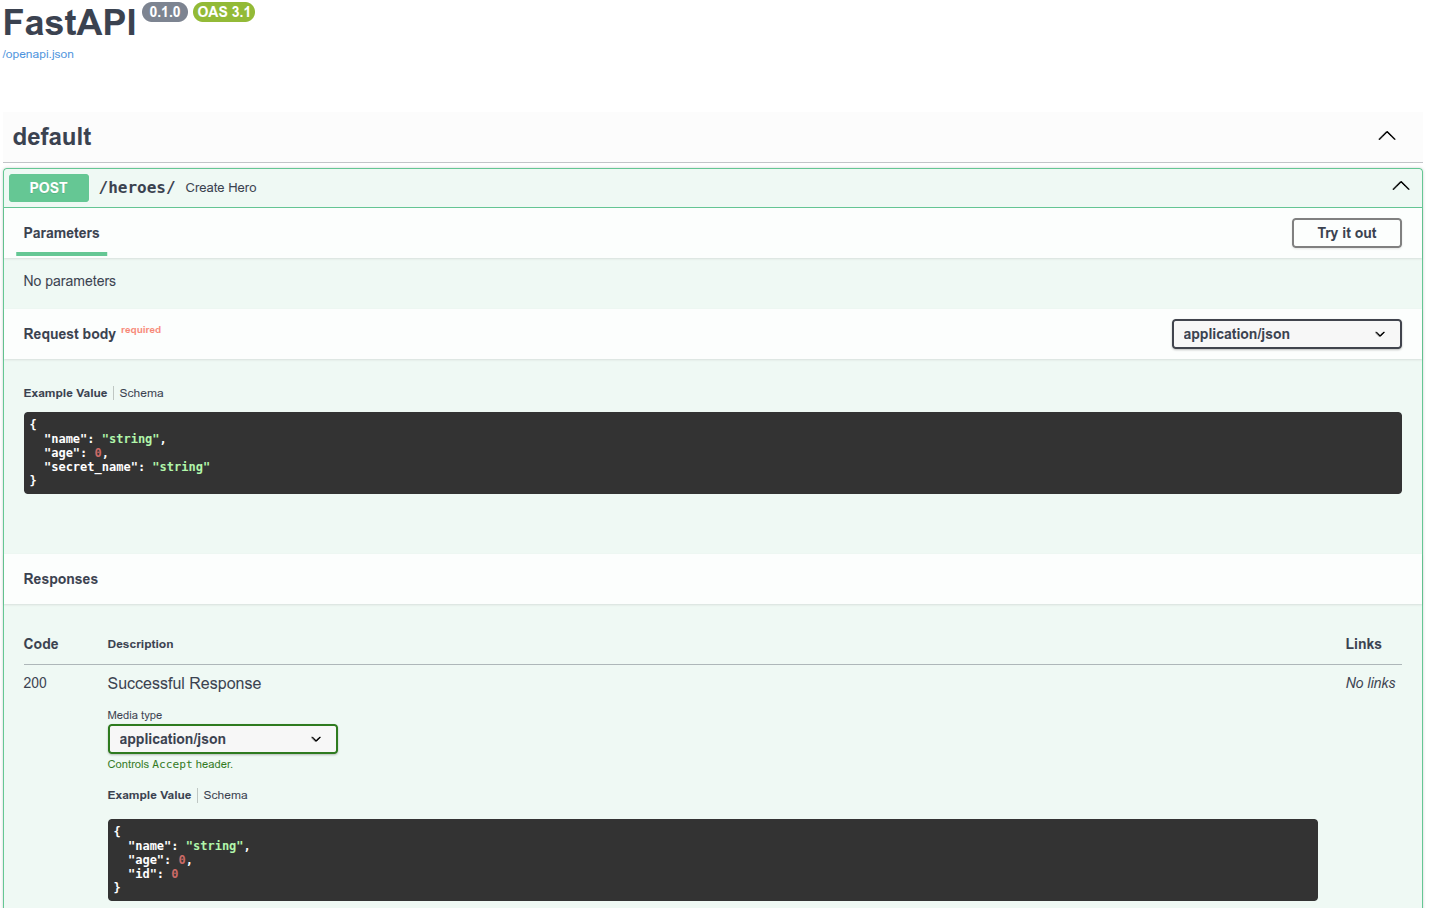
# 总结
from typing import Annotated
from fastapi import Depends, FastAPI, HTTPException, Query
from sqlmodel import Field, Session, SQLModel, create_engine, select
class HeroBase(SQLModel):
name: str = Field(index=True)
age: int | None = Field(default=None, index=True)
class Hero(HeroBase, table=True):
id: int | None = Field(default=None, primary_key=True)
secret_name: str
class HeroPublic(HeroBase):
id: int
class HeroCreate(HeroBase):
secret_name: str
class HeroUpdate(HeroBase):
name: str | None = None
age: int | None = None
secret_name: str | None = None
sqlite_file_name = "database.db"
sqlite_url = f"sqlite:///{sqlite_file_name}"
connect_args = {"check_same_thread": False}
engine = create_engine(sqlite_url, connect_args=connect_args)
def create_db_and_tables():
SQLModel.metadata.create_all(engine)
def get_session():
with Session(engine) as session:
yield session
SessionDep = Annotated[Session, Depends(get_session)]
app = FastAPI()
@app.on_event("startup")
def on_startup():
create_db_and_tables()
@app.post("/heroes/", response_model=HeroPublic)
def create_hero(hero: HeroCreate, session: SessionDep):
db_hero = Hero.model_validate(hero)
session.add(db_hero)
session.commit()
session.refresh(db_hero)
return db_hero
@app.get("/heroes/", response_model=list[HeroPublic])
def read_heroes(
session: SessionDep,
offset: int = 0,
limit: Annotated[int, Query(le=100)] = 100,
):
heroes = session.exec(select(Hero).offset(offset).limit(limit)).all()
return heroes
@app.get("/heroes/{hero_id}", response_model=HeroPublic)
def read_hero(hero_id: int, session: SessionDep):
hero = session.get(Hero, hero_id)
if not hero:
raise HTTPException(status_code=404, detail="Hero not found")
return hero
@app.patch("/heroes/{hero_id}", response_model=HeroPublic)
def update_hero(hero_id: int, hero: HeroUpdate, session: SessionDep):
hero_db = session.get(Hero, hero_id)
if not hero_db:
raise HTTPException(status_code=404, detail="Hero not found")
hero_data = hero.model_dump(exclude_unset=True)
hero_db.sqlmodel_update(hero_data)
session.add(hero_db)
session.commit()
session.refresh(hero_db)
return hero_db
@app.delete("/heroes/{hero_id}")
def delete_hero(hero_id: int, session: SessionDep):
hero = session.get(Hero, hero_id)
if not hero:
raise HTTPException(status_code=404, detail="Hero not found")
session.delete(hero)
session.commit()
return {"ok": True}
2
3
4
5
6
7
8
9
10
11
12
13
14
15
16
17
18
19
20
21
22
23
24
25
26
27
28
29
30
31
32
33
34
35
36
37
38
39
40
41
42
43
44
45
46
47
48
49
50
51
52
53
54
55
56
57
58
59
60
61
62
63
64
65
66
67
68
69
70
71
72
73
74
75
76
77
78
79
80
81
82
83
84
85
86
87
88
89
90
91
92
93
94
95
96
97
98
99
100
101
102
103
你可以使用SQLModel与SQL数据库进行交互, 并通过数据模型和表模型简化代码.
你可以在SQLModel的文档中学习到更多的内容, 其中有一个更详细的关于如何将SQLModel与FastAPI一起使用的教程.
PostgreSQL:
from typing import Annotated
from fastapi import Depends, FastAPI, HTTPException, Query
from sqlmodel import Field, Session, SQLModel, create_engine, select
class HeroBase(SQLModel):
name: str = Field(index=True)
age: int | None = Field(default=None, index=True)
class Hero(HeroBase, table=True):
id: int | None = Field(default=None, primary_key=True)
secret_name: str
class HeroPublic(HeroBase):
id: int
class HeroCreate(HeroBase):
secret_name: str
class HeroUpdate(HeroBase):
name: str | None = None
age: int | None = None
secret_name: str | None = None
# sqlite_file_name = "database.db"
# sqlite_url = f"sqlite:///{sqlite_file_name}"
# connect_args = {"check_same_thread": False}
# engine = create_engine(sqlite_url, connect_args=connect_args)
pgsql_url = "postgresql://postgres:zlqf%402024!@192.168.1.79/sys"
engine = create_engine(pgsql_url, echo=True, connect_args={"connect_timeout": 10})
def create_db_and_tables():
SQLModel.metadata.create_all(engine)
def get_session():
with Session(engine) as session:
yield session
SessionDep = Annotated[Session, Depends(get_session)]
app = FastAPI()
@app.on_event("startup")
def on_startup():
create_db_and_tables()
@app.post("/heroes/", response_model=HeroPublic)
def create_hero(hero: HeroCreate, session: SessionDep):
db_hero = Hero.model_validate(hero)
session.add(db_hero)
session.commit()
session.refresh(db_hero)
return db_hero
@app.get("/heroes/", response_model=list[HeroPublic])
def read_heroes(
session: SessionDep,
offset: int = 0,
limit: Annotated[int, Query(le=100)] = 100,
):
heroes = session.exec(select(Hero).offset(offset).limit(limit)).all()
return heroes
@app.get("/heroes/{hero_id}", response_model=HeroPublic)
def read_hero(hero_id: int, session: SessionDep):
hero = session.get(Hero, hero_id)
if not hero:
raise HTTPException(status_code=404, detail="Hero not found")
return hero
@app.patch("/heroes/{hero_id}", response_model=HeroPublic)
def update_hero(hero_id: int, hero: HeroUpdate, session: SessionDep):
hero_db = session.get(Hero, hero_id)
if not hero_db:
raise HTTPException(status_code=404, detail="Hero not found")
hero_data = hero.model_dump(exclude_unset=True)
hero_db.sqlmodel_update(hero_data)
session.add(hero_db)
session.commit()
session.refresh(hero_db)
return hero_db
@app.delete("/heroes/{hero_id}")
def delete_hero(hero_id: int, session: SessionDep):
hero = session.get(Hero, hero_id)
if not hero:
raise HTTPException(status_code=404, detail="Hero not found")
session.delete(hero)
session.commit()
return {"ok": True}
2
3
4
5
6
7
8
9
10
11
12
13
14
15
16
17
18
19
20
21
22
23
24
25
26
27
28
29
30
31
32
33
34
35
36
37
38
39
40
41
42
43
44
45
46
47
48
49
50
51
52
53
54
55
56
57
58
59
60
61
62
63
64
65
66
67
68
69
70
71
72
73
74
75
76
77
78
79
80
81
82
83
84
85
86
87
88
89
90
91
92
93
94
95
96
97
98
99
100
101
102
103
104
105
106
# 更大的应用-多个文件
如果你正在开发一个应用程序或Web API, 很少会将所有的内容都放在一个文件中. FastAPI提供了一个方便的工具, 可以在保持所有灵活性的同时构建你的应用程序.
如果你来自Flask, 那这将相当于Flask的Blueprints.
# 一个文件结构示例
假设你的文件结构如下:
.
├── app
│ ├── __init__.py
│ ├── main.py
│ ├── dependencies.py
│ └── routers
│ │ ├── __init__.py
│ │ ├── items.py
│ │ └── users.py
│ └── internal
│ ├── __init__.py
│ └── admin.py
2
3
4
5
6
7
8
9
10
11
12
上面有几个__init__.py文件: 每个目录或子目录中都有一个. 这就是能将代码从一个文件导入到另一个文件的原因. 例如, 在app/main.py中, 你可以有如下一行: from app.routers import items
app目录包含了所有内容. 并且它有一个空文件app/__init__.py, 因此它是一个Python包(Python模块的集合):app- 它包含一个
app/main.py文件. 由于它位于一个Python包(一个包含__init__文件的目录)中, 因此它是该包的一个模块:app.main. - 还有一个
app/dependencies.py文件, 就像app/main.py一样, 它是一个模块:app.dependencies. - 有一个子目录
app/routers/包含另一个__init__.py文件, 因此它是一个Python子包:app.routers. - 文件
app/routers/items.py位于app/routers/包中, 因此它是一个子模块:app.routers.items. - 同样适用于
app/routers/users.py, 它是另一个子模块:app.routers.users. - 还有一个子目录
app/internal/包含另一个__init__.py文件, 因此它是又一个Python子包:app.internal. app/internal/admin.py是另一个子模块:app.internal.admin.

.
├── app # 「app」是一个 Python 包
│ ├── __init__.py # 这个文件使「app」成为一个 Python 包
│ ├── main.py # 「main」模块,例如 import app.main
│ ├── dependencies.py # 「dependencies」模块,例如 import app.dependencies
│ └── routers # 「routers」是一个「Python 子包」
│ │ ├── __init__.py # 使「routers」成为一个「Python 子包」
│ │ ├── items.py # 「items」子模块,例如 import app.routers.items
│ │ └── users.py # 「users」子模块,例如 import app.routers.users
│ └── internal # 「internal」是一个「Python 子包」
│ ├── __init__.py # 使「internal」成为一个「Python 子包」
│ └── admin.py # 「admin」子模块,例如 import app.internal.admin
2
3
4
5
6
7
8
9
10
11
12
# APIRouter
假设专门用于处理用户逻辑的文件是位于/app/routers/users.py的子模块. 你希望将与用户相关的路径操作与其他代码分开, 以使其井井有条. 但它仍然是同一FastAPI应用程序/Web API的一部分(它是同一Python包的一部分). 你可以使用APIRouter为该模块创建路径操作.
# 导入 APIRouter
你可以导入它并通过与FastAPI类相同的方式创建一个实例:
from fastapi import APIRouter
router = APIRouter()
@router.get("/users", tags=["users"])
async def read_users():
return [{"username": "Rick"}, {"username": "Morty"}]
@router.get("/users/me", tags=["users"])
async def read_user_me():
return {"username": "fakecurrentuser"}
@router.get("/users/{username}", tags=["users"])
async def read_user(username: str):
return {"username": username}
2
3
4
5
6
7
8
9
10
11
12
13
14
15
16
17
18
# 使用 APIRouter 的路径操作
然后你可以使用它来声明路径操作. 使用方式与FastAPI类相同, 你可以将APIRouter视为一个迷你FastAPI类. 所有相同的选项都得到支持. 所有相同的parameters, responses, dependencies, tags等等.
在此示例中, 该变量被命名为router, 但你可以根据你的想法自由命名.
我们将在主FastAPI应用中包含该APIRouter, 但首先, 让我们来看看依赖项和另一个APIRouter.
# 依赖项
我们了解到我们将需要一些在应用程序的好几个地方所使用的依赖项. 因此, 我们将它们放在它们自己的dependencies模块(app/dependencies.py)中. 现在我们将使用一个简单的依赖项来读取一个自定义的X-Token请求首部:
from fastapi import Header, HTTPException
async def get_token_header(x_token: str | None = Header()):
if x_token != "fake-super-secret-token":
raise HTTPException(status_code=400, detail="X-Token header invalid")
async def get_query_token(token: str):
if token != "jessica":
raise HTTPException(status_code=400, detail="No Jessica token provided")
2
3
4
5
6
7
8
9
10
11
我们正在使用虚构的请求首部来简化此示例. 但在实际情况下, 使用集成的安全性使用工具会得到更好的效果.
# 其他使用 APIRouter 的模块
假设你在位于app/routers/items.py的模块中还有专门用于处理应用程序中项目的端点. 你具有以下路径操作:
items/items/{item_id}
这和app/routers/users.py的结构完全相同. 但是我们想变得更聪明并简化一些代码. 我们知道此模块中的所有路径操作都有相同的:
- 路径
prefix:/item. tags: (仅有一个items标签).- 额外的
responses. dependencies: 它们都需要我们创建的X-Token依赖项.
因此, 我们可以将其添加到APIRouter中, 而不是将其添加到每个路径操作中.
from fastapi import APIRouter, Depends, HTTPException
from ..dependencies import get_token_header
router = APIRouter(
prefix="/items",
tags=["items"],
dependencies=[Depends(get_token_header)],
responses={404: {"description": "Not found"}},
)
fake_items_db = {"plumbus": {"name": "Plumbus"}, "gun": {"name": "Portal Gun"}}
@router.get("/")
async def read_items():
return fake_items_db
@router.get("/{item_id}")
async def read_item(item_id: str):
if item_id not in fake_items_db:
raise HTTPException(status_code=404, detail="Item not found")
return {"name": fake_items_db[item_id]["name"], "item_id": item_id}
@router.put(
"/{item_id}",
tags=["custom"],
responses={403: {"description": "Operation forbidden"}},
)
async def update_item(item_id: str):
if item_id != "plumbus":
raise HTTPException(status_code=403, detail="You can only update the Plumbus")
return {"item_id": item_id, "name": "The great Plumbus"}
2
3
4
5
6
7
8
9
10
11
12
13
14
15
16
17
18
19
20
21
22
23
24
25
26
27
28
29
30
31
32
33
34
35
36
由于每个路径操作的路径都必须以/开头, 例如:
@router.get("/{item_id}")
async def read_item(item_id: str):
...
2
3
...前缀不能以/作为结尾. 因此, 本例中的前缀为/items. 我们还可以添加一个tags列表和额外的responses列表, 这些参数将应用于此路由器中包含的所有路径操作. 我们可以添加一个dependencies列表, 这些依赖项将被添加到路由器中的所有路径操作中, 并将针对向它们发起的每个请求执行/解决.
请注意, 和路径操作装饰器中的依赖项很类似, 没有值会被传递给你的路径操作函数.
最终结果是项目相关的路径现在为:
/items//items/{item_id}
...如我们所愿:
- 它们将被标记为仅包含单个字符串
"items"的标签列表.- 这些标签对于自动化交互式文档系统(使用OpenAPI)特别有用.
- 所有的路径操作都将包含预定义的
responses. - 所有的这些路径操作都将在自身之前计算/执行
dependencies列表.- 如果你还在一个具体的路径操作中声明了依赖项, 它们也会被执行.
- 路由器的依赖项最先执行, 然后是装饰器中的dependencies, 再然后是普通的参数依赖项.
- 你还可以添加具有scopes的Security依赖项.
在APIRouter中具有dependencies可以用来, 例如, 对一整组的路径操作要求身份认证. 即使这些依赖项并没有分别添加到每个路径操作中.
prefix, tags, responses以及dependencies参数只是(和其他很多情况一样)FastAPI的一个用于避免代码重复的功能.
# 导入依赖项
这些代码位于app.routers.items模块, app/routers/items.py文件中. 我们需要从app.dependencies模块即app/dependencies.py文件中获取依赖函数. 因此, 我们通过..对依赖项使用了相对导入:
from fastapi import APIRouter, Depends, HTTPException
from ..dependencies import get_token_header
router = APIRouter(
prefix="/items",
tags=["items"],
dependencies=[Depends(get_token_header)],
responses={404: {"description": "Not found"}},
)
fake_items_db = {"plumbus": {"name": "Plumbus"}, "gun": {"name": "Portal Gun"}}
@router.get("/")
async def read_items():
return fake_items_db
@router.get("/{item_id}")
async def read_item(item_id: str):
if item_id not in fake_items_db:
raise HTTPException(status_code=404, detail="Item not found")
return {"name": fake_items_db[item_id]["name"], "item_id": item_id}
@router.put(
"/{item_id}",
tags=["custom"],
responses={403: {"description": "Operation forbidden"}},
)
async def update_item(item_id: str):
if item_id != "plumbus":
raise HTTPException(
status_code=403, detail="You can only update the item: plumbus"
)
return {"item_id": item_id, "name": "The great Plumbus"}
2
3
4
5
6
7
8
9
10
11
12
13
14
15
16
17
18
19
20
21
22
23
24
25
26
27
28
29
30
31
32
33
34
35
36
37
38
# 相对导入如何工作
一个单点., 例如: from .dependencies import get_token_header 表示:
- 从该模块(
app/routers/items.py文件)所在的同一个包(app/routers/目录)开始... - 找到
dependencies模块(一个位于app/routers/dependencies.py的虚构文件)... - 然后从中导入函数
get_token_header.
但是该文件并不存在, 我们的依赖项位于app/dependencies.py文件中. 请记住我们的程序/文件结构是这样的:
两个点.., 例如: from ..dependencies import get_token_header 表示:
- 从该模块(
app/routers/items.py文件)所在的同一个包(app/routers/目录)开始... - 跳转到其父包(
app/目录)... - 在该父包中, 找到
dependencies模块(位于app/dependencies.py的文件)... - 然后从中导入函数
get_token_header.
同样, 如果我们使用了三个点..., 例如: from ...dependencies import get_token_header 那将意味着:
- 从该模块(
app/routers/items.py文件)所在的同一个包(app/routers/目录)开始 - 跳转到其父包(
app/目录) - 然后跳转到该包的父包(该父包并不存在,
app已经是最顶层的包) - 在该父包中, 找到
dependencies模块(位于app/更上一级目录中的dependencies.py文件) - 然后从中导入函数
get_token_header
这将引用app/的往上一级, 带有其自己的__init__.py等文件的某个包. 但是我们并没有这个包. 因此, 这将在我们的示例中引发错误. 现在你知道了它的工作原理, 因此无论它们多么复杂, 你都可以在自己的应用程序中使用相对导入.
# 添加一些自定义的 tags, response 和 dependencies
我们不打算在每个路径操作中添加前缀/items或tags=["items"], 因为我们将它们添加到了APIRouter中. 但是我们仍然可以添加更多将会应用于特定的路径操作的tags, 以及一些特定于该路径操作的额外responses:
from fastapi import APIRouter, Depends, HTTPException
from ..dependencies import get_token_header
router = APIRouter(
prefix="/items",
tags=["items"],
dependencies=[Depends(get_token_header)],
responses={404: {"description": "Not found"}},
)
fake_items_db = {"plumbus": {"name": "Plumbus"}, "gun": {"name": "Portal Gun"}}
@router.get("/")
async def read_items():
return fake_items_db
@router.get("/{item_id}")
async def read_item(item_id: str):
if item_id not in fake_items_db:
raise HTTPException(status_code=404, detail="Item not found")
return {"name": fake_items_db[item_id]["name"], "item_id": item_id}
@router.put(
"/{item_id}",
tags=["custom"],
responses={403: {"description": "Operation forbidden"}},
)
async def update_item(item_id: str):
if item_id != "plumbus":
raise HTTPException(
status_code=403, detail="You can only update the item: plumbus"
)
return {"item_id": item_id, "name": "The great Plumbus"}
2
3
4
5
6
7
8
9
10
11
12
13
14
15
16
17
18
19
20
21
22
23
24
25
26
27
28
29
30
31
32
33
34
35
36
37
38
最后的这个路径操作将包含标签的组合: ["items", "custom"]. 并且在文档中也会有两个响应, 一个用于404, 一个用于403.
# FastAPI 主体
现在, 让我们来看看位于app/main.py的模块. 在这里你导入并使用FastAPI类. 这将是你的应用程序中将所有内容联结在一起的主文件. 并且由于你的大部分逻辑现在都存在于其自己的特定模块中, 因此主文件的内容将非常简单.
# 导入 FastAPI
你可以像平常一样导入并创建一个FastAPI类. 我们甚至可以声明全局依赖项, 它会和每个APIRouter的依赖项组合在一起:
from fastapi import Depends, FastAPI
from .dependencies import get_query_token, get_token_header
from .internal import admin
from .routers import items, users
app = FastAPI(dependencies=[Depends(get_query_token)])
app.include_router(users.router)
app.include_router(items.router)
app.include_router(
admin.router,
prefix="/admin",
tags=["admin"],
dependencies=[Depends(get_token_header)],
responses={418: {"description": "I'm a teapot"}},
)
@app.get("/")
async def root():
return {"message": "Hello Bigger Applications!"}
2
3
4
5
6
7
8
9
10
11
12
13
14
15
16
17
18
19
20
21
22
23
# 导入 APIRouter
现在, 我们导入具有APIRouter的其他子模块, 由于文件app/routers/users.py和app/routers/items.py是同一Python包app一个部分的子模块, 因此我们可以使用单个点.通过相对导入来导入它们.
# 导入是如何工作的
这段代码: from .routers import items, users 表示:
- 从该模块(
app/main.py文件)所在的同一个包(app/目录)开始... - 寻找
routers子包(位于app/routers/的目录)... - 从该包中, 导入子模块
items(位于app/routers/items.py的文件)以及users(位于app/routers/users.py的文件)...
items模块将具有一个router变量(items.router). 这与我们在app/routers/items.py文件中创建的变量相同, 它是一个APIRouter对象. 然后我们对users模块进行相同的操作. 我们也可以像这样导入它们: from app.routers import items, users.
第一个版本是相对导入: from .routers import items, users
第二个版本是绝对导入: from app.routers import items, users
要了解有关Python包和模块的更多信息, 请查阅关于Modules的Python官方文档.
# 避免名称冲突
我们将直接导入items子模块, 而不是仅导入其router变量. 这是因为我们在users子模块中也有另一个名为router的变量. 如果我们一个接一个地导入, 例如:
from .routers.items import router
from .routers.users import router
2
来自users的router将覆盖来自items中的router, 我们将无法同时使用它们. 因此, 为了能够在同一个文件中使用它们, 我们直接导入子模块:
from fastapi import Depends, FastAPI
from .dependencies import get_query_token, get_token_header
from .internal import admin
from .routers import items, users
app = FastAPI(dependencies=[Depends(get_query_token)])
app.include_router(users.router)
app.include_router(items.router)
app.include_router(
admin.router,
prefix="/admin",
tags=["admin"],
dependencies=[Depends(get_token_header)],
responses={418: {"description": "I'm a teapot"}},
)
@app.get("/")
async def root():
return {"message": "Hello Bigger Applications!"}
2
3
4
5
6
7
8
9
10
11
12
13
14
15
16
17
18
19
20
21
22
23
# 包含 users 和 items 的 APIRouter
现在, 让我们来包含来自users和items子模块的router.
from fastapi import Depends, FastAPI
from .dependencies import get_query_token, get_token_header
from .internal import admin
from .routers import items, users
app = FastAPI(dependencies=[Depends(get_query_token)])
app.include_router(users.router)
app.include_router(items.router)
app.include_router(
admin.router,
prefix="/admin",
tags=["admin"],
dependencies=[Depends(get_token_header)],
responses={418: {"description": "I'm a teapot"}},
)
@app.get("/")
async def root():
return {"message": "Hello Bigger Applications!"}
2
3
4
5
6
7
8
9
10
11
12
13
14
15
16
17
18
19
20
21
22
23
users.router包含了app/routers/users.py文件中的APIRouter.
items.router包含了app/routers/items.py文件中的APIRouter.
使用app.include_router(), 我们可以将每个APIRouter添加到主FastAPI应用程序中. 它将包含来自该路由器的所有路由作为其一部分.
技术细节
实际上, 它将在内部为声明在APIRouter中的每个路径操作创建一个路径操作. 所以, 在幕后, 它实际上会像所有的东西都是同一个应用程序一样工作.
包含路由器时, 你不必担心性能问题. 这将花费几微秒时间, 并且只会在启动时发生. 因此, 它不会影响性能.
# 包含一个有自定义 prefix, tags, response 和 dependencies 的 APIRouter
现在, 假设你的组织为你提供了app/internal/admin.py文件. 它包含一个带有一些由你的组织在多个项目之间共享的管理员路径操作的APIRouter. 对于此示例, 它将非常简单. 但是假设由于它是与组织中的其他项目所共享的, 因此我们无法对其进行修改, 以及直接在APIRouter中添加prefix, dependencies, tags等:
from fastapi import APIRouter
router = APIRouter()
@router.post("/")
async def update_admin():
return {"message": "Admin getting schwifty"}
2
3
4
5
6
7
8
但是我们仍然希望在包含APIRouter时设置一个自定义的prefix, 以便其所有路径操作以/admin开头, 我们希望使用本项目已经有的dependencies保护它, 并且我们希望它包含自定义的tags和responses.
我们可以通过将这些参数传递给app.include_router()来完成所有的声明, 而不必修改原始的APIRouter:
from fastapi import Depends, FastAPI
from .dependencies import get_query_token, get_token_header
from .internal import admin
from .routers import items, users
app = FastAPI(dependencies=[Depends(get_query_token)])
app.include_router(users.router)
app.include_router(items.router)
app.include_router(
admin.router,
prefix="/admin",
tags=["admin"],
dependencies=[Depends(get_token_header)],
responses={418: {"description": "I'm a teapot"}},
)
@app.get("/")
async def root():
return {"message": "Hello Bigger Applications!"}
2
3
4
5
6
7
8
9
10
11
12
13
14
15
16
17
18
19
20
21
22
23
这样, 原始的APIRouter将保持不变, 因此我们仍然可以与组织中的其他项目共享相同的app/internal/admin.py文件. 结果是在我们的应用程序中, 来自admin模块的每个路径操作都将具有:
/admin前缀admin标签get_token_header依赖项418响应
但这只会影响我们应用中的的APIRouter, 而不会影响使用它的任何其他代码. 因此, 举例来说, 其他项目能够以不同的身份认证方法使用相同的APIRouter.
# 包含一个路径操作
我们还可以直接将路径操作添加到FastAPI应用中. 这里我们这样做了...只是为了表明我们可以做到:
from fastapi import Depends, FastAPI
from .dependencies import get_query_token, get_token_header
from .internal import admin
from .routers import items, users
app = FastAPI(dependencies=[Depends(get_query_token)])
app.include_router(users.router)
app.include_router(items.router)
app.include_router(
admin.router,
prefix="/admin",
tags=["admin"],
dependencies=[Depends(get_token_header)],
responses={418: {"description": "I'm a teapot"}},
)
@app.get("/")
async def root():
return {"message": "Hello Bigger Applications!"}
2
3
4
5
6
7
8
9
10
11
12
13
14
15
16
17
18
19
20
21
22
23
它将与通过app.include_router()添加的所有其他路径操作一起正常运行.
特别的技术细节
注意: 这是一个非常技术性的细节, 你也许可以直接跳过.
APIRouter没有被挂载, 它们与应用程序的其余部分没有隔离. 这是因为我们想要在OpenAPI模式和用户界面中包含它们的路径操作. 由于我们不能仅仅隔离它们并独立于其余部分来挂载它们, 因此路径操作是被克隆的(重新创建), 而不是直接包含.
# 查看自动化的API文档
现在, 使用app.main模块和app变量运行uvicorn:
uvicorn app.main:app --reload
然后打开http://127.0.0.1:8000/docs的文档. 你将看到使用了正确路径(和前缀)和正确标签的自动化API文档, 包括了来自所有子模块的路径:
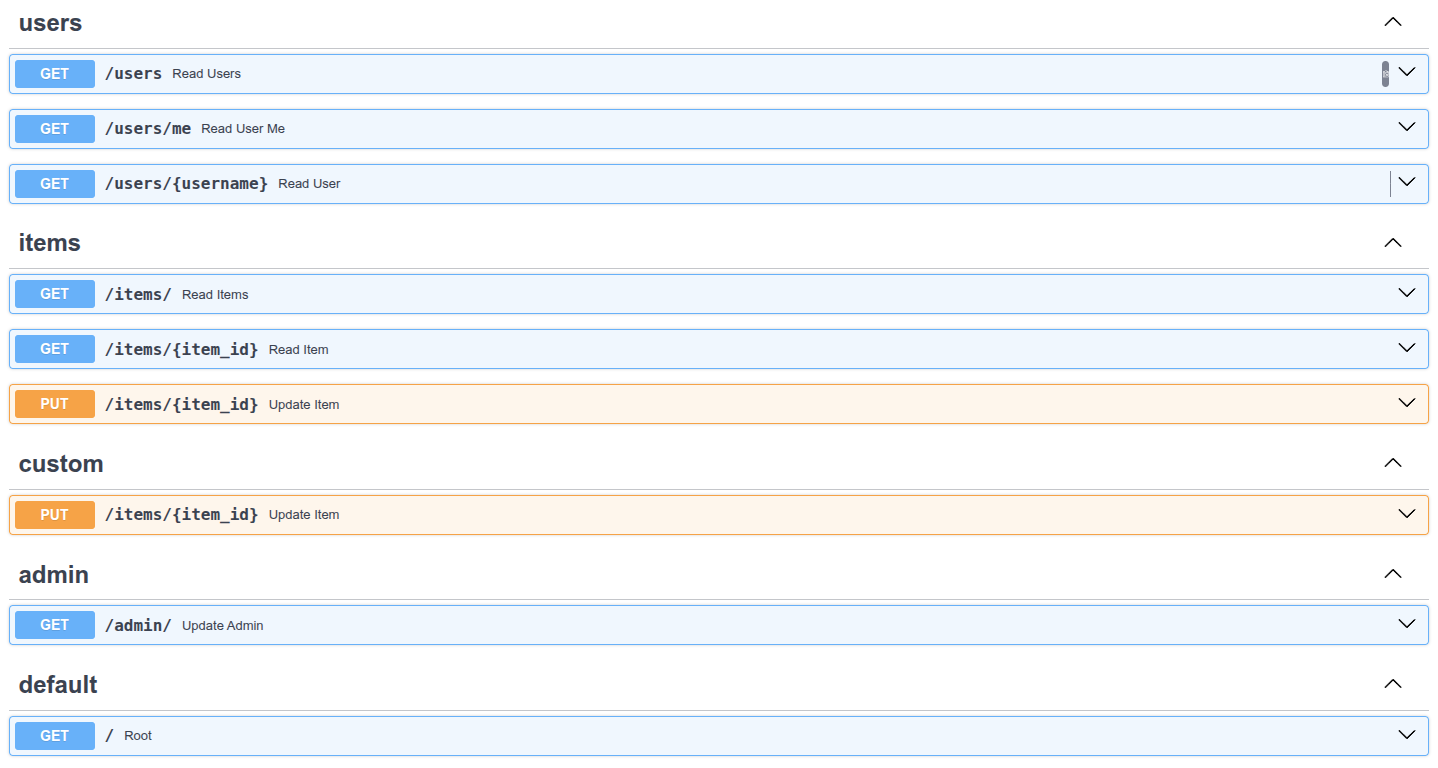
# 多次使用不同的 prefix 包含同一个路由器
你也可以在同一路由器上使用不同的前缀来多次使用.include_router(). 在有些场景这可能有用, 例如以不同的前缀公开同一个的API, 比方说/api/v1和/api/latest. 这是一个你可能并不真正需要的高级用法, 但万一你有需要了就能够用上.
# 在另一个 APIRouter 中包含一个 APIRouter
与在FastAPI应用程序中包含APIRouter的方式相同, 你也可以在另一个APIRouter中包含APIRouter, 通过:
router.include_router(other_router)
请确保在你将router包含到FastAPI应用程序之前进行此操作, 以便other_router中的路径操作也能被包含进来.
# 后台任务
你可以定义在返回响应后运行的后台任务. 这对需要在请求之后执行的操作很有用, 但客户端不必在接收响应之前等待操作完成. 包括这些例子:
- 执行操作后发送的电子邮件通知:
- 由于连接到电子邮件服务器并发送电子邮件往往很"慢"(几秒钟), 你可以立即返回响应并在后台发送电子邮件通知.
- 处理数据:
- 例如, 假设你收到的文件必须经过一个缓慢的过程, 你可以返回一个"Accepted"(HTTP 202)响应并在后台处理它.
# 使用 BackgroundTasks
首先导入BackgroundTasks并在路径操作函数中使用类型声明BackgroundTasks定义一个参数:
from fastapi import BackgroundTasks, FastAPI
app = FastAPI()
def write_notification(email: str, message=""):
with open("log.txt", mode="w") as email_file:
content = f"notification for {email}: {message}"
email_file.write(content)
@app.post("/send-notification/{email}")
async def send_notification(email: str, background_tasks: BackgroundTasks):
background_tasks.add_task(write_notification, email, message="some notification")
return {"message": "Notification sent in the background"}
2
3
4
5
6
7
8
9
10
11
12
13
14
15
FastAPI会创建一个BackgroundTasks类型的对象并作为该参数传入.
# 创建一个任务函数
创建要作为后台任务运行的函数. 它只是一个可以接收参数的的标准函数. 它可以是async def或普通的def函数, FastAPI知道如何正确处理. 在这种情况下, 任务函数将写入一个文件(模拟发送电子邮件). 由于写操作不使用async和await, 我们用普遍的def定义函数:
from fastapi import BackgroundTasks, FastAPI
app = FastAPI()
def write_notification(email: str, message=""):
with open("log.txt", mode="w") as email_file:
content = f"notification for {email}: {message}"
email_file.write(content)
@app.post("/send-notification/{email}")
async def send_notification(email: str, background_tasks: BackgroundTasks):
background_tasks.add_task(write_notification, email, message="some notification")
return {"message": "Notification sent in the background"}
2
3
4
5
6
7
8
9
10
11
12
13
14
15
# 添加后台任务
在你的路径操作函数中, 用.add_task()方法将任务函数传到后台任务对象中:
from fastapi import BackgroundTasks, FastAPI
app = FastAPI()
def write_notification(email: str, message=""):
with open("log.txt", mode="w") as email_file:
content = f"notification for {email}: {message}"
email_file.write(content)
@app.post("/send-notification/{email}")
async def send_notification(email: str, background_tasks: BackgroundTasks):
background_tasks.add_task(write_notification, email, message="some notification")
return {"message": "Notification sent in the background"}
2
3
4
5
6
7
8
9
10
11
12
13
14
15
.add_task()接收以下参数:
- 在后台运行的任务函数(
write_notification). - 应按顺序传递给任务函数的任意参数序列(
email). - 应传递给任务函数的任意关键字参数(
message="some notification")
# 依赖注入
使用BackgroundTasks也适用于依赖注入系统, 你可以在多个级别声明BackgroundTasks类型的参数: 在路径操作函数里, 在依赖中(可依赖), 在子依赖中, 等等. FastAPI知道在每种情况下该做什么以及如何复用同一对象, 因此所有后台任务被合并在一起并且随后在后台运行.
from typing import Annotated
from fastapi import BackgroundTasks, Depends, FastAPI
app = FastAPI()
def write_log(message: str):
with open("log.txt", mode="a") as log:
log.write(message)
def get_query(background_tasks: BackgroundTasks, q: str | None = None):
if q:
message = f"found query: {q}\n"
background_tasks.add_task(write_log, message)
return q
@app.post("/send-notification/{email}")
async def send_notification(
email: str, background_tasks: BackgroundTasks, q: Annotated[str, Depends(get_query)]
):
message = f"message to {email}\n"
background_tasks.add_task(write_log, message)
return {"message": "Message sent"}
2
3
4
5
6
7
8
9
10
11
12
13
14
15
16
17
18
19
20
21
22
23
24
25
26
该示例中, 信息会在响应发出之后被写到log.txt文件. 如果请求中有查询, 它将在后台任务中写入日志. 然后另一个在路径操作函数生成的后台任务将会使用路径参数email写入一条信息.
# 技术细节
BackgroundTasks类直接来自starlette.background. 它被直接导入/包含到FastAPI以便你可以从fastapi导入, 并避免意外从starlette.background导入备用的BackgroundTask(后面没有s).
通过仅使用BackgroundTasks(而不是BackgroundTask), 使得能将它作为路径操作函数的参数, 并让FastAPI为您处理其余部分, 就像直接使用Request对象.
在FastAPI中仍然可以单独使用BackgroundTask, 但你必须在代码中创建对象, 并返回包含它的StarletteResponse. 更多细节查看Starlette's official docs for Background Tasks.
# 告诫
如果你需要执行繁重的后台计算, 并且不一定需要由同一进程运行(例如, 你不需要共享内存, 变量等), 那么使用其他更大的工具(如Celery)可能更好. 它们往往需要更复杂的配置, 即消息/作业队列管理器, 如RabbitMQ或Redis, 但它们允许你在多个进程中运行后台任务, 甚至是在多个服务器中. 但是, 如果你需要从同一个FastAPI应用程序访问变量和对象, 或者需要执行小型后台任务(如发送电子邮件通知), 你只需使用BackgroundTasks即可.
# 回顾
导入并使用BackgroundTasks通过路径操作函数中的参数和依赖项来添加后台任务.
# 元数据和文档URL
你可以在FastAPI应用程序中自定义多个元数据配置.
# API元数据
你可以在设置OpenAPI规范和自动API文档UI中使用的以下字段:
| 参数 | 类型 | 描述 |
|---|---|---|
title | str | API的标题 |
summary | str | API的简短摘要 |
description | str | API的简短描述, 自OpenAPI 3.1.0, FastAPI 0.99.0起可用 |
version | string | API的版本, 这是你自己的应用程序的版本, 而不是OpenAPI的版本, 例2.5.0 |
terms_of_service | str | API服务条款的URL, 如果提供, 则必须是URL |
contact | dict | 公开的API的联系信息, 它可以包含多个字段 |
license_info | dict | 公开的API的许可证信息, 它可以包含多个字段 |
contact字段:
| 参数 | Type | 描述 |
|---|---|---|
name | str | 联系人/组织的识别名称 |
url | str | 指向联系信息的URL, 必须采用URL格式 |
email | str | 联系人/组织的电子邮件地址, 必须采用电子邮件的格式 |
公开的API的许可证信息, 它可以包含多个字段:
| 参数 | 类型 | 描述 |
|---|---|---|
name | str | 必须的(如果设置了license_info). 用于API的许可证名称 |
identifier | str | 一个API的SPDX, The identifier field is mutually exclusive of the url field. 自OpenAPI 3.1.0, FastAPI 0.99.0 起可用 |
url | str | 用于API的许可证的URL. 必须采用URL格式 |
你可以按如下方式设置它们:
from fastapi import Depends, FastAPI
from .dependencies import get_token_header, get_query_token
from .internal import admin
from .routers import items, users, tasks
description = """
ChimichangApp API helps you do awesome stuff. 🚀
## Items
You can **read items**.
## Users
You will be able to:
* **Create users** (_not implemented_).
* **Read users** (_not implemented_).
"""
app = FastAPI(
dependencies=[Depends(get_query_token)],
title="ChimichangApp",
description=description,
summary="Deadpool's favorite app. Nuff said.",
version="0.0.1",
terms_of_service="http://example.com/terms/",
contact={
"name": "Deadpoolio the Amazing",
"url": "http://x-force.example.com/contact/",
"email": "dp@x-force.example.com",
},
license_info={
"name": "Apache 2.0",
"url": "https://www.apache.org/licenses/LICENSE-2.0.html",
},
)
app.include_router(users.router)
app.include_router(items.router)
app.include_router(tasks.router)
app.include_router(
admin.router,
prefix="/admin",
tags=["admin"],
dependencies=[Depends(get_token_header)],
responses={418: {"description": "I'm a teapot"}},
)
@app.get("/")
async def root():
return {"message": "Hello Bigger Applications!"}
2
3
4
5
6
7
8
9
10
11
12
13
14
15
16
17
18
19
20
21
22
23
24
25
26
27
28
29
30
31
32
33
34
35
36
37
38
39
40
41
42
43
44
45
46
47
48
49
50
51
52
53
54
你可以在description字段中编写Markdown, 它将在输出中呈现.
通过这样设置, 自动API文档看起来会像:

# 标签元数据
# 创建标签元数据
让我们在带有标签的示例中为users和items试一下. 创建标签元数据并把它传递给openapi_tags参数:
from fastapi import Depends, FastAPI
from .dependencies import get_token_header, get_query_token
from .internal import admin
from .routers import items, users, tasks
description = """
ChimichangApp API helps you do awesome stuff. 🚀
## Items
You can **read items**.
## Users
You will be able to:
* **Create users** (_not implemented_).
* **Read users** (_not implemented_).
"""
tags_metadata = [
{
"name": "users",
"description": "Operations with users. The **login** logic is also here.",
},
{
"name": "items",
"description": "Manage items. So _fancy_ they have their own docs.",
"externalDocs": {
"description": "Items external docs",
"url": "https://fastapi.tiangolo.com/",
},
},
]
app = FastAPI(
dependencies=[Depends(get_query_token)],
title="ChimichangApp",
description=description,
summary="Deadpool's favorite app. Nuff said.",
version="0.0.1",
terms_of_service="http://example.com/terms/",
contact={
"name": "Deadpoolio the Amazing",
"url": "http://x-force.example.com/contact/",
"email": "dp@x-force.example.com",
},
license_info={
"name": "Apache 2.0",
"url": "https://www.apache.org/licenses/LICENSE-2.0.html",
},
openapi_tags=tags_metadata,
)
app.include_router(users.router)
app.include_router(items.router)
app.include_router(tasks.router)
app.include_router(
admin.router,
prefix="/admin",
tags=["admin"],
dependencies=[Depends(get_token_header)],
responses={418: {"description": "I'm a teapot"}},
)
@app.get("/")
async def root():
return {"message": "Hello Bigger Applications!"}
2
3
4
5
6
7
8
9
10
11
12
13
14
15
16
17
18
19
20
21
22
23
24
25
26
27
28
29
30
31
32
33
34
35
36
37
38
39
40
41
42
43
44
45
46
47
48
49
50
51
52
53
54
55
56
57
58
59
60
61
62
63
64
65
66
67
68
69
70
注意你可以在描述内使用Markdown, 例如 login 会显示为粗体(login)以及 fancy 会显示为斜体 (fancy).
不必为你使用的所有标签都添加元数据.
# 使用你的标签
将tags参数和路径操作(以及APIRouter)一起使用, 将其分配给不同的标签, 阅读更多关于标签的信息路径操作配置.
# 查看文档
如果你现在查看文档, 它们会显示所有附加的元数据:
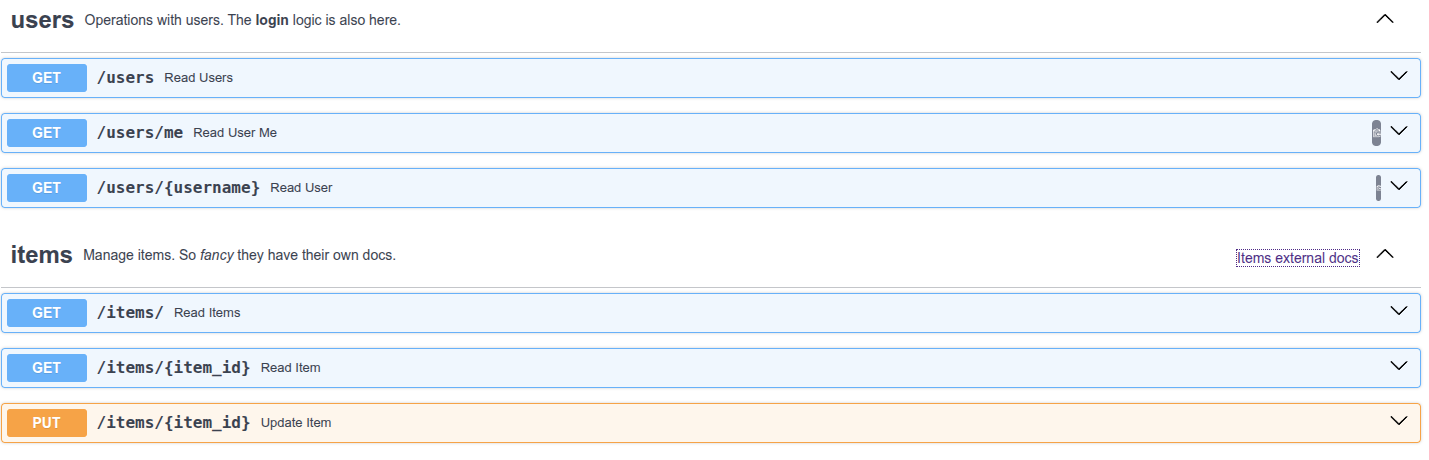
# 标签顺序
每个标签元数据字典的顺序也定义了在文档用户界面显示的顺序, 例如按照字母顺序, 即使users排在items之后, 它也会显示在前面, 因为我们将它的元数据添加为列表内的第一个字典.
# OpenAPI URL
默认情况下, OpenAPI模式服务于/openapi.json. 但是你可以通过参数openapi_url对其进行配置. 例如, 将其设置为服务于/api/v1/openapi.json:
from fastapi import FastAPI
app = FastAPI(openapi_url="/api/v1/openapi.json")
@app.get("/items/")
async def read_items():
return [{"name": "Foo"}]
2
3
4
5
6
7
8
如果你想完全禁用OpenAPI模式, 可以将其设置为openapi_url=None, 这样也会禁用使用它的文档用户界面.
# 文档 URLs
你可以配置两个文档用户界面, 包括:
- Swagger UI: 服务于
/docs- 可以使用参数
docs_url设置它的URL - 可以通过设置
docs_url=None禁用它
- 可以使用参数
- ReDoc: 服务于
/redoc- 可以使用参数
redoc_url设置它的URL - 可以通过设置
redoc_url=None禁用它
- 可以使用参数
例如, 设置Swagger UI服务于/documentation并禁用ReDoc:
from fastapi import FastAPI
app = FastAPI(docs_url="/documentation", redoc_url=None)
@app.get("/items/")
async def read_items():
return [{"name": "Foo"}]
2
3
4
5
6
7
8
# 静态文件
你可以使用StaticFiles从目录中自动提供静态文件.
# 使用StaticFiles
- 导入
StaticFiles - "挂载"(Mount)一个
StaticFiles()实例到一个指定路径.
from fastapi import FastAPI
from fastapi.staticfiles import StaticFiles
app = FastAPI()
app.mount("/static", StaticFiles(directory="static"), name="static")
2
3
4
5
6
技术细节
你也可以用from starlette.staticfiles import StaticFiles.
FastAPI提供了和starlette.staticfiles相同的fastapi.staticfiles, 只是为了开发者, 但它确实来自Starlette.
# 什么是"挂载"(Mounting)
"挂载"表示在特定路径添加一个安全"独立的"应用, 然后负责处理所有子路径.
这与使用APIRouter不同, 因为安装的应用程序是完全独立的. OpenAPI和来自你主应用的文档不会包含已挂载应用的任何东西等等. 你可以在高级用户指南中了解更多.
# 细节
from fastapi import Depends, FastAPI
from fastapi.staticfiles import StaticFiles
from .dependencies import get_token_header, get_query_token
from .internal import admin
from .routers import items, users, tasks
description = """
ChimichangApp API helps you do awesome stuff. 🚀
## Items
You can **read items**.
## Users
You will be able to:
* **Create users** (_not implemented_).
* **Read users** (_not implemented_).
"""
tags_metadata = [
{
"name": "users",
"description": "Operations with users. The **login** logic is also here.",
},
{
"name": "items",
"description": "Manage items. So _fancy_ they have their own docs.",
"externalDocs": {
"description": "Items external docs",
"url": "https://fastapi.tiangolo.com/",
},
},
]
app = FastAPI(
dependencies=[Depends(get_query_token)],
title="ChimichangApp",
description=description,
summary="Deadpool's favorite app. Nuff said.",
version="0.0.1",
terms_of_service="http://example.com/terms/",
contact={
"name": "Deadpoolio the Amazing",
"url": "http://x-force.example.com/contact/",
"email": "dp@x-force.example.com",
},
license_info={
"name": "Apache 2.0",
"url": "https://www.apache.org/licenses/LICENSE-2.0.html",
},
openapi_tags=tags_metadata,
)
app.include_router(users.router)
app.include_router(items.router)
app.include_router(tasks.router)
app.include_router(
admin.router,
prefix="/admin",
tags=["admin"],
dependencies=[Depends(get_token_header)],
responses={418: {"description": "I'm a teapot"}},
)
app.mount("/music", StaticFiles(directory="/home/sunyy/Music"), name="music")
@app.get("/")
async def root():
return {"message": "Hello Bigger Applications!"}
2
3
4
5
6
7
8
9
10
11
12
13
14
15
16
17
18
19
20
21
22
23
24
25
26
27
28
29
30
31
32
33
34
35
36
37
38
39
40
41
42
43
44
45
46
47
48
49
50
51
52
53
54
55
56
57
58
59
60
61
62
63
64
65
66
67
68
69
70
71
72
73
这个"子应用"会被"挂载"到第一个/static指向的子路径. 因此, 任何以/static开头的路径都会被它处理.
directory="static"指向包含你的静态文件的目录名字.
name="static"提供了一个能被FastAPI内部使用的名字.
所有这些参数可以不同于"static", 根据你应用的需要和具体细节调整它们.
# 更多信息
更多细节和选择查阅Starlette's docs about Static Files.
# 测试
感谢Starlette, 测试FastAPI应用轻松又愉快. 它基于HTTPX, 而HTTPX又是基于Requests设计的, 所以很相似且易懂. 有了它, 你可以直接与FastAPI仪器使用pytest.
# 使用 TestClient
要使用TestClient, 先要安装httpx. 例: pip install httpx.
导入TestClient. 通过传入你的FastAPI应用创建一个TestClient. 创建名字以test_开头的函数(这是标准的pytest约定). 像使用httpx那样使用TestClient对象. 为你需要检查的地方用标准的Python表达式写个简单的assert语句(重申, 标准的pytest).
from fastapi import FastAPI
from fastapi.testclient import TestClient
app = FastAPI()
@app.get("/")
async def read_main():
return {"msg": "Hello World"}
client = TestClient(app)
def test_read_main():
response = client.get("/")
assert response.status_code == 200
assert response.json() == {"msg": "Hello World"}
2
3
4
5
6
7
8
9
10
11
12
13
14
15
16
17
18
注意测试函数是普通的def, 不是async def. 还有client的调用也是普通的调用, 不是用await. 这让你可以直接使用pytest而不会遇到麻烦.
技术细节
你也可以用from starlette.testclient import TestClient.
FastAPI提供了和starlette.testclient一样的fastapi.testclient, 只是为了方便开发者. 但它直接来自Starlette.
除了发送请求之外, 如果你还想测试时在FastAPI应用中调用async函数(例如异步数据库函数), 可以在高级教程中看下Async Tests.
# 分离测试
在实际应用中, 你可能会把你的测试放在另一个文件里. 你的FastAPI应用程序也可能由一些文件/模块组成等等.
# FastAPI app 文件
假设你有一个像更大的应用中所描述的文件结构:
.
├── app
│ ├── __init__.py
│ └── main.py
2
3
4
在main.py文件中你有一个FastAPI app:
from fastapi import FastAPI
app = FastAPI()
@app.get("/")
async def read_main():
return {"msg": "Hello World"}
2
3
4
5
6
7
8
# 测试文件
然后你会有一个包含测试的文件test_main.py. app可以像Python包那样存在(一样是目录, 但有个__init__.py文件):
.
├── app
│ ├── __init__.py
│ ├── main.py
│ └── test_main.py
2
3
4
5
因为这文件在同一个包中, 所以你可以通过相对导入从main模块(main.py)导入app对象:
from fastapi.testclient import TestClient
from .main import app
client = TestClient(app)
def test_read_main():
response = client.get("/")
assert response.status_code == 200
assert response.json() == {"msg": "Hello World"}
2
3
4
5
6
7
8
9
10
11
...然后测试代码和之前一样.
# 测试: 扩展示例
现在让我们扩展这个例子, 并添加更多细节, 看下如何测试不同部分.
# 扩展后的FastAPI app 文件
让我们继续之前的文件结构:
.
├── app
│ ├── __init__.py
│ ├── main.py
│ └── test_main.py
2
3
4
5
假设现在包含FastAPI app的文件main.py有些其他路径操作. 有个GET操作会返回错误. 有个POST操作会返回一些错误. 所有路径操作都需要一个X-Token.
from typing import Annotated
from fastapi import FastAPI, Header, HTTPException
from pydantic import BaseModel
fake_secret_token = "coneofsilence"
fake_db = {
"foo": {"id": "foo", "title": "Foo", "description": "There goes my hero"},
"bar": {"id": "bar", "title": "Bar", "description": "The bartenders"},
}
app = FastAPI()
class Item(BaseModel):
id: str
title: str
description: str | None = None
@app.get("/items/{item_id}", response_model=Item)
async def read_main(item_id: str, x_token: Annotated[str, Header()]):
if x_token != fake_secret_token:
raise HTTPException(status_code=400, detail="Invalid X-Token header")
if item_id not in fake_db:
raise HTTPException(status_code=404, detail="Item not found")
return fake_db[item_id]
@app.post("/items/", response_model=Item)
async def create_item(item: Item, x_token: Annotated[str, Header()]):
if x_token != fake_secret_token:
raise HTTPException(status_code=400, detail="Invalid X-Token header")
if item.id in fake_db:
raise HTTPException(status_code=409, detail="Item already exists")
fake_db[item.id] = item
return item
2
3
4
5
6
7
8
9
10
11
12
13
14
15
16
17
18
19
20
21
22
23
24
25
26
27
28
29
30
31
32
33
34
35
36
37
38
# 扩展后的测试文件
然后你可以使用扩展后的测试更新test_main.py:
from fastapi.testclient import TestClient
from .main import app
client = TestClient(app)
def test_read_item():
response = client.get("/items/foo", headers={"X-Token": "coneofsilence"})
assert response.status_code == 200
assert response.json() == {
"id": "foo",
"title": "Foo",
"description": "There goes my hero",
}
def test_read_item_bad_token():
response = client.get("/items/foo", headers={"X-Token": "hailhydra"})
assert response.status_code == 400
assert response.json() == {"detail": "Invalid X-Token header"}
def test_read_nonexistent_item():
response = client.get("/items/baz", headers={"X-Token": "coneofsilence"})
assert response.status_code == 404
assert response.json() == {"detail": "Item not found"}
def test_create_item():
response = client.post(
"/items/",
headers={"X-Token": "coneofsilence"},
json={"id": "foobar", "title": "Foo Bar", "description": "The Foo Barters"},
)
assert response.status_code == 200
assert response.json() == {
"id": "foobar",
"title": "Foo Bar",
"description": "The Foo Barters",
}
def test_create_item_bad_token():
response = client.post(
"/items/",
headers={"X-Token": "hailhydra"},
json={"id": "bazz", "title": "Bazz", "description": "Drop the bazz"},
)
assert response.status_code == 400
assert response.json() == {"detail": "Invalid X-Token header"}
def test_create_existing_item():
response = client.post(
"/items/",
headers={"X-Token": "coneofsilence"},
json={
"id": "foo",
"title": "The Foo ID Stealers",
"description": "There goes my stealer",
},
)
assert response.status_code == 409
assert response.json() == {"detail": "Item already exists"}
2
3
4
5
6
7
8
9
10
11
12
13
14
15
16
17
18
19
20
21
22
23
24
25
26
27
28
29
30
31
32
33
34
35
36
37
38
39
40
41
42
43
44
45
46
47
48
49
50
51
52
53
54
55
56
57
58
59
60
61
62
63
64
65
每当你需要客户端在请求中传递信息, 但你不知道如何传递时, 你可以通过搜索(谷歌)如何用httpx做, 或者是用requests做, 毕竟HTTPX的设计是基于Requests的设计的. 接着只需在测试中同样操作.
示例:
- 传一个路径或查询参数, 添加到URL上.
- 传一个JSON体, 传一个Python对象(例如一个
dict)到参数json - 如果你需要发送Form Data而不是JSON, 使用
data参数 - 要发送headers, 传
dict给headers参数 - 对于cookies, 传
dict给cookies参数
关于如何传递数据给后端的更多信息(使用httpx或TestClient), 请查阅HTTPX文档.
注意TestClient接收可以被转化为JSON的数据, 而不是Pydantic模型.
如果你在测试中有一个Pydantic模型, 并且你想在测试时发送它的数据给应用, 你可以使用在JSON Compatible Encoder介绍的jsonable_encoder.
# 运行起来
之后, 你只需安装pytest:
pip install pytest
████████████████████████████████████████ 100%
2
3
他会自动检测文件和测试, 执行测试, 然后向你报告结果. 执行测试:
pytest
================ test session starts ================
platform linux -- Python 3.6.9, pytest-5.3.5, py-1.8.1, pluggy-0.13.1
rootdir: /home/user/code/superawesome-cli/app
plugins: forked-1.1.3, xdist-1.31.0, cov-2.8.1
collected 6 items
████████████████████████████████████████ 100%
test_main.py ...... [100%]
================= 1 passed in 0.03s =================
2
3
4
5
6
7
8
9
10
11
12
13
# 调试
你可以在编辑器中连接调试器, 例如使用Visual Studio Code或PyCharm.
# 调用 uvicorn
在你的FastAPI应用中直接导入uvicorn并运行:
import uvicorn
from fastapi import FastAPI
app = FastAPI()
@app.get("/")
def root():
a = "a"
b = "b" + a
return {"hello world": b}
if __name__ == "__main__":
uvicorn.run(app, host="0.0.0.0", port=8000)
2
3
4
5
6
7
8
9
10
11
12
13
14
15
# 关于 __name__ == "__main__"
__name__ == "__main__"的主要目的是使用以下代码调用文件时执行一些代码:
python myapp.py
而当其他文件导入它时并不会被调用, 像这样: from myapp import app
# 更多细节
假设你的文件命名为myapp.py. 如果你这样运行: python myapp.py 那么文件中由Python自动创建的内部变量__name__, 会将字符串"__main__"作为值. 所以, 下面这部分代码才会运行: uvicorn.run(app, host="0.0.0.0", port=8000), 如果你是导入这个模块(文件)就不会这样. 因此, 如果你的另一个文件importer.py像这样: from myapp import app, 在这种情况下, myapp.py内部的自动变量不会有值为"__main__"的变量__name__. 所以, 下面这一行不会被执行: uvicorn.run(app, host="0.0.0.0", port=8000).
更多信息请检查Python 官方文档.
# 使用你的调试器运行代码
由于你是从代码直接运行的Uvicorn服务器, 所以你可以从调试器直接调用Python程序(你的FastAPI应用).
例如, 你可以在Visual Studio Code中:
- 进入到调试面板
- 添加配置...
- 选中Python
- 运行*Python: 当前文件(集成终端)*选项的调试器
然后它会使用你的FastAPI代码开启服务器, 停在断点处, 等等. 看起来可能是这样:
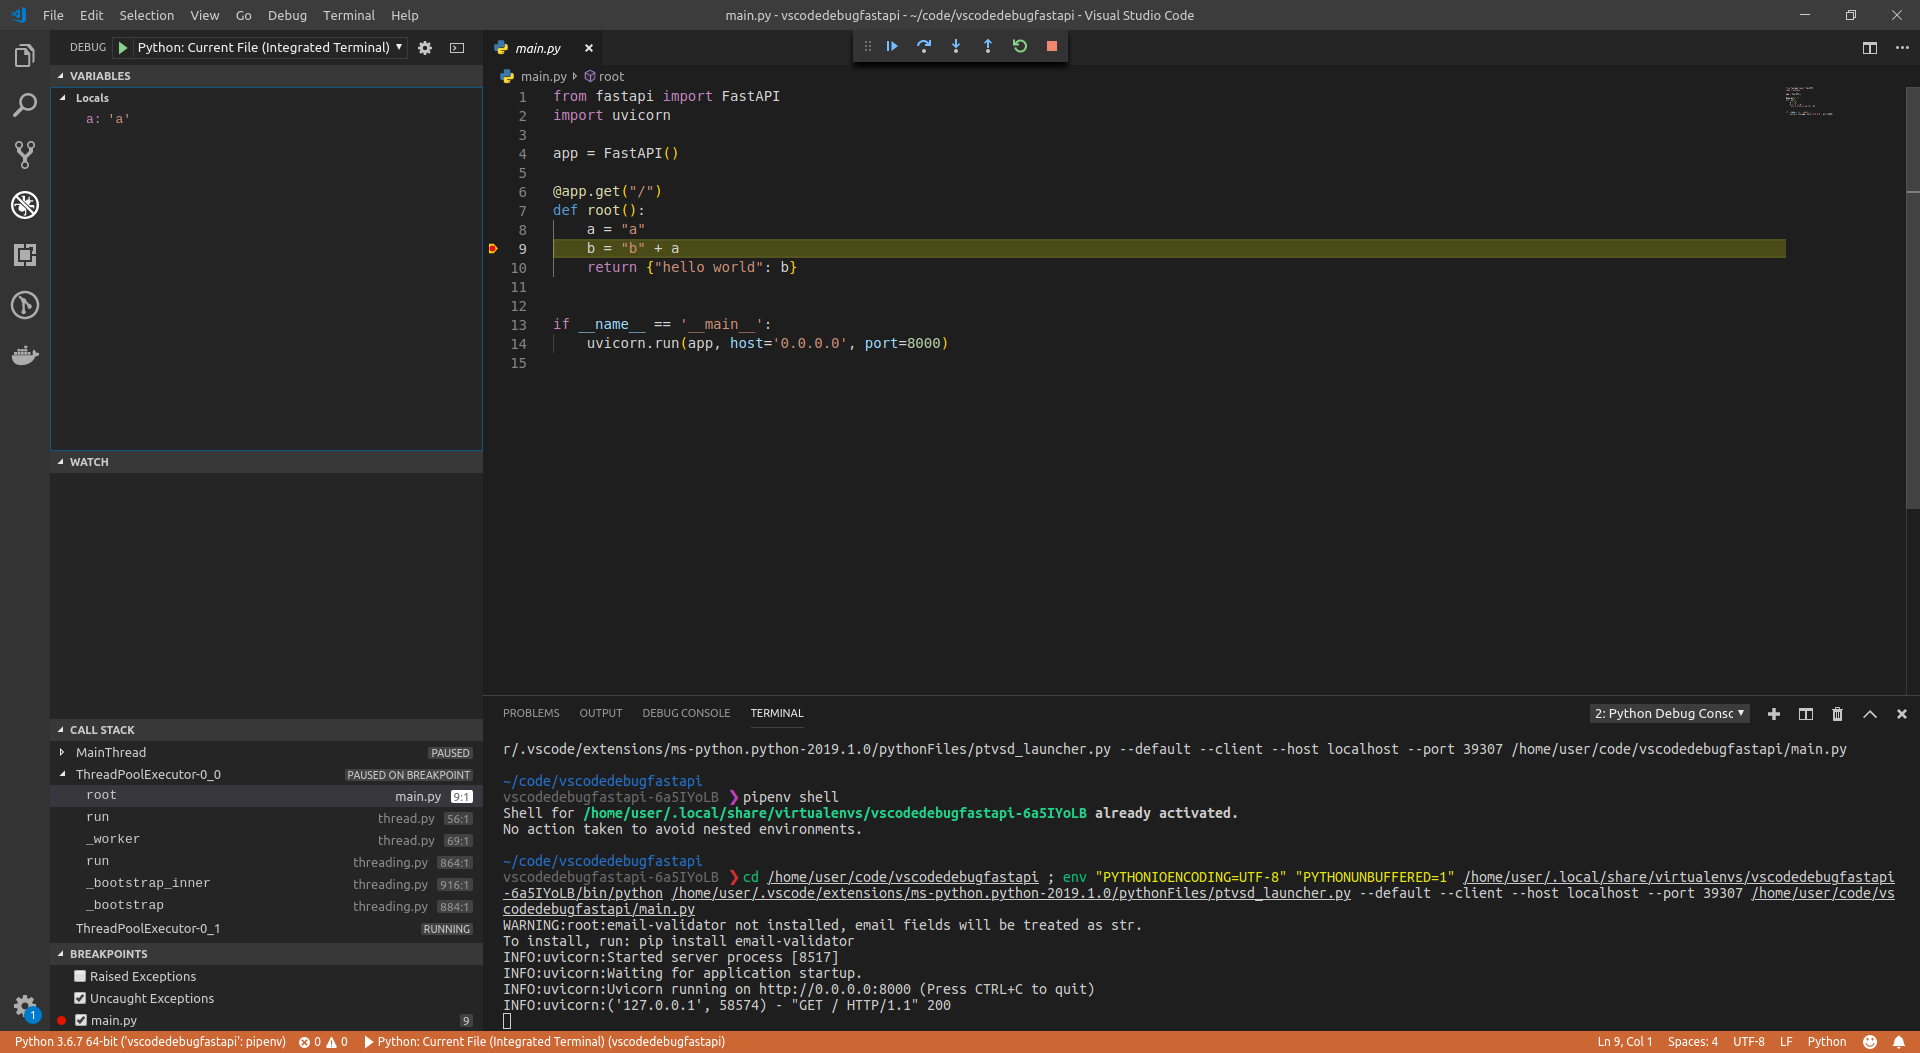
如果使用Pycharm, 你可以:
- 打开运行菜单
- 选中调试...
- 然后出现一个上下文菜单
- 选择要调试的文件(本例中的
main.py)
然后他会使用你的FastAPI代码开启服务器, 停在断点处, 等等. 看起来可能是这样:

- 第一步
- 查看
- 交互式API文档
- 可选的API文档
- OpenAPI
- 分布概括
- 总结
- 路径参数
- 声明路径参数的类型
- 数据转换
- 数据校验
- 查看文档
- 基于标准的好处, 备选文档
- Pydantic
- 顺序很重要
- 预设值
- 包含路径的路径参数
- 小结
- 查询参数
- 默认值
- 可选参数
- 查询参数类型转换
- 多个路径和查询参数
- 必选查询参数
- 请求体
- 导入Pydantic的BaseModel
- 创建数据模型
- 声明请求体参数
- 结论
- API文档
- 编辑器支持
- 使用模型
- 请求体+路径参数
- 请求体+路径参数+查询参数
- 不使用Pydantic
- 查询参数和字符串校验
- 额外的校验
- 使用Query作为默认值
- 添加更多校验
- 添加正则表达式
- 默认值
- 声明为必须参数
- 查询参数列表/多个值
- 声明更多元数据
- 别名参数
- 弃用参数
- 总结
- 路径参数和数值校验
- 导入Path
- 声明元数据
- 按需对参数排序
- 按需对参数排序的技巧
- 数值校验: 大于等于
- 数值校验: 大于和小于等于
- 数值校验: 浮点数, 大于和小于
- 总结
- 查询参数模型
- 使用Pydantic模型的查询参数
- 查看文档
- 禁止额外的查询参数
- 总结
- 请求体-多个参数
- 混合使用Path, Query和请求体参数
- 多个请求体参数
- 请求体中的单一值
- 多个请求体参数和查询参数
- 嵌入单个请求体参数
- 总结
- 请求体-字段
- 导入 Field
- 声明模拟属性
- 添加更多信息
- 小结
- 请求体-嵌套模型
- List字段
- 具有子类型的List字段
- Set类型
- 嵌套模型
- 特殊的类型和校验
- 带有一组子模型的属性
- 深度嵌套模型
- 纯列表请求体
- 无处不在的编辑器支持
- 任意dict构成的请求体
- 总结
- 模式的额外信息-例子
- Pydantic schema_extra
- Field 的附加参数
- Body 额外参数
- 文档UI中的例子
- 技术细节
- 其他信息
- 额外数据类型
- 其他数据类型
- 例子
- Cookie 参数
- 导入 Cookie
- 声明 Cookie 参数
- 小结
- Header 参数
- 导入 Header
- 声明 Header 参数
- 自动转换
- 重复的请求头
- 小结
- Cookie 参数模型
- 带有Pydantic模型的Cookie
- 查看文档
- 禁止额外的Cookie
- 总结
- Header 参数模型
- 使用Pydantic模型的Header参数
- 查看文档
- 禁止额外的Headers
- 总结
- 响应模型
- 返回与输入相同的数据
- 添加输出模型
- 在文档中查看
- 响应模型编码参数
- 总结
- 更多模型
- 多个模型
- 减少重复
- Union或者AnyOf
- 模型列表
- 任意dict构成的响应
- 小结
- 响应状态码
- 关于HTTP状态码
- 状态码名称快捷方式
- 更改默认状态码
- 表单数据
- 导入 Form
- 定义 Form 参数
- 关于表单字段
- 小结
- 表单模型
- 表单的Pydantic模型
- 检查文档
- 禁止额外的表单字段
- 总结
- 请求文件
- 导入 File
- 定义 File 参数
- 含 UploadFile 的文件参数
- 什么是表单数据
- 可选文件上传
- 带有额外元数据的 UploadFile
- 多文件上传
- 小结
- 请求表单与文件
- 导入 File 与 Form
- 定义 File 与 Form 参数
- 小结
- 处理错误
- 使用 HTTPException
- 添加自定义响应头
- 安装自定义异常处理器
- 覆盖默认异常处理器
- 路径操作配置
- status_code 状态码
- tags 参数
- summary 和 description 参数
- 文档字符串(docstring)
- 响应描述
- 弃用路径操作
- 小结
- JSON 兼容编码器
- 使用 jsonable_encoder
- 请求体-更新数据
- 用 PUT 更新数据
- 用 PATCH 进行部分更新
- 依赖项
- 依赖项介绍
- 类作为依赖项
- 子依赖项
- 路径操作装饰器依赖项
- 全局依赖项
- 使用yield的依赖项
- 安全性
- 安全性介绍
- 安全-第一步
- 获取当前用户
- OAuth2实现简单的 Password 和 Bearer 验证
- Oauth2 实现密码哈希与 Bearer JWT 令牌验证
- 中间件
- 创建中间件
- 其他中间件
- CORS 跨域资源共享
- 源
- 步骤
- 通配符
- 使用 CORSMiddleware
- 更多信息
- SQL 关系性数据库
- 安装 SQLModel
- 创建含有单一模型的应用程序
- 更新应用程序以支持多个模型
- 使用 HeroCreate 创建并返回 HeroPublic
- 用 HeroPublic 读取 Hero
- 用 HeroPublic 读取单个 Hero
- 用 HeroUpdate 更新单个 Hero
- 总结
- 更大的应用-多个文件
- 一个文件结构示例
- APIRouter
- 依赖项
- 其他使用 APIRouter 的模块
- FastAPI 主体
- 查看自动化的API文档
- 多次使用不同的 prefix 包含同一个路由器
- 在另一个 APIRouter 中包含一个 APIRouter
- 后台任务
- 使用 BackgroundTasks
- 创建一个任务函数
- 添加后台任务
- 依赖注入
- 技术细节
- 告诫
- 回顾
- 元数据和文档URL
- API元数据
- 标签元数据
- OpenAPI URL
- 文档 URLs
- 静态文件
- 使用StaticFiles
- 细节
- 更多信息
- 测试
- 使用 TestClient
- 分离测试
- 测试: 扩展示例
- 运行起来
- 调试
- 调用 uvicorn
- 使用你的调试器运行代码