
C++ 高级教程
# C++ 文件和流
之前已经使用了iostream标准库,它提供了cin和cout方法分别用于从标准输入读取流和向标准输出写入流。下面将介绍如何从文件读取流和向文件写入流,C++提供了另一个标准库fstream,它定义了三个新的数据类型:
| 数据类型 | 描述 |
|---|---|
ofstream | 该数据类型表示输出文件流,用于创建文件并向文件写入信息。 |
ifstream | 该数据类型表示输入文件流,用于从文件读取信息。 |
fstream | 该数据类型通常表示文件流,且同时具有ofstream和ifstream两种功能,这意味着它可以创建文件,向文件写入信息,从文件读取信息。 |
如果需要在C++中处理文件,必须在C++源代码文件中包含头文件<iostream>和<fstream>。
# 打开文件
在从文件读取信息或向文件写入信息之前,必须先打开文件。ofstream和fstream对象都可以用来打开文件进行写操作,如果只需要打开文件进行读操作,使用ifstream即可。
下面是open()函数的标准语法,open()函数是ofstream、ifstream、fstream对象的一个成员。
void open(const char *filename, ios::openmode mode);
在这里,open()成员函数的第一个参数指定要打开的文件名称和位置,第二个参数定义文件被打开的模式。
| 模式标志 | 描述 |
|---|---|
ios::app | 追加模式,所有写入都追加到文件末尾。 |
ios::ate | 文件打开后定位到文件末尾 |
ios::in | 打开文件用于读取 |
ios::out | 打开文件用于写入 |
ios::trunc | 如果该文件已经存在,其内容将在打开文件之前被截断,即把文件长度设为0. |
开发者可以把以上两种或两种以上的模式组合使用,如,如果想以写入模式打开文件,并截断文件,以防文件已存在。
ofstream outfile;
outfile.open("file.dat", ios::out | ios::trunc);
2
ifstream afile;
afile.open("file.dat", ios::out | ios::in);
2
# 关闭文件
当C++程序终止时,它会自动关闭刷新所有流,释放所有分配的内存,并关闭所有打开的文件,但开发者应该养成一个好习惯,在程序终止前关闭所有打开的文件。
下面是close()函数的标准语法,close()函数是fstream、ofstream和ifstream对象的一个成员。
void close();
# 写入文件
在C++中,使用流插入运算符<<向文件写入信息,就像使用该运算符输出信息到屏幕上一样,唯一不同的是,在这里使用的是ofstream或fstream对象,而不是cout对象。
# 读取文件
在C++中,使用流提取运算符>>从文件读取信息,就像使用该运算符从键盘输入信息一样,唯一不同的是,在这里使用的是ifstream或fstream对象,而不是cin对象。
# 读取&写入实例
#include <fstream>
#include <iostream>

using namespace std;

int main()
{
    char data[100];

    // 以写模式打开文件
    ofstream outfile;
    outfile.open("afile.dat");

    cout << "Writing to the file" << endl;
    cout << "Enter your name: ";
    cin.getline(data, 100);

    // 向文件写入用户输入的数据
    outfile << data << endl;

    cout << "Enter your age: ";
    cin >> data;
    cin.ignore();

    // 再次向文件写入用户输入的数据
    outfile << data << endl;

    // 关闭打开的文件
    outfile.close();

    // 以读模式打开文件
    ifstream infile;
    infile.open("afile.dat");

    cout << "Reading from the file" << endl;
    infile >> data;

    // 在屏幕上写入数据
    cout << data << endl;

    // 再次从文件读取数据,并显示它
    infile >> data;
    cout << data << endl;

    // 关闭打开的文件
    infile.close();

    return 0;

}
2
3
4
5
6
7
8
9
10
11
12
13
14
15
16
17
18
19
20
21
22
23
24
25
26
27
28
29
30
31
32
33
34
35
36
37
38
39
40
41
42
43
44
45
46
47
48
49
50

上面的实例中使用了cin对象的附加函数,getline()函数从外部读取一行,ignore()函数会忽略掉之前读语句留下的多余字符。
# 文件位置指针
istream和ostream都提供了用于重新定位文件位置指针的成员函数,这些成员函数包括istream的seekg(seek get)和ostream的seekp(seek put)。
seekg和seekp的参数通常是一个长整型,第二个参数可以用于指定查找方向,查找方向可以是ios::beg(默认,从流的开始定位),也可以是ios::cur(从流的当前位置开始定位),也可以是ios::end(从流的末尾开始定位)。文件位置指针是一个整数值,指定了从文件的起始位置到指针所在位置的字节数,如下实例:
// 定位到 fileObject 的第 n 个字节 (默认是 ios::beg)
fileObject.seekg(n);
// 把文件的读指针从 fileObject 当前位置向后移 n 个字节
fileObject.seekg(n, ios::cur);
// 把文件的读指针从 fileObject 末尾往回移 n 个字节
fileObject.seekg(n, ios::end);
// 定位到 fileObject 的末尾
fileObject.seekg(0, ios::end);
2
3
4
5
6
7
8
# C++ 异常处理
异常是程序在执行期间产生的问题,C++异常是指在程序运行时发生的特殊情况,比如尝试除以零的操作。异常提供了一种转移程序控制权的方式。C++异常处理涉及到三个关键字:try、catch和throw。
try:try块中的代码表示将被激活的特定异常,它后面通常跟着一个或多个catch块。catch: 在希望处理问题的地方,通过异常处理程序捕获异常,其用于捕获异常。throw: 当问题出现时,程序会抛出异常,其是通过throw实现的。
// 如果保护代码在不同的情景下抛出不同的异常,这个时候可以尝试罗列多个catch语句,用于捕获不同的异常。
try
{
  // 保护代码
} catch (ExceptionName e1)
{
  // catch 块
} catch (ExceptionName e2)
{
  // catch 块
} catch (ExceptionName eN) {
  // catch 块
}
2
3
4
5
6
7
8
9
10
11
12
13
# 抛出异常
throw语句可以在代码块中的任何地方抛出异常,其操作数可以是任意的表达式,表达式的结果的类型决定了抛出的异常的类型。
double division(int a, int b)
{
  if (b == 0)
  {
    throw "Division by zero condition!";
  }
  return (a/b);
}
2
3
4
5
6
7
8
# 捕获异常
catch块跟在try块后面,用于捕获异常,可以指定要捕获的异常类型,这是由catch关键字后的括号内的异常声明决定的。
try {
  // 保护代码
} catch (ExceptionName e)
{
  // 处理 ExceptionName 异常的代码
}
2
3
4
5
6
上面的代码会捕获一个类型为ExceptionName的异常,如果想让catch块能够处理try块抛出的任何类型的异常,则必须在异常声明的括号内使用省略号...,如下:
try
{
  // 保护代码
} catch (...)
{
  // 能处理任何异常的代码
}
2
3
4
5
6
7
下面是一个实例,抛出一个除以零的异常,并在catch块中捕获该异常。
#include <iostream>
using namespace std;

double division(int a, int b)
{
    if (b == 0)
    {
        throw "Division by zero condition!";
    }
    return (a/b);
}

int main()
{
    int x = 50;
    int y = 0;
    double z = 0;
    try
    {
        z = division(x, y);
        cout << z << endl;
    }
    catch(const char* msg)
    {
        cerr << msg << endl;
    }
    return 0;
}
2
3
4
5
6
7
8
9
10
11
12
13
14
15
16
17
18
19
20
21
22
23
24
25
26
27
28
由于抛出了一个类型为const char*的异常,因此,当捕获该异常时,必须在catch块中使用const char*。
# C++标准异常
C++提供了一系列标准的异常,定义在<exception>中,开发者可以在程序中使用这些标准的异常,它们是以父子层级的结构组织起来的,如下:
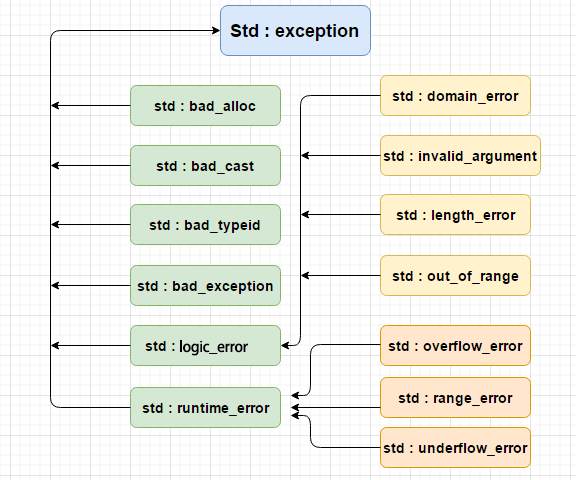
下表是对上面层次结构中出现的每个异常的说明:
| 异常 | 描述 |
|---|---|
std::exception | 该异常是所有标准C++异常的父类 |
std::bad_alloc | 该异常可以通过new抛出 |
std::bad_cast | 该异常可以通过dynamic_cast抛出 |
std::bad_typeid | 该异常可以通过typeid抛出 |
std::bad_exception | 在处理C++程序中无法预期的异常时非常有用 |
std::logic_error | 理论上可以通过检查代码来检查到的异常 |
std::domain_error | 当使用了一个无效的数学域时,会抛出该异常 |
std::invalid_argument | 当使用了无效的参数时,会抛出该异常 |
std::length_error | 当创建了太长的std::string时,会抛出该异常 |
std::out_of_range | 该异常可以通过方法抛出,例如std::vector和std::bitset<>::operator[]() |
std::runtime_error | 理论上不可以通过检查代码检查到的异常 |
std::overflow_error | 当发生数学上溢时,会抛出该异常 |
std::range_error | 当尝试存储超出范围的值时,会抛出该异常 |
std::underflow_error | 当发生数学下溢时,会抛出该异常 |
# 自定义异常
开发者可以通过继承和重载exception类来定义新的异常,如下:
#include <iostream>
#include <exception>
using namespace std;

struct MyException : public exception
{
    const char* what() const throw ()
    {
        return "C++ Exception";
    }
};

int main()
{
    try
    {
        throw MyException();
    }
    catch(MyException& e)
    {
        std::cout << "MyException caught" << std::endl;
        std::cout << e.what() << std::endl;
    }
    catch(std::exception& e)
    {
        // 其他的错误
    }
}
2
3
4
5
6
7
8
9
10
11
12
13
14
15
16
17
18
19
20
21
22
23
24
25
26
27
28

what()是异常类提供的一个公共方法,它已被所有子异常类重载,这将返回异常产生的原因。
# C++ 动态内存
C++程序中的内存分为两部分:
- 栈: 在函数内部声明的所有变量都将占用栈内存。
- 堆: 程序中未使用的内存,在程序运行时可用于动态分配内存。
很多时候,无法提前预知需要多少内存来存储某个定义变量中的特定信息,所需内存的大小需要在运行时才能确定。在C++中,可以使用特殊的运算分为给定类型的变量在运行时分配堆内的内存,并返回所分配的空间地址,即new运算符。
如果不再需要动态分配的内存空间,可以使用delete运算符,删除之前由new运算符分配的内存。
# new 和 delete 运算符
下面是使用new运算符来为任意的数据类型动态分配内存的通用语法。
new data-type;
data-type可以是包括数组在内的任意内置的数据类型,也可以是包括类或结构在内的用户自定义的任何数据类型,如: 可以定义一个指向double类型的指针,然后请求内存,该内存在执行时被分配
double* pvalue = NULL; // 初始化为 null 的指针
pvalue = new double; // 为变量请求内存
2
如果自由存储区已被用完,可能无法成功分配内存,因此建议检查 new 运算符是否返回NULL指针,并采取以下适当的操作:
double* pvalue = NULL;
if(!(pvalue = new double))
{
  cout << "Error: out of memory." << endl;
  exit(1);
}
2
3
4
5
6
malloc()函数在C语言中就存在,在C++中仍然存在,但建议尽量不要使用它。new与malloc()函数相比,其主要的优点是,其不只分配了内存,还创建了对象。在任何时候,当某个已经动态分配内存的变量不再需要使用时,可以使用delete操作费释放它所占用的内存,如下:
delete pvalue; // 释放 pvalue 所指向的内存
如下实例:
#include <iostream>
using namespace std;

int main()
{
    double *pvalue = NULL; // 初始化为 null 的指针
    pvalue = new double;   // 为变量请求内存

    *pvalue = 29494.99; // 在分配的地址存储数据
    cout << "Value of pvalue: " << *pvalue << endl;

    delete pvalue; // 释放内存
    return 0;
}
2
3
4
5
6
7
8
9
10
11
12
13
14
# 数组的动态内存分配
假设要为一个字符数组(一个有20个字符的字符串)分配内存,可以使用上面实例中的语法来为数组动态地分配内存,如下:
char* pvalue = NULL; // 初始化为 null 的指针
pvalue = new char[20]; // 为变量请求内存

delete [] pvalue; // 删除 pvalue 所指向的数组
2
3
4
下面是 new 操作符的通用语法,可以为多维数组分配内存,如下:
// 一维数组
int *array = new int[m];

// 释放内存
delete [] array;
2
3
4
5
// 二维数组
int **array;
// 假定数组第一维长度为 m,第二维长度为 n
// 动态分配内存空间
array = new int*[m];
for (int i = 0; i < m; i++)
{
  array[i] = new int[n];
}
// 释放
for (int i = 0; i < m; i++)
{
  delete [] array[i];
}
delete [] array;
2
3
4
5
6
7
8
9
10
11
12
13
14
15
#include <iostream>
using namespace std;

int main()
{
    int **p;
    int i, j; // p[4][8]
    // 开始分配4行8列的二维数组
    p = new int*[4];
    for (i = 0; i < 4; i++)
    {
        p[i] = new int[8];
    }

    for (i = 0; i < 4; i++)
    {
        for (j = 0; j < 8; j++)
        {
            p[i][j] = j*i;
        }
    }

    // 打印数据
    for (i = 0; i < 4; i++)
    {
        for (j = 0; j < 8; j++)
        {
            if (j == 0) cout << endl;
            cout << p[i][j] << "\t";
        }

    }

    // 释放内存
    for (i = 0; i < 4; i++)
    {
        delete [] p[i];
    }
    delete [] p;
    return 0;
}
2
3
4
5
6
7
8
9
10
11
12
13
14
15
16
17
18
19
20
21
22
23
24
25
26
27
28
29
30
31
32
33
34
35
36
37
38
39
40
41
// 三维数组
int ***array;
// 假定数组第一维为 m, 第二维为 n, 第三维为 h
// 动态分配空间
array = new int **[m];
for (int i = 0; i < m; i++)
{
  array[i] = new int *[n];
  for (int j = 0; j < n; j++) {
    array[i][j] = new int[h];
  }
}
// 释放
for (int i = 0; i < m; i++)
{
  for (int j = 0; j < n; j++)
  {
    delete[] array[i][j];
  }
  delete[] array[i];
}
delete[] array;
2
3
4
5
6
7
8
9
10
11
12
13
14
15
16
17
18
19
20
21
22
#include <iostream>
using namespace std;

int main()
{
    int i, j, k; // p[2][3][4]

    int ***p;
    p = new int **[2];
    for (i = 0; i < 2; i++)
    {
        p[i] = new int *[3];
        for (j = 0; j < 3; j++)
            p[i][j] = new int[4];
    }

    // 输出 p[i][j][k] 三维数据
    for (i = 0; i < 2; i++)
    {
        for (j = 0; j < 3; j++)
        {
            for (k = 0; k < 4; k++)
            {
                p[i][j][k] = i + j + k;
                cout << p[i][j][k] << "  ";
            }
            cout << endl;
        }
        cout << endl;
    }

    // 释放内存
    for (i = 0; i < 2; i++)
    {
        for (j = 0; j < 3; j++)
        {
            delete[] p[i][j];
        }
    }
    for (i = 0; i < 2; i++)
    {
        delete[] p[i];
    }
    delete[] p;
    return 0;
}
2
3
4
5
6
7
8
9
10
11
12
13
14
15
16
17
18
19
20
21
22
23
24
25
26
27
28
29
30
31
32
33
34
35
36
37
38
39
40
41
42
43
44
45
46
# 对象的动态内存分配
对象与简单的数据类型没有什么不同,如:
#include <iostream>
using namespace std;

class Box
{
public:
    Box()
    {
        cout << "调用构造函数!" << endl;
    }
    ~Box()
    {
        cout << "调用析构函数!" << endl;
    }
};

int main()
{
    Box *myBoxArray = new Box[4];

    delete[] myBoxArray; // 释放内存
    return 0;
}
2
3
4
5
6
7
8
9
10
11
12
13
14
15
16
17
18
19
20
21
22
23
如果要为一个包含四个Box对象的数组分配内存,构造函数将被调用4次,同样,当删除这些对象时,析构函数已将被调用相同的次数4次。

# C++ 命名空间
假设这样一种情况,当一个班上有两个名叫Zara的学生时,为了明确区分它们,在使用名字之外,不得不使用一些额外的信息,比如他们的家庭住址等等,同样的情况也出现在C++应用程序中,例如,可能会存在一个名为xyz()的函数,在另一个可用的库中也存在一个相同的函数xyz(),这样编译器就无法判断使用哪一个xyz()函数。因此,引入了命名空间这个概念,专门用于解决上面的问题,它可作为附加信息来区分不同库中相同名称的函数、类、变量等。使用了命名空间即定义了上下文,本质上,命名空间就是定义了一个范围。
# 定义命名空间
命名空间的定义使用关键字namespace,后跟命名空间的名称,如下:
namespace namespace_name {
  // 代码声明
}
2
3
为了调用带有命名空间的函数或变量,需要在前面加上命名空间的名称,如下:
name::code; // code 可以是变量或函数
下面来看下命名空间如何为变量或函数等实体定义范围:
#include <iostream>
using namespace std;

// 第一个命名空间
namespace first_space
{
    void func()
    {
        cout << "Inside first_space" << endl;
    }
}

// 第二个命名空间
namespace second_space
{
    void func()
    {
        cout << "Inside second_space" << endl;
    }
}

int main()
{
    // 调用第一个命名空间中的函数
    first_space::func();

    // 调用第二个命名空间中的函数
    second_space::func();

    return 0;
}
2
3
4
5
6
7
8
9
10
11
12
13
14
15
16
17
18
19
20
21
22
23
24
25
26
27
28
29
30
31
# using 指令
可以使用using namespace指令,这样在使用命名空间时就可以不用在前面加上命名空间的的名称,这个指令告诉编译器,后续的代码将使用指定的命名空间中的名称。
#include <iostream>
using namespace std;

// 第一个命名空间
namespace first_space
{
    void func()
    {
        cout << "Inside first_space" << endl;
    }
}

// 第二个命名空间
namespace second_space
{
    void func()
    {
        cout << "Inside second_space" << endl;
    }
}

using namespace first_space;
int main()
{
    func();

    return 0;
}
2
3
4
5
6
7
8
9
10
11
12
13
14
15
16
17
18
19
20
21
22
23
24
25
26
27
28
using指令也可以用来指定命名空间中的特定项目,如,如果只打算使用std命名空间中的cout部分,可以使用:
using std::cout;
随后的代码中,在使用cout就可以不用加上命名空间名作为前缀,但是std命名空间中的其他项目仍然需要加上命名空间名称作为前缀,如下:
#include <iostream>
using std::cout;

int main()
{
  cout << "std::endl is used with std!" << std::endl;

  return 0;
}
2
3
4
5
6
7
8
9
using指令引入的名称遵循正常的范围规则,名称从使用using指令开始是可见的,直到该范围结束,此时,在范围以外定义的同名实体是隐藏的。
# 不连续的命名空间
命名空间可以定义在几个不同的部分中,因此命名空间是由几个单独定义的部分组成的,一个命名空间的各个组成部分可以分散在多个文件中。所以,如果命名空间中的某个组成部分需要请求定义在另一个文件中的名称,则仍然需要声明该名称,下面的命名空间定义可以是定义一个新的命名空间,也可以是为已有的命名空间增加新的元素:
namespace namespace_name
{
  // 代码声明
}
2
3
4
# 嵌套的命名空间
命名空间可以嵌套,可以在一个命名空间中定义另一个命名空间,如下:
namespace namespace_name1
{
  // 代码声明
  namespace namespace_name2
  {
    // 代码声明
  }
}
2
3
4
5
6
7
8
可以通过使用::运算符来访问嵌套的命名空间中的成员:
// 访问 namespace_name2 中的成员
using namespace namespace_name1::namespace_name2;

// 访问 namespace_name1 中的成员
using namespace namespace_name1;
2
3
4
5
在上面的语句中,如果使用的是 namespace_name1,那么在该范围内 namespace_name2 中的元素也是可用的,如:
#include <iostream>
using namespace std;

// 第一个命名空间
namespace first_space
{
    void func()
    {
        cout << "Inside first_space" << endl;
    }

    // 第二个命名空间
    namespace second_space
    {
        void func()
        {
            cout << "Inside second_space" << endl;
        }
    }
} // namespace first_space

// using namespace first_space::second_space;
using namespace first_space;
int main()
{
    // 调用第二个命名空间中的函数
    // func();
    // 调用第二个命名空间中的函数
    second_space::func();

    return 0;
}
2
3
4
5
6
7
8
9
10
11
12
13
14
15
16
17
18
19
20
21
22
23
24
25
26
27
28
29
30
31
32
# C++ 模板
模板是泛型编程的基础,泛型编程即以一种独立于任何特定类型的方式编写代码。模板是创建泛型类或函数的蓝图或公式。库容器,比如迭代器和算法,都是泛型编程的例子,它们都是用了模板的概念。每个容器都一个单一的定义,比如向量,可以定义许多不同的向量,比如vector<int>或vector<string>。
# 函数模板
模板函数定义的一般形式如下:
template <typename type> ret-type func-name(parameter list)
{
  // 函数主体
}
2
3
4
这里,type是函数所使用的数据类型的占位符名称,这个名称可以在函数定义中使用。如:
#include <iostream>
#include <string>

using namespace std;

template <typename T>
inline T const &Max(T const &a, T const &b)
{
    return a < b ? b : a;
}

int main()
{
    int i = 39;
    int j = 20;
    cout << "Max(i, j): " << Max(i, j) << endl;

    double f1 = 13.5;
    double f2 = 20.7;
    cout << "Max(f1, f2): " << Max(f1, f2) << endl;

    string s1 = "Hello";
    string s2 = "World";
    cout << "Max(s1, s2): " << Max(s1, s2) << endl;

    return 0;
}
2
3
4
5
6
7
8
9
10
11
12
13
14
15
16
17
18
19
20
21
22
23
24
25
26
27
# 类模板
泛型类声明的一般形式如下:
template <class type> class class-name
{
  // ...
}
2
3
4
type是占位符类型名称,可以在类被实例化的时候进行指定,可以使用一个逗号分隔的列表来定义多个泛型数据类型,下面的实例定义了类Stack<>,并实现了泛型方法来对元素进行入栈出栈操作:
#include <iostream>
#include <vector>
#include <cstdlib>
#include <string>
#include <stdexcept>

using namespace std;

template <class T>
class Stack
{
private:
    vector<T> elems; // 元素

public:
    void push(T const &); // 入栈
    void pop();           // 出栈
    T top() const;        // 返回栈顶元素
    bool empty() const    // 如果为空则返回真
    {
        return elems.empty();
    }
};

template <class T>
void Stack<T>::push(T const &elem)
{
    // 追加传入元素的副本
    elems.push_back(elem);
}

template <class T>
void Stack<T>::pop()
{
    if (elems.empty())
    {
        throw out_of_range("Stack<>::pop(): empty stack");
    }
    // 删除最后一个元素
    elems.pop_back();
}

template <class T>
T Stack<T>::top() const
{
    if (elems.empty())
    {
        throw out_of_range("Stack<>::top(): empty stack");
    }
    // 返回最后一个元素的副本
    return elems.back();
}

int main()
{
    try
    {
        Stack<int> intStack;       // int 类型的栈
        Stack<string> stringStack; // string 类型的栈

        // 操作 int 类型的栈
        intStack.push(7);
        cout << intStack.top() << endl;

        // 操作 string 类型的栈
        stringStack.push("hello");
        cout << stringStack.top() << endl;
        stringStack.pop();
        stringStack.pop();
    }
    catch (const std::exception &e)
    {
        cerr << "Exception: " << e.what() << endl;
        return -1;
    }
}
2
3
4
5
6
7
8
9
10
11
12
13
14
15
16
17
18
19
20
21
22
23
24
25
26
27
28
29
30
31
32
33
34
35
36
37
38
39
40
41
42
43
44
45
46
47
48
49
50
51
52
53
54
55
56
57
58
59
60
61
62
63
64
65
66
67
68
69
70
71
72
73
74
75
76
# C++ 预处理器
预处理器是一些指令,指示编译器在实际编译之前所需完成的预处理。所有的预处理器指令都是以#开头,只有空格字符可以出现在预处理指令之前,预处理指令不是C++语句,因此不会以;结尾。之前所有的实例中都有#include指令,这个宏用于把头文件包含到源文件中。C++支持很多预处理指令,如#include、#define、#if、#else、#line等。
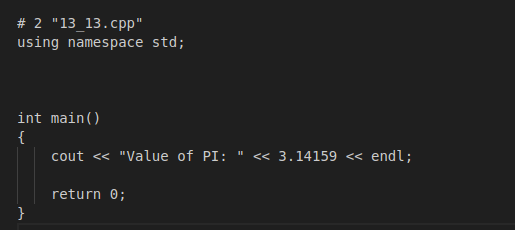
# #define 预处理
#define预处理指令用于创建符号常量,该符号常量通常称为宏,指令的一般形式是:
#define macro-name replacement-text
当这一行代码出现在一个文件中时,在该文件中后续出现的所有宏都将会在程序编译之前被替换为replacement-text,如:
#include <iostream>
using namespace std;

#define PI 3.14159

int main()
{
    cout << "Value of PI: " << PI << endl;

    return 0;
}
2
3
4
5
6
7
8
9
10
11
接下来使用-E选项进行编译,并把结果重定向到13_13.p,现在如果查看13_13.p文件,将会看到已经包含大量的信息,而且文件底部的值被改为如下:
gcc -E 13_13.cpp > 13_13.p
# 参数宏
可以使用#define来定义一个带有参数的宏,如下:
#include <iostream>
using namespace std;

#define MIN(a, b) (a < b ? a : b)

int main()
{
    int i, j;
    i = 100;
    j = 30;
    cout << "较小的值为: " << MIN(i, j) << endl;

    return 0;
}
2
3
4
5
6
7
8
9
10
11
12
13
14
# 条件编译
有几个指令可以用来有选择地对部分程序源代码进行编译,这个过程被称为条件编译,条件预处理器的结构与if选择结构很像。
#ifdef NULL
    #define NULL 0
#endif
2
3
可以只在调试时进行编译,调试开关可以使用一个宏来实现,如下:
#ifdef DEBUG
    cerr << "Variable x = " << x << endl;
#endif
2
3
如果在指令#ifdef DEBUG之前已经定义了符号常量DEBUG,则会对程序中的cerr语句进行编译,还可以使用#if 0语句注释掉程序的一部分,如:
#if 0
    不进行编译的代码
#endif
2
3
#include <iostream>
using namespace std;
#define DEBUG

#define MIN(a, b) (((a) < (b)) ? a : b)

int main()
{
    int i, j;
    i = 100;
    j = 30;
#ifdef DEBUG
    cerr << "Trace: Inside main function" << endl;
#endif

#if 0
    /* 这是注释部分 */
    cout << MKSTR(HELLO C++) << endl;
#endif

    cout << "The minimum is " << MIN(i, j) << endl;

#ifdef DEBUG
    cerr << "Trace: Coming out of main function" << endl;
#endif

    return 0;
}
2
3
4
5
6
7
8
9
10
11
12
13
14
15
16
17
18
19
20
21
22
23
24
25
26
27
28
# # 和 ## 运算符
#和##预处理运算符在C++和ANSI/IOS C中都是可用的,#运算符会把replacement-text令牌转换为用引号引起来的字符串,如:
#include <iostream>
using namespace std;

#define MKSTR(x) #x

// cout << MKSTR(HELLO C++) << endl;
// cout << "HELLO C++" << endl;
int main()
{
    cout << MKSTR(HELLO C++) << endl;

    return 0;
}
2
3
4
5
6
7
8
9
10
11
12
13
##运算符用于连接两个令牌,如:
#define CONCAT(x, y) x ## y
当CONCAT出现在程序中时,它的参数会被连接起来,并用来取代宏。
#include <iostream>
using namespace std;

#define concat(a, b) a##b
int main()
{
    int xy = 100;

    cout << concat(x, y);
    return 0;
}
2
3
4
5
6
7
8
9
10
11
# C++ 中的预定义宏
C++中提供了下表所示的一些预定义宏
| 宏 | 描述 |
|---|---|
__LINE__ | 这会在程序编译时包含当前行号 |
__FILE__ | 这会在程序编译时包含当前文件名 |
__DATE__ | 这会包含一个形式为month/day/year的字符串,表示程序被编译的日期 |
__TIME__ | 这会包含一个形式为hour:minute:second的字符串,表示程序被编译的时间 |
#include <iostream>
using namespace std;

int main()
{
    cout << "Value of __LINE__: " << __LINE__ << endl;
    cout << "Value of __FILE__: " << __FILE__ << endl;
    cout << "Value of __DATE__: " << __DATE__ << endl;
    cout << "Value of __TIME__: " << __TIME__ << endl;

    return 0;
}
2
3
4
5
6
7
8
9
10
11
12

# C++ 信号处理
信号是由操作系统传给进程的中断,会提早终止一个程序,在UNIX、LINUX、Mac OS X或Windows系统上,可以通过Ctrl + C产生中断。有些信号不能被程序捕获,但是下表所列信号可以在程序中捕获,并可以基于信号采取适当的动作,这些信号是定义在C++头文件<csignal>中。
| 信号 | 描述 |
|---|---|
SIGABRT | 程序的异常终止,如调用abort |
SIGFPE | 错误的算术运算,比如除以零或导致溢出的操作 |
SIGILL | 监测非法指令 |
SIGINT | 程序终止interrupt信号 |
SIGSEGV | 非法访问内存 |
SIGTERM | 发送到程序的终止请求 |
# signal() 函数
C++信号处理提供了signal函数,用来捕获突发事件,以下是signal()函数的语法:
void (*signal (int sig, void (*func)(int)))(int);
// signal(registered signal, signal handler)
2
这个函数接收两个参数:第一个参数是要设置的信号的标识符,第二个参数是指向信号处理函数的指针,函数返回值是一个指向先前信号处理函数的指针,如果先前没有设置信号处理函数,则返回值SIG_DFL,如果先前设置的信号处理函数为SIG_IGN,则返回值为SIG_IGN。
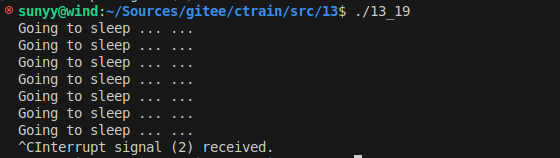
使用signal()函数捕获SIGINT信号,不管在程序中捕获什么信号,都必须使用signal函数来注册信号,并将其与信号处理程序相关联,如:
#include <iostream>
#include <csignal>
#include <unistd.h>

using namespace std;

void signalHandler(int signum)
{
    cout << "Interrupt signal (" << signum << ") received.\n";
    // 清理并关闭
    // 终止程序
    exit(signum);
}

int main()
{
    // 注册信号 SIGINT 和 信号处理程序
    signal(SIGINT, signalHandler);

    while (1)
    {
        cout << "Going to sleep ... ..." << endl;
        sleep(1);
    }

    return 0;

}
2
3
4
5
6
7
8
9
10
11
12
13
14
15
16
17
18
19
20
21
22
23
24
25
26
27
28
当代码被编译执行时,摁Ctrl + C终端程序,将会输出如下结果:
# raise() 函数
可以使用函数raise()生成信号,该函数带有一个整数信号编号作为参数,如:
int raise(signal sig);
这里,sig是要发送的信号的编号,如:SIGINT、SIGABRT、SIGFPE、SIGILL、SIGSEGV、SIGTERM、SIGHUP。
#include <iostream>
#include <csignal>
#include <unistd.h>

using namespace std;

void signalHandler(int signum)
{
    cout << "Interrupt signal (" << signum << ") received.\n";
    // 清理并关闭
    // 终止程序
    exit(signum);
}

int main()
{
    int i = 0;
    // 注册信号 SIGINT 和 信号处理程序
    signal(SIGINT, signalHandler);

    while (++i)
    {
        cout << "Going to sleep ... ..." << endl;
        if (i == 5) {
            raise(SIGINT);
        }
        sleep(1);
    }

    return 0;

}
2
3
4
5
6
7
8
9
10
11
12
13
14
15
16
17
18
19
20
21
22
23
24
25
26
27
28
29
30
31
32
# C++ 多线程
线程是程序中的轻量级执行单元,允许程序同时执行多个任务。多线程是多任务处理的一种特殊形式,多任务处理允许让电脑同时运行两个或两个以上的程序。一般情况,两种类型的多任务处理:基于进程和基于线程。
- 基于进程的多任务处理是程序的并发执行
- 基于线程的多任务处理是同一程序的片段的并发执行。
C++多线程编程涉及在一个程序中创建和管理多个并发执行的线程。C++提供了强大的多线程支持,特别是在C++11标准及其之后,通过<thread>标准库使得多线程编程变得更加简单和安全。
# 概念说明
# 线程
- 线程是程序执行中的单一顺序控制流,多个线程可以在同一个进程中独立运行
- 线程共享进程的地址空间、文件描述符、堆和全局变量等资源,但每个线程有自己的栈、寄存器和程序计数器。
# 并发(Concurrency)与并行(Parallelism)
- 并发: 多个任务在时间片段内交替执行,表现出同时进行的效果
- 并行:多个任务在多个处理器或处理器核上同时执行
C++11及以后的标准提供了多线程支持,核心组件包括:
std::thread: 用于创建和管理线程std::mutex: 用于线程之间的互斥,防止多个线程同时访问共享资源std::lock_guard和std::unique_lock: 用于管理锁和释放std::condition_variable: 用于线程间的条件变量,协调线程间的等待和通知std::future和std::promise: 用于实现线程间的值传递和任务同步
# 创建线程
C++11之后添加了新的标准线程库std::thread,std::thread在<thread>头文件中声明,因此使用std::thread时需要包含<thread>头文件。
注意: 之前一些编译器使用C++11的编译参数是`-std=c++11`
g++ -std=c++11 test.cpp
#include <thread>
std::thread thread_object(callable, args...);
2
callable: 可调用对象,可以是函数指针、函数对象、Lambda表达式等args...: 传递给callable的参数列表
# 使用函数指针
通过函数指针创建线程,这是最基本的方式:
#include <iostream>
#include <thread>

void printMessage(int count)
{
    for (int i = 0; i < count; i++)
    {
        std::cout << "Hello from thread (function pointer)!\n";
    }
}

int main()
{
    std::thread t1(printMessage, 5); // 创建线程,传递函数指针和参数
    t1.join(); // 等待线程完成
    return 0;
}
2
3
4
5
6
7
8
9
10
11
12
13
14
15
16
17
# 使用函数对象
通过类中的operator()方法定义函数对象来创建线程
#include <iostream>
#include <thread>

class PrintTask
{
public:
    void operator()(int count) const
    {
        for (int i = 0; i < count; ++i)
        {
            std::cout << "Hello from thread (function object)!\n";
        }
    }
};

int main()
{
    std::thread t2(PrintTask(), 5); // 创建线程,传递函数对象和参数
    t2.join();                      // 等待线程完成
    return 0;
}
2
3
4
5
6
7
8
9
10
11
12
13
14
15
16
17
18
19
20
21
# 使用Lambda表达式
Lambda表达式可以直接内联定义线程执行的代码:
#include <iostream>
#include <thread>

int main()
{
    std::thread t3([](int count)
                   {
        for (int i = 0; i < count; ++i)
        {
            std::cout << "Hello from thread (lambda)!\n";
        } }, 5); // 创建线程,传递Lambda表达式和参数
    t3.join();              // 等待线程完成
    return 0;
}
2
3
4
5
6
7
8
9
10
11
12
13
14
# 线程管理
# join()
join()用于等待线程完成执行,如果不调用join()或detach()而直接销毁线程对象,会导致程序崩溃
# detach()
detach()将线程与主线程分离,线程在后台独立运行,主线程不再等待它。
# 线程的传参
# 值传递
参数可以通过值传递给线程:
std::thread t(func, arg1, arg2);
# 引用传递
如果需要传递引用参数,需要使用std::ref
#include <iostream>
#include <thread>

void increment(int& x)
{
    ++x;
}

int main()
{
    int num = 0;
    std::thread t(increment, std::ref(num)); // 使用 std::ref 传递引用
    t.join();
    std::cout << "Value after increment: " << num << std::endl;
    return 0;
}
2
3
4
5
6
7
8
9
10
11
12
13
14
15
16
# 综合实例
#include <iostream>
#include <thread>
using namespace std;

// 一个简单的函数,作为线程的入口函数
void foo(int z)
{
    for (int i = 0; i < z; i++)
    {
        cout << "线程使用函数指针作为可调用参数\n";
    }
}

// 可调用对象的类定义
class ThreadObj
{
public:
    void operator()(int x) const
    {
        for (int i = 0; i < x; i++)
        {
            cout << "线程使用函数对象作为可调用参数\n";
        }
    }
};

int main()
{
    cout << "线程1、2、3独立运行" << endl;
    // 使用函数指针创建线程
    thread th1(foo, 3);

    // 使用函数对象创建线程
    thread th2(ThreadObj(), 3);

    // 使用Lambda表达式创建线程
    thread th3([](int x)
               {
        for (int i = 0; i < x; i++)
        {
            cout << "线程使用Lambada表达式作为可调用参数\n";
        } }, 3);

    // 等待所有线程完成
    th1.join();
    th2.join();
    th3.join();

    return 0;
}
2
3
4
5
6
7
8
9
10
11
12
13
14
15
16
17
18
19
20
21
22
23
24
25
26
27
28
29
30
31
32
33
34
35
36
37
38
39
40
41
42
43
44
45
46
47
48
49
50
# 线程的同步与互斥
在多线程编程中,线程同步与互斥是两个非常重要的概念,它们用于控制多个线程对共享资源的访问,以避免数据竞争、死锁等问题。
# 互斥量(Mutex)
互斥量是一种同步原语,用于防止多个线程同时访问共享资源,当一个线程需要访问共享资源时,它首先需要锁定(lock)互斥量,如果互斥量已经被其他线程锁定,那么请求锁定的线程将被阻塞,直到互斥量被解锁(unlock)。
std::mutex用于保护共享资源,防止数据竞争。
std::mutex mtx;
mtx.lock(); // 锁定互斥锁
// 访问共享资源
mtx.unlock(); // 释放互斥锁
2
3
4
std::lock_guard和std::unique_lock自动管理锁的获取和释放。
std::lock_guard<std::mutex> lock(mtx); // 自动锁定和释放
// 访问共享资源
2
#include <thread>
#include <mutex>

std::mutex mtx; // 全局互斥量

void safeFunction()
{
    mtx.lock(); // 请求锁定互斥量
    // 访问或修改共享资源
    mtx.unlock(); // 释放互斥量
}

int main()
{
    std::thread t1(safeFunction);
    std::thread t2(safeFunction);
    t1.join();
    t2.join();
    return 0;
}
2
3
4
5
6
7
8
9
10
11
12
13
14
15
16
17
18
19
20
# 锁(Locks)
C++提供了多种锁类型,用于简化互斥量的使用和管理,常见的锁类型包括:
std::lock_guard: 作用域锁,当构造时自动锁定互斥量,当析构时自动解锁std::unique_lock: 与std::lock_guard类似,但提供了更多的灵活性,例如可以转移所有权和手动解锁。
#include <mutex>

std::mutex mtx;

void safeFunctionWithLockGuard()
{
    std::lock_guard<std::mutex> lk(mtx);
    // 访问或修改共享资源
}

void safeFunctionWithUniqueLock()
{
    std::unique_lock<std::mutex> ul(mtx);
    // 访问或修改共享资源
    // ul.unlock();  // 可选 手动解锁
    // ...
}
2
3
4
5
6
7
8
9
10
11
12
13
14
15
16
17
# 条件变量(Condition Variable)
条件变量用于线程间的协调,允许一个或多个线程线程等待某个条件的发生,它通常与互斥量一起使用,以实现线程间的同步。std::condition_variable用于实现线程间的等待和通知机制。
std::condition_variable cv;
std::mutex mtx;
bool ready = false;

std::unique_lock<std::mutex> lock(mtx);
cv.wait(lock, []{ return ready; }); // 等待条件满足
// 条件瞒住后执行
2
3
4
5
6
7
#include <mutex>
#include <condition_variable>

std::mutex mtx;
std::condition_variable cv;
bool ready = false;

void workerThread()
{
    std::unique_lock<std::mutex> lk(mtx);
    cv.wait(lk, []
            { return ready; }); // 等待条件
    // 当条件满足时执行工作
}

void mainThread()
{
    {
        std::lock_guard<std::mutex> lk(mtx);
        // 准备数据
        ready = true;
    } // 离开作用域时解锁
    cv.notify_one(); // 通知一个等待线程
}
2
3
4
5
6
7
8
9
10
11
12
13
14
15
16
17
18
19
20
21
22
23
24
# 原子操作(Atomic Operations)
原子操作确保对共享数据的访问是不可分隔的,即在多线程环境下,原子操作要么完全执行,要么完全不执行,不会出现中间状态。
#include <atomic>
#include <thread>
#include <iostream>

using namespace std;

std::atomic<int> count(0);

void increment()
{
    count.fetch_add(1, std::memory_order_relaxed);
}

int main()
{
    std::thread t1(increment);
    std::thread t2(increment);
    t1.join();
    t2.join();
    cout << count << endl;
    return count; // 应返回2
}
2
3
4
5
6
7
8
9
10
11
12
13
14
15
16
17
18
19
20
21
22
# 线程局部存储(Thread Local Storage, TLS)
线程局部变量存储允许每个线程拥有自己的数据副本,可以通过thread_local关键字实现,避免对共享资源的争用。
#include <iostream>
#include <thread>

thread_local int threadData = 0;

void threadFunction()
{
    threadData = 42; // 每个线程都有自己的threadData副本
    std::cout << "Thread Data: " << threadData << std::endl;
}

int main() {
    std::thread t1(threadFunction);
    std::thread t2(threadFunction);
    t1.join();
    t2.join();
    return 0;
}
2
3
4
5
6
7
8
9
10
11
12
13
14
15
16
17
18
# 死锁(Deadlock)和避免策略
死锁发生在多个线程互相等待对方释放资源,但没有一个线程能够继续执行,避免死锁的策略包括:
- 总是以相同的顺序请求资源
- 使用超时来尝试获取资源
- 使用死锁检测算法
# 线程间通信
std::future和std::promise:实现线程间的值传递。
std::promise<int> p;
std::future<int> f = p.get_future();

std::thread t([&p] {
    p.set_value(10); // 设置值, 触发 future
});

int result = f.get(); // 获取值
2
3
4
5
6
7
8
消息队列(基于std::queue和std::mutex实现简单的线程间通信)
C++17引入了并行算法库(<algorithm>),其中部分算法支持并行执行,可以利用多核CPU提高性能。
#include <algorithm>
#include <vector>
#include <execution>

std::vector<int> vec = { 1, 2, 3, 4, 5 };
std::for_each(std::execution::par, vec.begin(), vec.end(), [](int &n) {
    n *= 2;
});
2
3
4
5
6
7
8
# C++标准库中的并行算法
# C++ Web编程
# 什么是CGI
- 公共网关接口(CGI),是一套标准,定义了信息是如何在WEB服务器和客服端脚本之间进行交换的
- CGI规范目前是由NCSA维护的,NCSA定义CGI如下:
- 公共网关接口(CGI),是一种用于外部网关程序与信息服务器(如HTTP服务器)对接的接口标准
- 目前的版本是CGI/1.1,CGI/1.2正在推进中
# Web浏览
Web浏览过程:
- 浏览器连接HTTP Web服务器,并请求URL,即文件名
- Web服务器解析URL,并查找文件名,如果找到请求的文件,Web服务器会把文件发送回浏览器,否则发送一条错误消息,表明请求了错误文件。
- Web浏览器从Web服务器获取响应,并根据接收到的响应显示文件或错误信息。
以这种方式搭建起来的HTTP服务器,不管何时请求目录中的某个文件,HTTP服务器发送回来的不是该文件,而是以程序形式执行,并把执行产生的输出发送回浏览器显示出来。公共网关接口(CGI),是使用应用程序能够与Web服务器以及客户端进行交互的标准协议,这些CGI程序可以用Python、PERL、Shell、C或C++等进行编写。
# CGI架构图
# Web服务器配置
在进行CGI编程之前,需要确保Web服务器支持CGI,并已配置可以处理CGI程序,所有由HTTP服务器执行的CGI程序,都必须在预配置的目录中,该目录称为CGI目录,按照惯例命名为/var/www/cgi-bin,虽然CGI文件是C++可执行文件,但是按照惯例它的扩展名是.cgi。默认情况下,Apach Web服务器会配置在/var/www/cgi-bin中运行CGI程序,如果希望指定其他目录来运行CGI脚本,可以在httpd.conf文件中修改以下部分:
<Directory "/var/www/cgi-bin">
   AllowOverride None
   Options ExecCGI
   Order allow,deny
   Allow from all
</Directory>

<Directory "/var/www/cgi-bin">
Options All
</Directory>
2
3
4
5
6
7
8
9
10
# 第一个CGI程序
#include <iostream>
using namespace std;

int main ()
{

   cout << "Content-type:text/html\r\n\r\n";
   cout << "<html>\n";
   cout << "<head>\n";
   cout << "<title>Hello World - 第一个 CGI 程序</title>\n";
   cout << "</head>\n";
   cout << "<body>\n";
   cout << "<h2>Hello World! 这是我的第一个 CGI 程序</h2>\n";
   cout << "</body>\n";
   cout << "</html>\n";

   return 0;
}
2
3
4
5
6
7
8
9
10
11
12
13
14
15
16
17
18
编译上面的代码,把可执行文件命名为cplusplus.cgi,并把这个文件保存在/var/www/cgi-bin目录中,在运行CGI程序之前,需要使用chmod 755 cplusplus.cgi命令修改文件模式,确保文件可执行。
上面的C++程序是一个简单的程序,把它的输出写在STDOUT文件上,即显示在屏幕上,需要注意的是,第一行输出Content-type:text/html\r\n\r\n。这一行发送给浏览器,并指定要显示在浏览器窗口上的内容类型,开发者必须理解CGI的基本概念,才能进一步编写更多复杂的CGI程序,C++ CGI程序可以与任何其他外部的系统(如RDBMS)进行交互。
# HTTP 头信息
Content-type:text/html\r\n\r\n是HTTP头信息的组成部分,其形式如下:
HTTP 字段名称: 字段内容

如
Content-type: text/html\r\n\r\n
2
3
4
| 头信息 | 描述 |
|---|---|
Content-type | MIME字符串,定义返回的文件格式,如Content-type: text/html |
Expires: Date | 信息变成无效的日期,浏览器使用它来判断一个页面何时需要刷新,一个有效的日期字符串的格式为01 Jan 1998 12:00:00 GMT |
Location: URL | 这个URL是指应该返回的URL,而不是请求的URL,可以使用它来重定向一个请求到任意的文件 |
Last-modified: Date | 资源的最后修改日期 |
Content-length: N | 要返回的数据的长度,以字节为单位,浏览器使用这个值来表示一个文件的预计下载时间 |
Set-Cookie: String | 通过string设置cookie |
# CGI 环境变量
所有的CGI程序都可以访问下列的环境变量,这些变量在编写CGI程序时扮演了非常重要的角色
| 变量名 | 描述 |
|---|---|
CONTENT_TYPE | 内容的数据类型,当客户端向服务器发送附加内容时使用,如,文件上传等功能 |
CONTENT_LENGTH | 查询的信息长度,只对POST请求可用 |
HTTP_COOKIE | 以键&值对应的形式返回设置的cookies |
HTTP_USER_AGENT | 用户代理请求标头字段,递交用户发起请求的有关信息,包含了浏览器的名称、版本和其他平台性的附加信息 |
PATH_INFO | CGI脚本的路径 |
QUERY_STRING | 通过GET方法发送请求时的URL编码信息,包含URL中问号后面的参数 |
REMOTE_ADDR | 发出请求的远程主机的IP地址,在日志记录和认证时非常有用 |
REMOTE_HOST | 发出请求的主机的完全限定名称,如果此信息不可用,可以用REMOTE_ADDR来获取IP地址 |
REQUEST_METHOD | 用于发出请求的方法,最常见的方法是GET和POST |
SCRIPT_FILENAME | CGI脚本的完整路径 |
SCRIPT_NAME | CGI脚本的名称 |
SERVER_NAME | 服务器的主机名或IP地址 |
SERVER_SOFTWARE | 服务器上运行的软件的名称和版本 |
#include <iostream>
#include <stdlib.h>
#include <string>
using namespace std;

const string ENV[ 24 ] = {
        "COMSPEC", "DOCUMENT_ROOT", "GATEWAY_INTERFACE",
        "HTTP_ACCEPT", "HTTP_ACCEPT_ENCODING",
        "HTTP_ACCEPT_LANGUAGE", "HTTP_CONNECTION",
        "HTTP_HOST", "HTTP_USER_AGENT", "PATH",
        "QUERY_STRING", "REMOTE_ADDR", "REMOTE_PORT",
        "REQUEST_METHOD", "REQUEST_URI", "SCRIPT_FILENAME",
        "SCRIPT_NAME", "SERVER_ADDR", "SERVER_ADMIN",
        "SERVER_NAME","SERVER_PORT","SERVER_PROTOCOL",
        "SERVER_SIGNATURE","SERVER_SOFTWARE" };

int main ()
{

   cout << "Content-type:text/html\r\n\r\n";
   cout << "<html>\n";
   cout << "<head>\n";
   cout << "<title>CGI 环境变量</title>\n";
   cout << "</head>\n";
   cout << "<body>\n";
   cout << "<table border = \"0\" cellspacing = \"2\">";

   for ( int i = 0; i < 24; i++ )
   {
       cout << "<tr><td>" << ENV[ i ] << "</td><td>";
       // 尝试检索环境变量的值
       char *value = getenv( ENV[ i ].c_str() );
       if ( value != 0 ){
         cout << value;
       }else{
         cout << "环境变量不存在。";
       }
       cout << "</td></tr>\n";
   }
   cout << "</table><\n";
   cout << "</body>\n";
   cout << "</html>\n";

   return 0;
}
2
3
4
5
6
7
8
9
10
11
12
13
14
15
16
17
18
19
20
21
22
23
24
25
26
27
28
29
30
31
32
33
34
35
36
37
38
39
40
41
42
43
44
45
# C++ CGI库
在真实的实例中,需要通过CGI程序执行许多操作,这里有一个专为C++程序而编写的CGI库,cgicc-3.2.19.tar.gz
tar -zxf cgicc-X.X.X.tar.gz
cd cgicc-X.X.X/
./configure --prefix=/usr
make
make install
2
3
4
5
注意 libcgicc.so 和 libcgicc.a 库会被安装到/usr/lib目录下,需执行拷贝命令:
sudo cp /usr/lib/ligcgicc.* /usr/lib64/
才能使CGI程序自动找到libcgicc.so动态连接库
# GET 和 POST 方法
通常浏览器会使用两种方法把信息传到Web服务器,分别是 GET 和 POST 方法
- 使用 GET 方法传递信息
GET方法发送已编码的用户信息追加到页面请求中,页面和已编码信息通过?字符分隔开,如下:
http://www.test.com/cgi-bin/cpp.cgi?key1=value1&key2=value2
GET方法是默认的从浏览器向Web服务器传信息的方法,它会在浏览器的地址栏中生成一串很长的字符串,当向服务器传密码或其他一些敏感信息时,不要使用GET方法。GET方法有大小限制,在一个请求字符串中最多可以传1024个字符。当使用GET方法时,使用QUERY_STRING http头传递信息,在CGI程序中可以使用QUERY_STRING环境变量来访问,可以通过在URL后跟上简单连接的键值对,也可以通过使用 HTML <FORM>标签的GET方法来传递。
下面是一个简单的URL,使用GET方法传递两个值给cpp_get.cgi程序。/cgi-bin/cpp_get.cgi?first_name=ZARA&last_name=ALI
#include <iostream>
#include <vector>
#include <string>
#include <stdio.h>
#include <stdlib.h>

#include <cgicc/CgiDefs.h>
#include <cgicc/Cgicc.h>
#include <cgicc/HTTPHTMLHeader.h>
#include <cgicc/HTMLClasses.h>

using namespace std;
using namespace cgicc;

int main ()
{
   Cgicc formData;

   cout << "Content-type:text/html\r\n\r\n";
   cout << "<html>\n";
   cout << "<head>\n";
   cout << "<title>使用 GET 和 POST 方法</title>\n";
   cout << "</head>\n";
   cout << "<body>\n";

   form_iterator fi = formData.getElement("first_name");
   if( !fi->isEmpty() && fi != (*formData).end()) {
      cout << "名:" << **fi << endl;
   }else{
      cout << "No text entered for first name" << endl;
   }
   cout << "<br/>\n";
   fi = formData.getElement("last_name");
   if( !fi->isEmpty() &&fi != (*formData).end()) {
      cout << "姓:" << **fi << endl;
   }else{
      cout << "No text entered for last name" << endl;
   }
   cout << "<br/>\n";

   cout << "</body>\n";
   cout << "</html>\n";

   return 0;
}
2
3
4
5
6
7
8
9
10
11
12
13
14
15
16
17
18
19
20
21
22
23
24
25
26
27
28
29
30
31
32
33
34
35
36
37
38
39
40
41
42
43
44
45
编译上面的程序,如下:
g++ -o cpp_get.cgi cpp_get.cpp -lcgicc
生成cpp_get.cgi,并把它放在CGI目录中,并尝试使用下面的链接访问:/cgi-bin/cpp_get.cgi?first_name=ZARA&last_name=ALI
- 简单的表单实例:GET方法
<form action="/cgi-bin/cpp_get.cgi" method="get">
名:<input type="text" name="first_name">  <br />

姓:<input type="text" name="last_name" />
<input type="submit" value="提交" />
</form>
2
3
4
5
6
- 使用POST方法传递信息
一个更可靠的向CGI程序传递信息的方法是POST方法,这种方法打包信息的方式与GET方法相同,不同的是,它不是把信息以文本字符串形式放在URL中的?之后进行传递,而是把它以单独的消息形式进行传递,该消息是以标准输入的形式传给CGI脚本。
<form action="/cgi-bin/cpp_get.cgi" method="post">
名:<input type="text" name="first_name"><br />
姓:<input type="text" name="last_name" />

<input type="submit" value="提交" />
</form>
2
3
4
5
6
- 向CGI程序传递复选框数据
<form action="/cgi-bin/cpp_checkbox.cgi"
         method="POST"
         target="_blank">
<input type="checkbox" name="maths" value="on" /> 数学
<input type="checkbox" name="physics" value="on" /> 物理
<input type="submit" value="选择学科" />
</form>
2
3
4
5
6
7
#include <iostream>
#include <vector>
#include <string>
#include <stdio.h>
#include <stdlib.h>

#include <cgicc/CgiDefs.h>
#include <cgicc/Cgicc.h>
#include <cgicc/HTTPHTMLHeader.h>
#include <cgicc/HTMLClasses.h>

using namespace std;
using namespace cgicc;

int main ()
{
   Cgicc formData;
   bool maths_flag, physics_flag;

   cout << "Content-type:text/html\r\n\r\n";
   cout << "<html>\n";
   cout << "<head>\n";
   cout << "<title>向 CGI 程序传递复选框数据</title>\n";
   cout << "</head>\n";
   cout << "<body>\n";

   maths_flag = formData.queryCheckbox("maths");
   if( maths_flag ) {
      cout << "Maths Flag: ON " << endl;
   }else{
      cout << "Maths Flag: OFF " << endl;
   }
   cout << "<br/>\n";

   physics_flag = formData.queryCheckbox("physics");
   if( physics_flag ) {
      cout << "Physics Flag: ON " << endl;
   }else{
      cout << "Physics Flag: OFF " << endl;
   }
   cout << "<br/>\n";
   cout << "</body>\n";
   cout << "</html>\n";

   return 0;
}
2
3
4
5
6
7
8
9
10
11
12
13
14
15
16
17
18
19
20
21
22
23
24
25
26
27
28
29
30
31
32
33
34
35
36
37
38
39
40
41
42
43
44
45
46
- 向CGI程序传递单选按钮数据
<form action="/cgi-bin/cpp_radiobutton.cgi"
         method="post"
         target="_blank">
<input type="radio" name="subject" value="maths"
                                    checked="checked"/> 数学
<input type="radio" name="subject" value="physics" /> 物理
<input type="submit" value="选择学科" />
</form>
2
3
4
5
6
7
8
#include <iostream>
#include <vector>
#include <string>
#include <stdio.h>
#include <stdlib.h>

#include <cgicc/CgiDefs.h>
#include <cgicc/Cgicc.h>
#include <cgicc/HTTPHTMLHeader.h>
#include <cgicc/HTMLClasses.h>

using namespace std;
using namespace cgicc;

int main ()
{
   Cgicc formData;

   cout << "Content-type:text/html\r\n\r\n";
   cout << "<html>\n";
   cout << "<head>\n";
   cout << "<title>向 CGI 程序传递单选按钮数据</title>\n";
   cout << "</head>\n";
   cout << "<body>\n";

   form_iterator fi = formData.getElement("subject");
   if( !fi->isEmpty() && fi != (*formData).end()) {
      cout << "Radio box selected: " << **fi << endl;
   }

   cout << "<br/>\n";
   cout << "</body>\n";
   cout << "</html>\n";

   return 0;
}
2
3
4
5
6
7
8
9
10
11
12
13
14
15
16
17
18
19
20
21
22
23
24
25
26
27
28
29
30
31
32
33
34
35
36
- 向CGI程序传递文本区域数据
<form action="/cgi-bin/cpp_textarea.cgi"
         method="post"
         target="_blank">
<textarea name="textcontent" cols="40" rows="4">
请在这里输入文本...
</textarea>
<input type="submit" value="提交" />
</form>
2
3
4
5
6
7
8
#include <iostream>
#include <vector>
#include <string>
#include <stdio.h>
#include <stdlib.h>

#include <cgicc/CgiDefs.h>
#include <cgicc/Cgicc.h>
#include <cgicc/HTTPHTMLHeader.h>
#include <cgicc/HTMLClasses.h>

using namespace std;
using namespace cgicc;

int main ()
{
   Cgicc formData;

   cout << "Content-type:text/html\r\n\r\n";
   cout << "<html>\n";
   cout << "<head>\n";
   cout << "<title>向 CGI 程序传递文本区域数据</title>\n";
   cout << "</head>\n";
   cout << "<body>\n";

   form_iterator fi = formData.getElement("textcontent");
   if( !fi->isEmpty() && fi != (*formData).end()) {
      cout << "Text Content: " << **fi << endl;
   }else{
      cout << "No text entered" << endl;
   }

   cout << "<br/>\n";
   cout << "</body>\n";
   cout << "</html>\n";

   return 0;
}
2
3
4
5
6
7
8
9
10
11
12
13
14
15
16
17
18
19
20
21
22
23
24
25
26
27
28
29
30
31
32
33
34
35
36
37
38
- 向CGI程序传递下拉框数据
<form action="/cgi-bin/cpp_dropdown.cgi"
                       method="post" target="_blank">
<select name="dropdown">
<option value="Maths" selected>数学</option>
<option value="Physics">物理</option>
</select>
<input type="submit" value="提交"/>
</form>
2
3
4
5
6
7
8
#include <iostream>
#include <vector>
#include <string>
#include <stdio.h>
#include <stdlib.h>

#include <cgicc/CgiDefs.h>
#include <cgicc/Cgicc.h>
#include <cgicc/HTTPHTMLHeader.h>
#include <cgicc/HTMLClasses.h>

using namespace std;
using namespace cgicc;

int main ()
{
   Cgicc formData;

   cout << "Content-type:text/html\r\n\r\n";
   cout << "<html>\n";
   cout << "<head>\n";
   cout << "<title>向 CGI 程序传递下拉框数据</title>\n";
   cout << "</head>\n";
   cout << "<body>\n";

   form_iterator fi = formData.getElement("dropdown");
   if( !fi->isEmpty() && fi != (*formData).end()) {
      cout << "Value Selected: " << **fi << endl;
   }

   cout << "<br/>\n";
   cout << "</body>\n";
   cout << "</html>\n";

   return 0;
}
2
3
4
5
6
7
8
9
10
11
12
13
14
15
16
17
18
19
20
21
22
23
24
25
26
27
28
29
30
31
32
33
34
35
36
- 在CGI中使用Cookies
HTTP协议是一种无状态的协议,但对于一个商业网站,一般会需要在不同页面间保持会话信息,如,一个用户在完成多个页面的步骤之后结束注册,但是,如何在所有网页中保持用户的会话信息呢?在许多情况下,使用cookies是记忆和跟踪有关用户喜好、购买、佣金以及其他为追求更好的游客体验或网站统计所需信息的最有效的方法。
服务器以cookie的形式向访客的浏览器发送一些数据,如果浏览器接受了cookie,则cookie会以纯文本记录的形式存储在访客的硬盘上,当访客访问网站上的另一个页面时,会检索cookie,一旦找到cookie,服务器就知道存储了什么。
cookie是一种纯文本的数据记录,带有5个可变长度的字段:
Expires: cookie的过期日期,如果此字段留空,cookie会在访客退出浏览器时过期Domain: 网站的域名Path: 设置cookie的目录或网页的路径,如果想从任意的目录或网页检索cookie,此字段可以留空Secure: 如果此字段包含单词secure,那么cookie智能通过安全服务器进行检索,如果此字段留空,则不存在该限制Name=Value: cookie以键值对的形式被设置和获取
- 设置 cookies
向浏览器发送cookies是非常简单的,这些cookies会在Content-type字段之前,与HTTP头一起被发送,假设设置UserID和Password为cookies,步骤如下:
#include <iostream>
using namespace std;

int main ()
{

   cout << "Set-Cookie:UserID=XYZ;\r\n";
   cout << "Set-Cookie:Password=XYZ123;\r\n";
   cout << "Set-Cookie:Domain=www.w3cschool.cc;\r\n";
   cout << "Set-Cookie:Path=/perl;\n";
   cout << "Content-type:text/html\r\n\r\n";

   cout << "<html>\n";
   cout << "<head>\n";
   cout << "<title>CGI 中的 Cookies</title>\n";
   cout << "</head>\n";
   cout << "<body>\n";

   cout << "设置 cookies" << endl;

   cout << "<br/>\n";
   cout << "</body>\n";
   cout << "</html>\n";

   return 0;
}
2
3
4
5
6
7
8
9
10
11
12
13
14
15
16
17
18
19
20
21
22
23
24
25
26
从上面的实例中,使用Set-CookieHTTP头来设置cookies,这里,有一些设置cookies的属性是可选的,比如Expires、Domain和Path,值得注意的是,cookie是在发送行Content-type:text/html\r\n\r\n之前被设置的。
- 获取cookies
检索所有设置的cookies是非常简单的,cookies被存储在CGI环境变量HTTP_COOKIE中,形式如下:
key1=value1;key2=value2;key3=value3....
#include <iostream>
#include <vector>
#include <string>
#include <stdio.h>
#include <stdlib.h>

#include <cgicc/CgiDefs.h>
#include <cgicc/Cgicc.h>
#include <cgicc/HTTPHTMLHeader.h>
#include <cgicc/HTMLClasses.h>

using namespace std;
using namespace cgicc;

int main ()
{
   Cgicc cgi;
   const_cookie_iterator cci;

   cout << "Content-type:text/html\r\n\r\n";
   cout << "<html>\n";
   cout << "<head>\n";
   cout << "<title>CGI 中的 Cookies</title>\n";
   cout << "</head>\n";
   cout << "<body>\n";
   cout << "<table border = \"0\" cellspacing = \"2\">";

   // 获取环境变量
   const CgiEnvironment& env = cgi.getEnvironment();

   for( cci = env.getCookieList().begin();
        cci != env.getCookieList().end();
        ++cci )
   {
      cout << "<tr><td>" << cci->getName() << "</td><td>";
      cout << cci->getValue();
      cout << "</td></tr>\n";
   }
   cout << "</table><\n";

   cout << "<br/>\n";
   cout << "</body>\n";
   cout << "</html>\n";

   return 0;
}
2
3
4
5
6
7
8
9
10
11
12
13
14
15
16
17
18
19
20
21
22
23
24
25
26
27
28
29
30
31
32
33
34
35
36
37
38
39
40
41
42
43
44
45
46
- 文件上传实例
为了上传文件,HTML表单必须把enctype属性设置为multipart/form-data,带有文件类型的input标签会创建一个Browse按钮。
<html>
<body>
   <form enctype="multipart/form-data"
            action="/cgi-bin/cpp_uploadfile.cgi"
            method="post">
   <p>文件:<input type="file" name="userfile" /></p>
   <p><input type="submit" value="上传" /></p>
   </form>
</body>
</html>
2
3
4
5
6
7
8
9
10
#include <iostream>
#include <vector>
#include <string>
#include <stdio.h>
#include <stdlib.h>

#include <cgicc/CgiDefs.h>
#include <cgicc/Cgicc.h>
#include <cgicc/HTTPHTMLHeader.h>
#include <cgicc/HTMLClasses.h>

using namespace std;
using namespace cgicc;

int main ()
{
   Cgicc cgi;

   cout << "Content-type:text/html\r\n\r\n";
   cout << "<html>\n";
   cout << "<head>\n";
   cout << "<title>CGI 中的文件上传</title>\n";
   cout << "</head>\n";
   cout << "<body>\n";

   // 获取要被上传的文件列表
   const_file_iterator file = cgi.getFile("userfile");
   if(file != cgi.getFiles().end()) {
      // 在 cout 中发送数据类型
      cout << HTTPContentHeader(file->getDataType());
      // 在 cout 中写入内容
      file->writeToStream(cout);
   }
   cout << "<文件上传成功>\n";
   cout << "</body>\n";
   cout << "</html>\n";

   return 0;
}
2
3
4
5
6
7
8
9
10
11
12
13
14
15
16
17
18
19
20
21
22
23
24
25
26
27
28
29
30
31
32
33
34
35
36
37
38
39
上面的实例是在cout流中写入内容,但可以打开文件流,并把上传的文件内容保存在目标位置的某个文件中。
- C++ 文件和流
- 打开文件
- 关闭文件
- 写入文件
- 读取文件
- 读取&写入实例
- 文件位置指针
- C++ 异常处理
- 抛出异常
- 捕获异常
- C++标准异常
- 自定义异常
- C++ 动态内存
- new 和 delete 运算符
- 数组的动态内存分配
- 对象的动态内存分配
- C++ 命名空间
- 定义命名空间
- using 指令
- 不连续的命名空间
- 嵌套的命名空间
- C++ 模板
- 函数模板
- 类模板
- C++ 预处理器
- #define 预处理
- 参数宏
- 条件编译
- # 和 ## 运算符
- C++ 中的预定义宏
- C++ 信号处理
- signal() 函数
- raise() 函数
- C++ 多线程
- 概念说明
- 创建线程
- 线程管理
- 线程的传参
- 综合实例
- 线程的同步与互斥
- 线程间通信
- C++标准库中的并行算法
- C++ Web编程
- 什么是CGI
- Web浏览
- CGI架构图
- Web服务器配置
- 第一个CGI程序