
Milvus 开始
# 快速入门Milvus Lite
向量是神经网络模型的输出数据格式, 可以有效地对信息进行编码, 在知识库, 语义搜索, 检索增强生成(RAG)等人工智能应用中发挥着举足轻重的作用.
Milvus 是一个开源的向量数据库, 适合各种规模的人工智能应用, 从在 Jupyter notebook 中运行一个演示聊天机器人, 到构建服务数十亿用户的网络规模搜索. 在本指南中, 我们将指导您如何在几分钟内本地设置 Milvus, 并使用 Python 客户端库生成, 存储和搜索向量.
# 安装Milvus
在本指南中, 我们使用 Milvus Lite, 它是pymilvus中包含的一个 python 库, 可以嵌入到客户端应用程序中. Milvus 还支持在Docker和Kubernetes上部署, 适用于生产用例.
开始之前, 请确保本地环境中有 Python 3.8+ 可用. 安装pymilvus, 其中包含 python 客户端库和 Milvus Lite:
pip install -U pymilvus
# 设置向量数据库
要创建本地的 Milvus 向量数据库, 只需实例化一个MilvusClient, 指定一个存储所有数据的文件名, 如 "milvus_demo.db".
# 创建Collections
在 Milvus 中, 我们需要一个 Collections 来存储向量及其相关元数据. 你可以把它想象成传统 SQL 数据库中的表格. 创建 Collections 时, 可以定义 Schema 和索引参数来配置向量规格, 如维度, 索引类型和远距离度量. 此外, 还有一些复杂的概念来优化索引以提高向量搜索性能. 现在, 我们只关注基础知识, 并尽可能使用默认设置. 至少, 你只需要设置 Collections 的名称和向量场的维度.
if client.has_collection(collection_name="demo_collection"):
    client.drop_collection(collection_name="demo_collection")
client.create_collection(
    collection_name="demo_collection",
    dimension=768,  # The vectors we will use in this demo has 768 dimensions
)
2
3
4
5
6
在上述设置中
- 主键和向量字段使用默认名称("id"和"vector).
- 度量类型(向量距离定义)设置为默认值(COSINE).
- 主键字段接受整数, 且不自动递增(即不使用自动ID功能). 或者, 也可以按照此说明正式定义Collections的Schema.
# 准备数据
在本指南中, 我们使用向量对文本进行语义搜索. 我们需要通过下载 embedding 模型为文本生成向量. 使用pymilvus[model]库中的实用功能可以轻松完成这项工作.
# 用向量表示文本
首先, 安装模型库. 该软件包包含 PyTorch 等基本 ML 工具. 如果您的本地环境从未安装过 PyTorch, 下载软件包可能需要一些时间.
pip install "pymilvus[model]"
用默认模型生成向量 Embeddings. Milvus 希望数据以字典列表的形式插入, 每个字典代表一条数据记录, 称为实体.
from pymilvus import model


embedding_fn = model.DefaultEmbeddingFunction()

docs = [
    "Artificial intelligence was founded as an academic discipline in 1956.",
    "Alan Turing was the first person to conduct substantial research in AI.",
    "Born in Maida Vale, London, Turing was raised in southern England.",
]

vectors = embedding_fn.encode_documents(docs)
print("Dim:", embedding_fn.dim, vectors[0].shape)  # Dim: 768 (768,)

data = [
    {"id": i, "vector": vectors[i], "text": docs[i], "subject": "history"}
    for i in range(len(vectors))
]

print("Data has", len(data), "entities, each with fields: ", data[0].keys())
print("Vector dim:", len(data[0]["vector"]))
2
3
4
5
6
7
8
9
10
11
12
13
14
15
16
17
18
19
20
21
Dim: 768 (768,)
Data has 3 entities, each with fields:  dict_keys(['id', 'vector', 'text', 'subject'])
Vector dim: 768
2
3
# (另一种方法)使用随机向量的假表示法
如果由于网络问题无法下载模型, 作为一种走马观花的方法, 你可以使用随机向量来表示文本, 仍然可以完成示例. 只需注意, 由于向量是假向量, 搜索结果不会反映语义相似性.
import random

docs = [
    "Artificial intelligence was founded as an academic discipline in 1956.",
    "Alan Turing was the first person to conduct substantial research in AI.",
    "Born in Maida Vale, London, Turing was raised in southern England.",
]
vectors = [[random.uniform(-1, 1) for _ in range(768)] for _ in docs]
data = [
    {"id": i, "vector": vectors[i], "text": docs[i], "subject": "history"}
    for i in range(len(vectors))
]

print("Data has", len(data), "entities, each with fields: ", data[0].keys())
print("Vector dim:", len(data[0]["vector"]))
2
3
4
5
6
7
8
9
10
11
12
13
14
15
Data has 3 entities, each with fields:  dict_keys(['id', 'vector', 'text', 'subject'])
Vector dim: 768
2
# 插入数据
让我们把数据插入 Collections:
res = client.insert(collection_name="demo_collection", data=data)

print(res)
2
3
{'insert_count': 3, 'ids': [0, 1, 2], 'cost': 0}
# 语义搜索
现在我们可以通过将搜索查询文本表示为向量来进行语义搜索, 并在 Milvus 上进行向量相似性搜索.
# 向量搜索
Milvus 可同时接受一个或多个向量搜索请求. query_vectors 变量的值是一个向量列表, 其中每个向量都是一个浮点数数组.
query_vectors = embedding_fn.encode_queries(["Who is Alan Turing?"])

res = client.search(
    collection_name="demo_collection",  # target collection
    data=query_vectors,  # query vectors
    limit=2,  # number of returned entities
    output_fields=["text", "subject"],  # specifies fields to be returned
)

print(res)
2
3
4
5
6
7
8
9
10
data: ["[{'id': 2, 'distance': 0.5859944820404053, 'entity':
{'text': 'Born in Maida Vale, London, Turing was raised in southern England.', 'subject': 'history'}},
{'id': 1, 'distance': 0.5118255615234375, 'entity':
{'text': 'Alan Turing was the first person to conduct substantial research in AI.', 'subject': 'history'}}]"] ,
extra_info: {'cost': 0}
2
3
4
5
输出结果是一个结果列表, 每个结果映射到一个向量搜索查询. 每个查询都包含一个结果列表, 其中每个结果都包含实体主键, 到查询向量的距离以及指定output_fields的实体详细信息.
# 带元数据过滤的向量搜索
你还可以在考虑元数据值(在 Milvus 中称为 "标量 "字段,因为标量指的是非向量数据)的同时进行向量搜索. 这可以通过指定特定条件的过滤表达式来实现. 让我们在下面的示例中看看如何使用subject字段进行搜索和筛选.
docs = [
    "Machine learning has been used for drug design.",
    "Computational synthesis with AI algorithms predicts molecular properties.",
    "DDR1 is involved in cancers and fibrosis.",
]
vectors = embedding_fn.encode_documents(docs)
data = [
    {"id": 3 + i, "vector": vectors[i], "text": docs[i], "subject": "biology"}
    for i in range(len(vectors))
]

client.insert(collection_name="demo_collection", data=data)

res = client.search(
    collection_name="demo_collection",
    data=embedding_fn.encode_queries(["tell me AI related information"]),
    filter="subject == 'biology'",
    limit=2,
    output_fields=["text", "subject"],
)

print(res)
2
3
4
5
6
7
8
9
10
11
12
13
14
15
16
17
18
19
20
21
22
data: ["
  [
    {
      'id': 4,
      'distance': 0.27030569314956665,
      'entity': {
        'text': 'Computational synthesis with AI algorithms predicts molecular properties.',
        'subject': 'biology'
      }
    },
    {
      'id': 3,
      'distance': 0.16425910592079163,
      'entity': {
        'text': 'Machine learning has been used for drug design.',
        'subject': 'biology'
      }
    }
  ]"] , extra_info: {'cost': 0}
2
3
4
5
6
7
8
9
10
11
12
13
14
15
16
17
18
19
默认情况下, 标量字段不编制索引. 如果需要在大型数据集中执行元数据过滤搜索, 可以考虑使用固定 Schema, 同时打开索引以提高搜索性能.
除了向量搜索, 还可以执行其他类型的搜索:
# 查询
查询()是一种操作符,用于检索与某个条件(如过滤表达式或与某些 id 匹配)相匹配的所有实体.
例如, 检索标量字段具有特定值的所有实体:
res = client.query(
    collection_name="demo_collection",
    filter="subject == 'history'",
    output_fields=["text", "subject"],
)
2
3
4
5
通过主键直接检索实体
res = client.query(
    collection_name="demo_collection",
    ids=[0, 2],
    output_fields=["vector", "text", "subject"],
)
2
3
4
5
# 删除实体
如果想清除数据, 可以删除指定主键的实体, 或删除与特定过滤表达式匹配的所有实体.
res = client.delete(collection_name="demo_collection", ids=[0, 2])

print(res)

res = client.delete(
    collection_name="demo_collection",
    filter="subject == 'biology'",
)

print(res)
2
3
4
5
6
7
8
9
10
[0, 2]
[3, 4, 5]
2
# 加载现有数据
由于 Milvus Lite 的所有数据都存储在本地文件中, 因此即使在程序终止后, 你也可以通过创建一个带有现有文件的MilvusClient, 将所有数据加载到内存中. 例如, 这将恢复 "milvus_demo.db "文件中的 Collections, 并继续向其中写入数据.
from pymilvus import MilvusClient

client = MilvusClient("milvus_demo.db")
2
3
# 删除Collections
如果想删除 Collections 中的所有数据, 可以通过以下方法删除 Collections
client.drop_collection(collection_name="demo_collection")
# 了解更多
Milvus Lite 非常适合从本地 python 程序入门. 如果你有大规模数据或想在生产中使用 Milvus, 你可以了解在Docker和Kubernetes 上部署 Milvus. Milvus 的所有部署模式都共享相同的 API, 因此如果转向其他部署模式, 你的客户端代码不需要做太大改动. 只需指定部署在任何地方的 Milvus 服务器的URI 和令牌即可:
client = MilvusClient(uri="http://localhost:19530", token="root:Milvus")
要将数据从 Milvus Lite 迁移到部署在 Docker 或 Kubernetes 上的 Milvus, 请参阅从 Milvus Lite 迁移数据.
Milvus 提供 REST 和 gRPC API, 以及Python, Java, Go, C#和Node.js 等语言的客户端库.
# 搜索数据模型设计
信息检索系统(又称搜索引擎)是各种人工智能应用(如检索增强生成(RAG), 可视化搜索和产品推荐)的关键. 这些系统的核心是精心设计的数据模型, 用于组织, 索引和检索信息.
Milvus允许你通过Collect schema指定搜索数据模型, 组织非结构化数据, 它们的密集或稀疏向量表示以及结构化元数据. 无论你处理的是文本, 图像还是其他数据类型, 本实践指南都将帮助你理解和应用关键的Schema概念, 在实践中设计搜索数据模型.

# 数据模型
搜索系统的数据模型设计包括分析业务需求, 并将信息抽象为模式表达的数据模型. 定义明确的Schema对于使数据模型与业务目标保持一致, 确保数据一致性和服务质量非常重要. 此外, 选择适当的数据类型和索引对于经济地实现业务目标也很重要.
# 分析业务需求
要有效满足业务需求, 首先要分析用户将执行的查询类型, 并确定最合适的搜索方法.
- 用户查询: 确定用户预期执行的查询类型. 这有助于确保你的Schema支持真实世界的用例并优化搜索性能, 这些查询可能包括:
- 检索与自然语言查询相匹配的文档
- 查找与参考图片相似或匹配文本描述的图片
- 根据名称, 类别或品牌等属性搜索产品
- 根据结构化元数据(如出版日期, 标签, 评级)过滤项目
- 在混合查询中结合多种标准(例如, 在视觉搜索中, 同时考虑图像及其说明的寓意相似性)
- 搜索方法: 根据用户将执行的查询类型选择适当的搜索技术. 不同的方法服务于不同的目的, 通常可以结合使用以获得更强大的结果:
- 语义搜索: 使用密集向量相似性来查找具有相似含义的项目, 非常适合文本或图像等非结构化数据.
- 全文搜索: 用关键字匹配补充语义搜索. 全文搜索可利用词法分析, 避免将长词分解成零散的标记, 在检索过程中抓住特殊术语.
- 元数据过滤: 在向量搜索的基础上, 应用日期范围, 类别或标签等约束条件.
# 将业务需求转化为搜索数据模型
下一步是将业务需求转化为具体的数据模型, 方法是确定信息的核心组件及其搜索方法:
- 定义需要存储的数据, 如原始内容(文本, 图像, 音频), 相关元数据(标题, 标签, 作者)和上下文属性(时间戳, 用户行为等).
- 为每个元素确定适当的数据类型和格式, 例如:
- 文本描述 -> 字符串
- 图像或文档Embeddings -> 密集或稀疏向量
- 类别, 标签或标志 -> 字符串, 数组和bool
- 价格或评级等数字属性 -> 整数或浮点数
- 结构化信息, 如作者详细信息 -> json
明确定义这些元素可确保数据的一致性, 搜索结果的准确性以及与下游应用逻辑集成的便捷性.
# Schema 设计
在Milvus中, 数据模型通过Collections Schema表达. 在Collections模式中设计正确的字段是实现有效检索的关键. 每个字段都定义了存储在Collections中的特定数据类型, 并在搜索过程中扮演着不同的角色. 在高层次上, Milvus支持两种主要类型的字段: 向量字段和标量字段.
现在, 可以将数据模型映射到字段Schema中, 包括向量和任何辅助标量字段. 确保每个字段都与数据模型中的属性相关联, 尤其要注意向量类型(密集型或标量型)及其维度.
# 向量字段
向量字段存储文本, 图像和音频等非结构化数据类型的嵌入. 这些嵌入可能是密集型, 稀疏型和二进制型, 具体取决于数据类型和使用的检索方法. 通常, 密集向量用于语义搜索, 而稀疏向量则更适合全文或词性匹配. 当存储和计算资源有限时, 二进制向量很有用. 一个Collections可能包含多个向量场, 以实现多模式或混合检索策略. 有关该主题的详细指南, 参阅多向量混合检索.
Milvus支持向量数据类型: FLOAT_VECTOR表示密集向量, SPARSE_FLOAT_VECTOR表示稀疏向量, BINARY_VECTOR表示二进制向量.
# 标量字段
标量字段存储原始的结构化值, 通常称为元数据, 如数字, 字符串或日期. 这些值可以与向量搜索结果一起返回, 对于筛选和排序至关重要. 它们允许你根据特定属性缩小搜索结果的范围, 比如将文档限制在特定类别或定义的时间范围内.
Milvus支持标量类型, 如BOOL, INT8/16/32/64, FLOAT, DOUBLE, VARCHAR, JSON和ARRAY, 用于存储和过滤非向量数据. 这些类型提高了搜索操作的精度和定制化程度.
# 在模式设计中利用高级功能
在设计Schema时, 仅仅使用支持的数据类型将数据映射到字段是不够的. 必须全面了解字段之间的关系以及可用的配置策略. 在设计阶段牢记关键功能, 可确保Schema不仅能满足当前的数据处理需求, 还具有可扩展性和适应性, 以满足未来的需求. 通过精心设计整合这些功能, 可以构建一个强大的数据架构, 最大限度地发挥Milvus的功能, 并支持你更广泛的数据策略和目标. 以下是Collections Schema的主要功能概述:
# 主键
主键字段是Schema的基本组成部分, 因为它能唯一标识Collections中的每个实体. 必须定义主键, 它必须是整数或字符串类型的标量字段, 并标记为is_primary=True. 可选择为主键启用auto_id, 主键会自动分配整数, 随着更多的数据被采集到Collections中, 整数也会随之增长.
有关详细信息, 请参阅主字段和自动ID.
# 分区
为了加快搜索速度, 可以选择打开分区. 通过为分区指定一个特定的标量字段, 并在搜索过程中根据该字段指定过滤条件, 可以有效地将搜索范围限制在相关的分区中. 这种方法通过缩小搜索域, 大大提高了检索操作的效率.
更多详情, 请参阅使用Partition Key.
# 分析器
分析器是处理和转换文本数据的重要工具. 它的主要功能是将原始文本转换为标记, 并对其进行结构化处理, 以便编制索引和进行检索. 具体做法是对字符串进行标记化处理, 去掉停顿词, 并将单个词的词干转化为标记.
更多详情, 请参阅分析器概述.
# 功能
Milvus允许你定义内置函数作为Schema的一部分, 以自动推导出某些字段. 例如, 可以添加内置BM25函数, 从VARCHAR字段生成稀疏向量, 以支持全文搜索. 这些函数派生字段可简化预处理, 并确保Collections保持自足和查询就绪.
更多详情, 请参阅全文检索.
# 真实世界示例
在本节中, 将概述上图所示多媒体文档搜索应用程序的Schema设计和代码示例. 该Schema设计用于管理包含文章的数据集, 数据映射到以下字段:
| 字段 | 数据源 | 搜索方法使用 | 主键 | 分区键 | 分析器 | 函数输入/输出 |
|---|---|---|---|---|---|---|
article_id(INT64) | 启用后自动生成auto_id | 使用"获取"进行查询 | Y | N | N | N |
标题(VARCHAR) | 文章标题 | 文本匹配 | N | N | Y | N |
时间戳(INT32) | 发布日期 | 按分区密钥过滤 | N | Y | N | N |
文本(VARCHAR) | 文章原始文本 | 多向量混合搜索 | N | N | Y | 输入 |
文本密集向量(FLOAT_VECTOR) | 由文本Embeddings模型生成的密集向量 | 基本向量搜索 | N | N | N | N |
文本稀疏向量(SPARSE_FLOAT_VECTOR) | 由内置BM25函数自动生成的稀疏向量 | 全文搜索 | N | N | N | 输出 |
有关Schema的更多信息以及添加各类字段的详细指导, 参阅Schema Explained.
# 初始化模式
首先, 需要创建一个空模式, 这一步为定义数据模型建立了基础结构.
from pymilvus import MilvusClient

schema = MilvusClient.create_schema()
2
3
# 添加字段
创建Schema后, 下一步就是指定构成数据的字段. 每个字段都与各自的数据类型和属性相关联.
from pymilvus import DataType

schema.add_field(field_name="article_id", datatype=DataType.INT64, is_primary=True, auto_id=True, description="article id")
schema.add_field(field_name="title", datatype=DataType.VARCHAR, enable_analyzer=True, enable_match=True,
max_length=200, description="article title")
schema.add_field(field_name="timestamp", datatype=DataType.INT32, description="publish date")
schema.add_field(field_name="text", datatype=DataType.VARCHAR, max_length=2000, enable_analyzer=True,
description="article text content")
schema.add_field(field_name="text_dense_vector", datatype=DataType.FLOAT_VECTOR, dim=768, description="text dense vector")
schema.add_field(field_name="text_sparse_vector", datatype=DataType.SPARSE_FLOAT_VECTOR, description="text sparse vector")
2
3
4
5
6
7
8
9
10
在本例中, 为字段指定了以下属性:
- 主键:
article_id用作主键, 可自动为输入实体分配主键. - Partition Key:
timestamp被指定为分区键, 允许通过分区进行过滤. - 文本分析器: 文本分析器应用于2个字符串字段
title和text, 分别支持文本匹配和全文搜索.
# (可选)添加功能
为增强数据查询功能, 可在Schema中加入函数. 例如, 可以创建一个函数来处理与特定字段相关的数据.
from pymilvus import Function, FunctionType

bm25_function = Function(
    name="text_bm25",
    input_field_names=["text"],
    output_field_names=["text_sparse_vector"],
    function_type=FunctionType.BM25,
)

schema.add_function(bm25_function)
2
3
4
5
6
7
8
9
10
本例在Schema中添加了一个内置的BM25函数, 利用text字段作为输入, 并将生成的稀疏向量存储在text_sparse_vector字段中.
# 下一步
# 安装Milvus
# 执行安装命令
sudo dpkg -i milvus_2.6.0-1_amd64.deb
# 如果提示依赖错误, 使用下面的命令修复
sudo apt install -f
# 再次执行安装命令
sudo dpkg -i milvus_2.6.0-1_amd64.deb
2
3
4
5
6
# 概述
Milvus是一个高性能, 可扩展的向量数据库. 它支持各种规模的用例, 从在Jupyter笔记本中本地运行的演示到处理数百亿向量的大规模Kubernetes集群. 目前, Milvus有三种部署选项: Milvus Lite, Milvus Standalone 和 Milvus Distributed.
# Milvus Lite
Milvus Lite是一个Python库, 可导入到你的应用程序中. 作为Milvus的轻量级版本, 它非常适合在Jupyter笔记本或资源有限的只能设备上运行快速原型. Milvus Lite支持与Milvus其他部署相同的API. 与Milvus Lite交互的客户端代码也能与其他部署模式下的Milvus实例协同工作.
要将Milvus Lite集成到应用程序中, 请运行pip install pymilvus进行安装, 并使用MilvusClient("./demo.db")语句实例化一个带有本地文件的向量数据库, 以持久化所有数据. 运行Milvus Lite.
# Milvus Standalone
Milvus Standalone是单机服务器部署. Milvus Standalone的所有组件都打包到一个Docker镜像中, 部署起来非常方便. 如果有生产工作负载, 但又不想使用Kubernetes, 在内存充足的单机上运行Milvus Standalone是一个不错的选择.
# Milvus Distributed
Milvus Distributed可部署在Kubernetes集群上. 这种部署采用云原生架构, 摄取负载和搜索查询分别有独立节点处理, 允许关键组件冗余. 它具有最高的可扩展性和可用性, 并能灵活定制每个组件中分配的资源. Milvus Distributed是在生产中运行大规模向量搜索系统的企业用户的首选.
# 为你的案例选择正确的部署方式
部署模式的选择通常取决于应用程序的开发阶段:
- 用于快速原型开发
如果你想快速构建原型或用于学习, 如检索增强生成(RAG)演示, 人工智能聊天机器人, 多模态搜索, Milvus Lite本身或Milvus Lite与Milvus Standalone的组合都很适合. 可以在笔记本中使用Milvus Lite进行快速原型开发, 并探索各种方法, 如RAG中的不同分块策略. 你可能希望在小规模生产中部署用Milvus Lite构建的应用程序, 为真正的用户提供服务, 或在更大的数据集(例如超过几百万个向量)上验证想法. Milvus Standalone是合适的选择. Milvus Lite的应用逻辑仍可共享, 因为所有Milvus部署都有相同的客户端应用程序接口. Milvus Lite中存储的数据也可以通过命令行工具移植到Milvus Standalone中.
- 小规模生产部署
对于早期生产阶段, 当项目仍在寻求产品与市场的契合, 敏捷性比可扩展性更重要时, Milvus Standalone是最佳选择. 只有有足够的机器资源, 它仍然可以扩展到1亿向量, 同时对DevOps的要求也比维护K8S集群低的多.
- 大规模生产部署
当你的业务快速增长, 数据规模超过单台服务器的容量时, 就要考虑Milvus Distributed了. 你可以继续使用Milvus Standalone作为开发或暂存环境, 并操作运行Milvus Distributed的K8S集群. 这可以支持你处理数百亿个向量, 还能根据特定的工作负载(如高读取, 低写入或高写入, 低读取的情况)灵活调整节点大小.
- 边缘设备上的本地搜索
对于在边缘设备上通过私有或敏感信息进行搜索, 可以在设备上部署Milvus Lite, 而无需依赖基于云的服务来进行文本或图像搜索. 这适用于专有文档搜索或设备上对象监测等情况.
Milvus部署模式的选择取决于项目的阶段和规模. Milvus为从快速原型开发到大规模企业部署的各种需求提供了灵活而强大的解决方案.
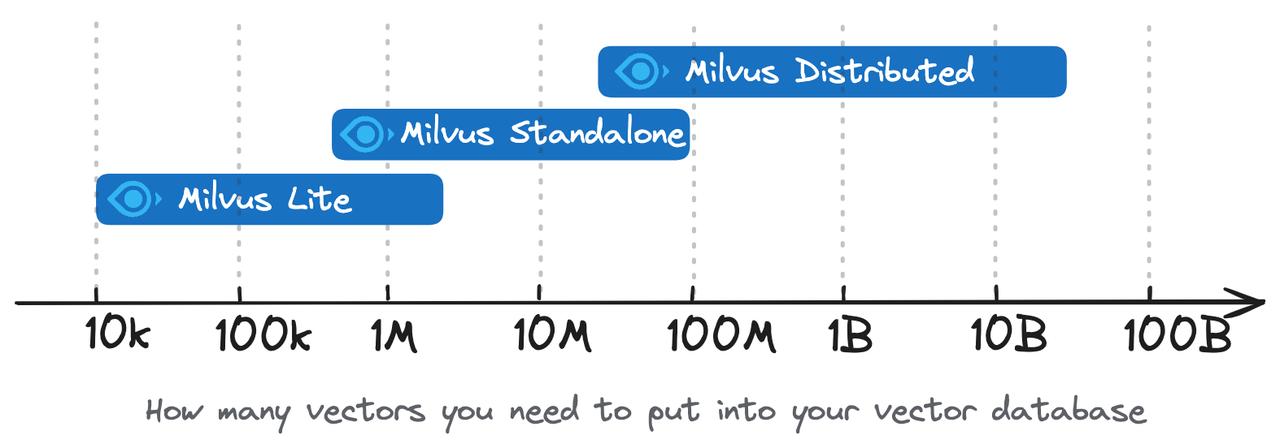
- Milvus Lite建议用于较小的数据集, 多大及百万个向量.
- Milvus Standalone适用于中型数据集, 可扩展至1亿向量.
- Milvus Distributed专为大规模而设计, 能够处理从一亿到数百亿的数据集.
# 功能比较
| 功能 | Milvus Lite | Milvus 单机版 | 分布式 Milvus |
|---|---|---|---|
| SDK/客户端软件 | Python gRPC | Python Go Java Node.js C# RESTful | Python Java Go Node.js C# RESTful |
| 数据类型 | 密集向量 稀疏向量 二进制向量 布尔值 整数 浮点 VarChar 数组 JSON | 密集向量 稀疏向量 二进制向量 布尔值 整数 浮点 VarChar 数组 JSON | 密集向量 稀疏向量 二进制向量 布尔值 整数 浮点 VarChar 数组 JSON |
| 搜索功能 | 向量搜索(ANN搜索) 元数据过滤 范围搜索 标量查询 通过主键获取实体 混合搜索 | 向量搜索(ANN搜索) 元数据过滤 范围搜索 标量查询 通过主键获取实体 混合搜索 | 向量搜索(ANN搜索) 元数据过滤 范围搜索 标量查询 通过主键获取实体 混合搜索 |
| CRUD操作符 | ✔️ | ✔️ | ✔️ |
| 高级数据管理 | 不适用 | 访问控制 分区 分区密钥 | 访问控制 分区 分区密钥 物理资源分组 |
| 一致性级别 | 强 | 强 有界停滞 会话 最终 | 强 有界稳定性 会话 最终 |
# 运行Milvus Lite
本章介绍如何使用Milvus Lite在本地运行Milvus. Milvus Lite是Milvus的轻量级版本, Milvus是一个开源向量数据库, 通过向量嵌入和相似性搜索为人工智能应用提供支持.
# 概述
Milvus Lite可导入你的Python应用程序, 提供Milvus的核心向量搜索功能. Milvus Lite已包含在Milvus的Python SDK中, 它可以通过pip install pymilvus简单地部署.
使用Milvus Lite, 可以在几分钟内开始构建具有向量相似性搜索功能的人工智能应用程序. Milvus Lite适合在以下环境中运行:
- Jupyter Notebook / Google Colab
- 笔记本电脑
- 边缘设备
Milvus Lite与Milvus Standalone和Distributed共享相同的API, 涵盖了向量数据持久化和管理, 向量CRUD操作, 稀疏和密集向量搜索, 元数据过滤, 多向量和混合搜索(hybrid_search)等大部分功能. 它们共同为不同类型的环境提供了一致的体验, 从边缘设备到云中的集群, 适合不同规模的使用案例. 使用相同的客户端代码, 可以在笔记本电脑或Jupyter Notebook上使用Milvus Lite运行GenAI应用程序, 或在Docker容器上使用Milvus Standalone运行GenAI应用程序, 或在大规模集群上使用Milvus Distributed运行GenAI应用程序, 为生产提供数十亿向量.
# 先决条件
Milvus Lite目前支持以下环境:
- Ubuntu >= 20.04 (x86_64和arm64)
- MacOS >= 11.0 (苹果M1/M2和x86_64)
请注意, Milvus Lite仅适用于小规模向量搜索使用案例. 对于大规模用例, 建议使用Milvus Standalone或Milvus Distributed. 也可以考虑在Zilliz Cloud上使用完全托管的Milvus.
# 设置Milvus Lite
pip install -U pymilvus
建议使用pymilvus, 由于milvus-lite已包含在pymilvus 2.4.2或更高版本中, 因此可通过pip install与-U强制更新到最新版本, milvus-lite会自动安装.
如果想明确安装milvus-lite软件包, 或已经安装了旧版本的milvus-lite并想更新它, 可以使用pip install -U milvus-lite.
# 连接Milvus Lite
在pymilvus中, 指定一个本地文件名作为MilvusClient的uri参数将使用Milvus Lite.
from pymilvus import MilvusClient
client = MilvusClient("./milvus_demo.db")
2
运行上述代码后, 将在当前文件夹下生成名为milvus_demo.db的数据库文件.
注意
同样的API也适用于Milvus Standalone, Milvus Distributed和Zilliz Cloud, 唯一的区别是将本地文件名替换为远程服务器端点和凭据, 如: client = MilvusClient(uri="http://localhost:19530", token="username:password").
# 示例
以下是如何使用Milvus Lite进行文本搜索的简单演示. 还有更多使用Milvus Lite构建RAG, 图像搜索等应用程序的综合示例, 以及在LangChain和LlamaIndex等流行RAG框架中使用Milvus Lite的示例.
from pymilvus import MilvusClient
import numpy as np

client = MilvusClient("./milvus_demo.db")
client.create_collection(
    collection_name="demo_collection",
    dimension=384 # The vectors we will use in this demo has 384 dimensions
)

# Text strings to search from.
docs = [
    "Artifical intelligence was founded as an academic discipline in 1956.",
    "Alan Turing was the first person to conduct substantial research in AI.",
    "Born in Media Vale, London, Turing was raised in sourthern England.",
]
# For illustration, here we use fake vectors with random numbers (384 dimension).

vectors = [[ np.random.uniform(-1, 1) for _ in range(384) ] for _ in range(len(docs)) ]
data = [ {"id": i, "vector": vectors[i], "text": docs[i], "subject": "history" } for i in range(len(vectors)) ]
res = client.insert(
    collection_name="demo_collection",
    data=data
)

# This vill exclude any text in "history" subject despite close to the query vector.
res = client.search(
    collection_name="demo_collection",
    data=[vectors[0]],
    filter="subject == 'history,",
    limit=2,
    output_fields=["text", "subject"],
)
print(res)

# a query that retrieves all entities matching filter expressions.
res = client.query(
    collection_name="demo_collection",
    filter="subject == 'history'",
    output_fields=["text", "subject"],
)
print(res)

# delete
res = client.delete(
    collection_name="demo_collection",
    filter="subject == 'history'",
)
print(res)
2
3
4
5
6
7
8
9
10
11
12
13
14
15
16
17
18
19
20
21
22
23
24
25
26
27
28
29
30
31
32
33
34
35
36
37
38
39
40
41
42
43
44
45
46
47
48
# 限制
运行Milvus Lite时, 请注意某些功能不受支持. 下表总结了Milvus Lite的使用限制.
- Collections
| 方法/参数 | Milvus Lite 支持 |
|---|---|
| create_collection() | 支持有限参数 |
collection_name | Y |
dimension | Y |
primary_field_name | Y |
id_type | Y |
vector_field_name | Y |
metric_type | Y |
auto_id | Y |
schema | Y |
index_params | Y |
enable_dynamic_field | Y |
num_shards | N |
partition_key_field | N |
num_partitions | N |
consistency_level | N(仅支持Strong; 任何配置都被视为Strong.) |
| get_collection_stats() | 只是获取Collections统计信息. |
collection_name | Y |
timeout | Y |
| describe_collection() | num_shards, consistency_level和collection_id响应无效. |
timeout | Y |
| has_collection() | 支持检查集合是否存在. |
collection_name | Y |
timeout | Y |
| list_collection() | 支持列出所有Collections |
| drop_collection() | 支持删除Collections |
collection_name | Y |
timeout | Y |
| rename_collection() | 不支持重命名Collections |
- 字段和Schema
| 方法/参数 | Milvus Lite 支持 |
|---|---|
| create_schema() | 支持有限参数 |
auto_id | Y |
enable_dynamic_field | Y |
primary_field | Y |
partition_key_field | N |
| add_field() | 支持有限参数 |
field_name | Y |
datatype | Y |
is_primary | Y |
max_length | Y |
element_type | Y |
max_capacity | Y |
dim | Y |
is_partition_key | N |
- 插入和搜索
| 方法/参数 | Milvus Lite 支持 |
|---|---|
| search() | 支持有限参数 |
collection_name | Y |
data | Y |
filter | Y |
limit | Y |
output_fields | Y |
search_params | Y |
timeout | Y |
partition_names | N |
anns_field | Y |
| query() | Support with limited parameters |
collection_name | Y |
filter | Y |
output_fields | Y |
timeout | Y |
ids | Y |
partition_names | N |
| get() | Support with limited parameters |
collection_name | Y |
ids | Y |
output_fields | Y |
timeout | Y |
partition_names | N |
| delete() | Support with limited parameters |
collection_name | Y |
ids | Y |
timeout | Y |
filter | Y |
partition_name | N |
| insert() | Support with limited parameters |
collection_name | Y |
data | Y |
timeout | Y |
partition_name | N |
| upsert() | Support with limited parameters |
collection_name | Y |
data | Y |
timeout | Y |
partition_name | N |
- Load & Release
| Method / Parameter | Supported in Milvus Lite |
|---|---|
| load_collection() | Y |
collection_name | Y |
timeout | Y |
| release_collection() | Y |
collection_name | Y |
timeout | Y |
| get_load_state() | Getting load status is not supported. |
| refresh_load() | Loading the uploaded data of a loaded collection is not supported. |
| close() | Y |
- Index
| Method / Parameter | Supported in Milvus Lite |
|---|---|
| list_index() | Listing Indexes is supported. |
collection_name | Y |
field_name | Y |
| create_index() | Only supports FLAT index type. |
index_params | Y |
timeout | Y |
| drop_index() | Dropping indexes is supported. |
collection_name | Y |
index_name | Y |
timeout | Y |
| describe_index() | Describing indexes is supported. |
collection_name | Y |
index_name | Y |
timeout | Y |
- Vector Index Types
Milvus Lite only supports FLAT. It uses FLAT type regardless of the specified index type in collection.
- Search Features
Milvus Lite supports Sparse Vector, Multi-vector, Hybrid Search.
- Partition
Milvus Lite does not support partitions and partition-related methods.
- Users & Roles
Milvus Lite does not support users and roles and related methods.
- Alias
Milvus Lite does not support aliases and alias-related methods.
# Migrating data from Milvus Lite
All data stored in Milvus Lite can be easily exported and loaded into other types of Milvus deployment, such as Milvus Standalone on Docker, Milvus Distributed on K8S, or fully-managed Milvus on Zilliz Cloud.
Milvus Lite provides a command line tool that can dump data into a json file, which can be imported into milvus and Zilliz Cloud (the fully managed cloud service for Milvus). The milvus-lite command will be installed together with milvus-lite python package.
pip install -U "pymilvus[bulk_writer]"

milvus-lite dump -h

usage: milvus-lite dump [-h] [-d DB_FILE] [-c COLLECTION] [-p PATH]

optional arguments:
  -h, --help            show this help message and exit
  -d DB_FILE, --db-file DB_FILE
                        milvus lite db file
  -c COLLECTION, --collection COLLECTION
                        collection that need to be dumped
  -p PATH, --path PATH  dump file storage dir
2
3
4
5
6
7
8
9
10
11
12
13
The following example dumps all data from demo_collection collection that's stored in ./milvus_demo.db (Milvus Lite database file).
To export data:
milvus-lite dump -d ./milvus_demo.db -c demo_collection -p ./data_dir
# ./milvus_demo.db: milvus lite db file
# demo_collection: collection that need to be dumped
# ./data_dir : dump file storage dir
2
3
4
With the dump file, you can upload data to Zilliz Cloud via Data Import, or upload data to Milvus servers via Bulk Insert.
# Run Milvus Standalone
# Requirements
# RPM/DEB
This page illustrates how to install Milvus standalone with a pre-built RPM/DEB package.
# Prerequisites
- You have already installed
libstdc++ 8.5.0or a later version. - Check the requirements for hardware and software prior to your installation.
# Download the RPM/DEB Package
You can download the RPM/DEB package according to your system architecture from the Milvus Releases page.
- For x86_64/amd64, download the milvus_2.6.0-1_amd64.deb or milvus_2.6.0-1_amd64.rpm package.
- For ARM64, download the milvus_2.6.0-1_arm64.deb or milvus_2.6.0-1_arm64.rpm package.
The following command assumes that you are going to run Milvus Standalone on a x86_64/amd64 machine.
wget https://github.com/milvus-io/milvus/releases/download/v2.6.0/milvus_2.6.0-1_amd64.rpm -O milvus_2.6.0-1_amd64.rpm
# Install the RPM/DEB Package
To install the RPM/DEB package, you can use the package manager of your system.
For RPM-based systems (such as CentOS, Fedora, and RHEL), use the yum command to install the package.
yum install -y ./milvus_2.6.0-1_amd64.rpm
rpm -qa| grep milvus
2
For DEB-based systems (such as Ubuntu and Debian), use the apt command to install the package.
apt install -y  ./milvus_2.6.0-1_amd64.deb
dpkg -l | grep milvus
2
# Start Milvus Standalone
After the installation is complete, Milvus is installed as a systemd service and can be started using the following command:
systemctl start milvus
You can check the status of the Milvus service using the following command:
systemctl status milvus
If milvus is running successfully, you should see the following output:
● milvus.service - Milvus Standalone Server
   Loaded: loaded (/lib/systemd/system/milvus.service; enabled; vendor preset: enabled)
   Active: active (running) since Fri 2025-08-10 10:30:00 UTC; 5s ago
 Main PID: 1044122 (milvus)
    Tasks: 10 (limit: 4915)
   CGroup: /system.slice/milvus.service
           └─1044122 /usr/bin/milvus run standalone
2
3
4
5
6
7
You can find the Milvus binary at /usr/bin/milvus, the systemd service file at /lib/systemd/system/milvus.service, and the dependencies at /usr/lib/milvus/.
# (Optional) Update Milvus configurations
You can modify the Milvus configurations in the /etc/milvus/configs/milvus.yaml file. For example, to change the proxy.healthCheckTimeout to 1000 ms, you can search for the target parameter and modify accordingly. For applicable configuration items, refer to System Configuration.
# Stop Milvus Standalone
To stop Milvus Standalone, you can use the following command:
systemctl stop milvus
# Uninstall Milvus Standalone
To uninstall Milvus Standalone, you can use the following command:
For RPM-based systems:
rpm -e milvus
For DEB-based systems:
apt remove milvus
# Docker (Linux)
# Docker Compose (Linux)
# Docker Desktop (Windows)
# Run Milvus Distributed
# Run Milvus with GPU
# Install SDKs
# PyMilvus
This topic describes how to install Milvus python SDK pymilvus for Milvus.
Current version of Milvus supports SDKs in Python, Node.js, GO, and Java.
# Requirements
- Python 3.7 or later is required.
- Google protobuf is installed. You can install it with the command
pip3 install protobuf==3.20.0. - grpcio-tools is installed. You can install it with the command
pip3 install grpcio-tools.
# Install PyMilvus via pip
PyMilvus is available in Python Package Index.
NOTE
It is recommended to install a PyMilvus version that matches the version of the Milvus server you installed. For more information, see Release Notes.
python3 -m pip install pymilvus==2.6.0
# Verify installation
If PyMilvus is correctly installed, no exception will be raised when you run the following command.
python3 -c "from pymilvus import Collection"
# Java SDK
# Go SDK
# Node.js SDK
# Connect to Milvus Server
This topic describes how to establish a client connection to a Milvus server and configure common connection options.
# Prerequisites
- The SDK of your language installed. For detail, refer to Python SDK, Java SDK, Go SDK, or Nodejs SDK.
- A Milvus server address (for local default:
http://localhost:19530, proxy port 19530). - If authentication is enabled, provide either a token or a username + passsword. A token can be
username:password(e.g.,root:Milvus). See Authenticate User Access and Create Users & Roles for details.
# Connect by URI (authentication disabled)
Use the milvus server address (e.g. http://localhost:19530) to establish a connection.
from pymilvus import MilvusClient

client = MilvusClient("http://localhost:19530")
2
3
# Connect with credentials (authentication enabled)
Provide either a token in the form "username:password" or separate user and password. The default built-in admin is root:Milvus (change this for production).
from pymilvus import MilvusClient

# Token form
client = MilvusClient(
    uri="http://localhost:19530",
    token="root:Milvus",
)

# Or explicit user/password
client = MilvusClient(
    uri="http://localhost:19530",
    user="root",
    password="Milvus",
)
2
3
4
5
6
7
8
9
10
11
12
13
14
NOTE
Token format is "<username>:<password>". The docs explicitly note root:Milvus as the default credential, and the Create Users & Roles guide covers managing users.
# Configure a timeout
Set a default timeout on the client connection:
from pymilvus import MilvusClient

client = MilvusClient(uri="http://localhost:19530", timeout=1000) # If not set, the timeout defaults to 10s.
2
3
NOTE
This timeout is used only when establishing connections. It does not serve as a default timeout for other API operations.
# Connect to a specific database
Choose the target database during construction with db_name. You can also switch later using using_database().
from pymilvus import MilvusClient

# Set the database when creating the client
client = MilvusClient(
    uri="http://localhost:19530",
    token="root:Milvus",
    db_name="analytics",
)

# (Optional) Switch the active database later
# client.using_database("reports")
2
3
4
5
6
7
8
9
10
11
- 快速入门Milvus Lite
- 安装Milvus
- 设置向量数据库
- 创建Collections
- 准备数据
- 用向量表示文本
- (另一种方法)使用随机向量的假表示法
- 插入数据
- 语义搜索
- 带元数据过滤的向量搜索
- 删除实体
- 加载现有数据
- 删除Collections
- 了解更多
- 搜索数据模型设计
- 数据模型
- Schema 设计
- 在模式设计中利用高级功能
- 真实世界示例
- 下一步
- 安装Milvus
- 概述
- 运行Milvus Lite
- Run Milvus Standalone
- Run Milvus Distributed
- Run Milvus with GPU
- Install SDKs
- PyMilvus
- Java SDK
- Go SDK
- Node.js SDK
- Connect to Milvus Server
- Prerequisites
- Connect by URI (authentication disabled)
- Connect with credentials (authentication enabled)
- Configure a timeout
- Connect to a specific database